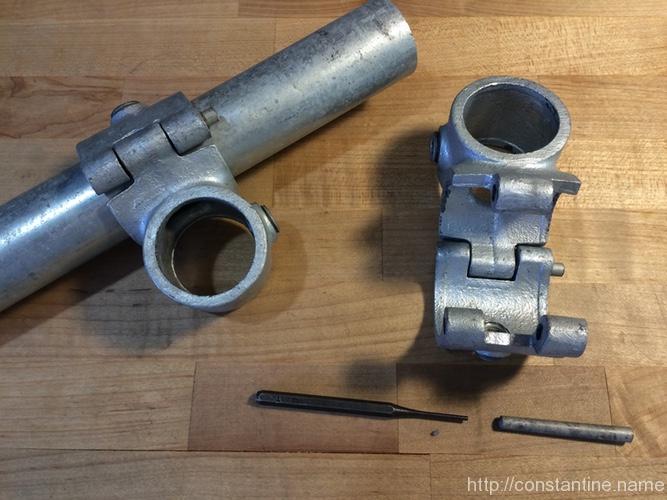
Bookending

(Part 62 of 72 in series, My Journey)

For as long as I can remember, I’ve had an idea I call “bookending.”

While most of life is reasonably flexible, there are certain important events which are scheduled at firmly fixed times. Bookending is planning, starting with the fixed event and working backwards. From the fixed event, I can imagine in reverse all the preceding steps, and how much time each requires. I can then determine the time at which I must begin the first step in the chain. From the beginning of that first step, through to the fixed event, defines a wide bookend during which all my actions are more or less known.

As I was writing my series on Parkour Travel, it became clear that bookending is critical to my success with traveling. A Parkour trip tends to be very random and unorganized (those are good things,) but that means it’s even easier to get surprised by firmly scheduled things sneaking up.

Bookending is simply a visualization practice. Various professions use visualization to minimize mistakes. They visualize each step happening successfully, as a complete chain of events, which leads to the desired outcome. When they face time constraints, visualizing the important details of each action they will take reduces errors and increases the likelihood of success.

Here’s an example from traveling:

My flight leaves at 11:00. I don’t have any checked luggage, so I’ll plan to arrive an hour and a half before my flight departs. I’m now thinking, “9:30.” There’s a bus which leaves at 8:00 and arrives at the airport at 9:27. That’s too close for my personal preference. I’ve already bookended the time before the flight: It’s not, “flight at 11:00”, the fixed event is now “be at airport at 9:30.” The previous bus leaves at 7:00, I’ll plan on that one. Now I’m thinking, “bus leaves at 7:00.” I need 15 minutes to drive to the bus terminal, and let’s aim to be 15 minutes early for the bus. That’s now 6:30. I need to park, buy a bus ticket, probably stop at the bathroom, and I need a cup of coffee somewhere along the way, so I’ll throw in another half an hour. I’m now thinking, “6:00.” My bookend is from 6:00 through 11:00. When I begin at 6:00, everything falls into place, bumps in the road don’t cause significant problems and I’ve plenty of time at each step of the way.

Before I learned to bookend, I used to remember the time of the firmly scheduled event (“my flight departs at 11:00”), and then I’d have in mind how long I needed before that (“I need five hours to get there.”) People would ask me, “What are you doing tomorrow?” and my train of thought each time was always, “Flight at 11, I need 5 hours… Five hours? Really?! Yes, I’ve already thought about this. I should leave at 6:00. Ouch. That’s pretty early.” And then I would finally say, “I have a flight at 11:00 and I want to leave about 6:00.”

With my old “method” is was, “Flight at 11:00 and then here are more details that aren’t important, but actually 6:00.” In my mind, and everyone else’s, it’s 11-and-then-all-these-other-details. In my mind, and everyone else’s, we’re always second-guessing why I seem to want to start so early. How did a flight at 11:00 lead to wanting to leave at 6:00?

A large part of what makes bookending useful is that it flips the thinking to, “I would like to leave at 6.” I’m thinking 6:00. I’m saying 6:00. 6:00 is what’s bouncing around in my head. 6:00 comes around and the entire planned sequence of events for the bookend is cued. Off I go, and on time I am.

As I got used to this process, I discovered other benefits: People who host or who are helping you when you travel, understand when you do NOT need their help. If I say “I have a flight at 11:00,” does that imply I’d like a ride to the airport? Perhaps. But if I say, “I’m leaving at 6:00,” that implies I have a plan to get wherever it is that I’m going.

There’s another huge benefit that sneaks in. Having extra time padded in, leads to little chunks of time for me to read. I keep a collection of read-this-later items in my phone (via services like Pocket or Read It Later.) As I find pockets of spare time I always have things to read rather than wasting time in social media or bookface.

ɕ

§4 – Sleep Prologue

(Part 4 of 13 in series, Changes and Results)

I’ve been talking about writing a post about sleep for years. But as I started writing, it turned into a huge article. Which makes sense, because fixing my sleep is the single most important healthy change I have ever made.

I realized that if I wanted to get a sufficient, healthy amount of sleep — let’s say around 8 hours — I would be spending ONE THIRD of my life sleeping. That means sleeping vastly outweighs any other activity in my life. I became determined to optimize the time spent sleeping and to ARRANGE MY LIFE AROUND SLEEPING. This was the critical, first step.

Failing to plan is planning to fail

I only know how much sleep works for me. You’ll need to find out for yourself how much sleep you need. This is another spot where the habit journal will really pay off. If you can track when you go to sleep, when you wake, how much sleep you get, and your quality of sleep, then you can make changes as you review each month.

One detail I’ve discovered is that some days I simply need extra sleep. So while I have a consistent plan, some days I’m stumble-down tired a half an hour before I’d normally turn in for the night. In these cases I just go to bed a little early, and with that extra half hour I usually feel terrific the next morning. There’s no feeling to match that of walking up, fully refreshed, a few minutes before the alarm.

I started by considering the time I needed to be at work, and subtracted time working backwards (commute, breakfast, shower, etc.) to determine what time I actually needed to get up. It was basically when my alarm was already set for, but it was good to double-check by consciously figuring this out. From there I just backed up 8 hours and that told me when I needed to go to sleep.

That gave me my very first sleep hack: Get to bed at the appointed time. That would lead to sufficient sleep (sufficient is the first hurdle, quality comes next), and a reset of my life at the start of each day. But it was immediately clear that I would have to change much of my evening habit. Dinner had to be coordinated at a more consistent, earlier time, and I had to break the habit of lounging in front of the TV.

This is all VERY hard to do.

I worked to consistently use my habit journal, and to review each month. Each day that I wasn’t in bed on time, I reminded myself that SLEEP was the most important thing in my life. These days — a decade later — I do deviate from the plan. Usually it’s when I’m traveling, or intentionally out late. But the point is: I HAVE A PLAN. My sleep plan sets me up FOR SUCCESS, rather than having no plan, and sabotaging the rest of my life each day, before I even open my eyes.

Partner Buy-in

Since I share sleeping space, this was the first, serious issue I had to solve.

I found that every night we enacted the following scene: I would get sleepy, and ask her, “What time do you want to go to bed?” The response was usually, “I just need ten minutes to finish this up.” Ten minutes later, it’s role reversal: She’s ready for bed, but I’m busy with something new and it’s my turn to ask for 10 more minutes. We’d then repeat this until 1am when we’d both crash, exhausted, and get yet another terrible night of sleep.

( Sound familiar? Maybe for you it’s roommates, or guests that are around all the time. Whatever. )

Our solution was to set a bed time, and a lights-out time. Everyone goes to bed at bed time. At “lights-out” time, the ready-for-bed person, is permitted to turn off EVERY light in the house (because we sleep in darkness), leaving the other to stumble into bed IN THE DARK — no turning lights on after bed time! This means you have to learn to plan the end of your evening so you can have time for your bedtime routine.

Why bed times? Why lights out rules? Because we realize that we must go to bed on time, so we can wake up on time, having slept well.

Sleep is priority number one.

Next up

A long list of sleep hacking ideas…

ɕ

§8 – Focus on the process

(Part 20 of 37 in series, Study inspired by Pakour & Art du Déplacement by V. Thibault)

Early on a brisk Saturday morning, I was struggling to find the motivation to put solid effort into a quadrapedie workout. During a break, I was talking to someone about how I’ve recently been dropping goals. I’ve always had a laundry-list of goals such as getting to a free-standing hand-stand, or a specific number of pull-ups. But I’m learning — slowly — that blindly chasing goals only leads me to injury and failure. Tenaciously refusing to let go of a goal can be counterproductive, even overtly unhealthy.

I find it’s easy to learn, and easy to get some new bit of knowledge stored in my mind. But it is difficult to get my instincts and feelings to change to align with that new knowledge. So it is with my processes and goals: I know it’s all about the process, but my instincts and habits are to create goal upon goal. I regularly get caught up chasing the goals, and lose sight of the process.

How far ahead can I see? How wisely can I set my goals? Do I chase them blindly causing my journey to veer off? Or do I have a broad spread of goals that firmly draw me in my desired direction towards the horizon, and ultimately, to the end of my journey?

ɕ

§3 – Strategy

(Part 3 of 13 in series, Changes and Results)

The bulk of this series is about the various major changes I have made. In the big picture sense, it’s just a long list of posts with actionable ideas for you to consider. Unfortunately, accomplishing any of these changes requires you to be able to break old habits and create new ones.

There’s plenty of information available on habit change, so I’m leaving the psychology of habit change out of this series. Instead, I’m going to suggest one activity: Keep a habit journal. I started my habit journal, began by trying to fix my sleep, and slowly began my upward spiral.

For the rest of this series I won’t – I promise! – tell you the back story of how I discovered and explored each change I’ll be describing. Instead, I’ll compress each as much as I can, with as much actionable intel as possible. But for this “Strategy” part of the series, I want to tell you the story of how I discovered and started my habit journal.

This entire “Changes and Results” story begins with me realizing I needed to get more, quality sleep. It was a slow realization, and it sprang from some online articles I had stumbled upon. As I read more, I became curious about my sleep, and found I was often thinking about my sleep and how to improve it.

To make any change, new knowledge is required; What would the change look like? What are healthy sleep cycles, duration and times-of-day? What temperature, light and sound levels are conducive to good sleep? What room details (the bed, the colors, the room layout) and room uses (is the room multi-use or a space where I only sleep) are conducive to good sleep? It turns out that all of that knowledge is out there, and so I dug into it to varying degrees until I felt I had satisfactory answers to some of my questions.

But, all that new knowledge accomplishes nothing.

I had identified a problem, (“get better sleep”,) which gave me new questions. From there, my curiosity led me to new knowledge. At that point, I knew what I wanted to change, but right there is where I had always failed.

Enter, stage left, Benjamin Franklin.

One day, still frustrated and making no progress on improving my sleep, I read an article about Ben Franklin. Franklin had set out to improve himself over the course of several years. He came to the conclusion that there were too many different things to focus on for him to improve himself in one broad effort:

It was about this time I conceived the bold and arduous project of arriving at moral perfection. I wished to live without committing any fault at any time; I would conquer all that either natural inclination, custom, or company might lead me into. As I knew, or thought I knew, what was right and wrong, I did not see why I might not always do the one and avoid the other. But I soon found I had undertaken a task of more difficulty than I had imagined. While my care was employed in guarding against one fault, I was often surprised by another; Habit took the advantage of inattention; Inclination was sometimes too strong for reason.

I had reached the same conclusion, (but, alas, without the same eloquence,) when I was unable to change things by simply desiring them to change. Goals such as: sleep better, be less grumpy, and lose some weight, all failed to materialize.

Franklin went on to create a grid, with a row for each virtue and a column for each day of the week. At the end of each day, he put a mark if he felt he hadn’t lived up to that virtue on that day. The goal was then to have no marks on the grid at the end of the week. Each week he would focus particularly on one virtue (and he cycled through his 13 virtue goals.) He began each week by re-reading a small reminder he’d written about the week’s focus virtue (for example, “Humility: Be not Achilles; Imitate Socrates.”) He would then set about focusing on that virtue during the week. Franklin was working on a list of virtues such as Tranquility or Temperance, but his system works perfectly well for anything.

[O]n the whole, though I never arrived at the perfection I had been so ambitious of obtaining, but fell far short of it, yet I was, by the endeavor, a better and a happier man than I otherwise should have been if I had not attempted it.

Inspired by Franklin, I began my habit journal more than ten years ago. At the beginning of each month I create a table with the dates across the top, and a row for each thing I’d like to work on that month. Initially, I had a small notebook just for these monthly habit journal tables. I started with rows for 6, 7 or 8, hours of sleep and put a corresponding mark for each day. This created a rough graph running across the month. That visual graph really gave me a push: “Yesterday’s mark is 6.5 hours, if I go to bed right now, I can put tomorrow’s mark at 7.” (I’ll go into the details of my sleep changes in the next post.)

Eventually, if something becomes an ingrained habit, I remove it from the grid; If it becomes a problem again, I add it back and work on it again. Sometimes I don’t get around to filling in the table, and the next day, I’m thinking, “Not two days in a row! Fill it in!” Which serves to further reinforce my paying attention to my daily goals.

(When I travel, I usually leave the habit journal behind and track nothing. Generally, I don’t have the time and my schedule is changed, so filling it in or even sticking to the habit plans would be tough. But such trips — little breaks from the habit journal — serve as test runs with the training wheels off. A three-day weekend, for example, gives me a lot to think about when I pick up my habit journal upon returning home to my normal routine.)

The monthly habit journal tables grew in size and complexity as I added and tracked more things, and eventually tracked many things. But there’s no need to start with complexity. Start with columns for the days of the month, and make a row for that one thing you want to work on first. Next month, assess how you did, adjust as necessary, and add a row if you want to work on a second thing.

In the very beginning, I used a small, square-gridded, notebook, but my tables eventually outgrew the page size. Years later, I started journaling and I didn’t want to have both a habit journal and a “regular” journal. So I invested the time to copy all the historical grids into my journal so I’d always be able to refer to them.

So what does this actually look like? Here’s my (recopied) habit journal table from the very first month, December 2006:

…and here is the table from, February 2017:


That’s really all there is to it. These little grids are the framework on which I hang whatever it is I’m trying to change.

ɕ

How do I stay motivated?

(Part 61 of 72 in series, My Journey)

My level of motivation varies tremendously, and it took me far too long to learn that it was cyclical. I used to think I had these huge swaths of motivated productivity with an occasional, unexplained crash. I used to think I just needed to figure out how to avoid those anomalous crashes, and I spent too much precious time fighting with myself in the down-turns. I now see that I was wrong; My motivation is inherently cyclical.

When I am highly motivated, it’s alluring to believe that I should spend my time working only on focused and directed things. I used to fall into the trap of trying to focus all of my time and energy on moving forward. I felt that if I wasn’t on-task, then I was wasting time, and that feeling fed into my sense of guilt.

Because I now expect the inevitable down-turns, I feel justified spending time on things which support my motivation in the long run. I work intermittently in two directions: I spend some of my time working on-task towards achieving my goals, and some time goofing-off cultivating my motivation and inspiration. In effect, I’m prolonging the motivational peaks by spreading them out wider. At the highest points, I may not be as motivated as I once was, but I maintain a productive level of motivation for a much longer time.

(To be fair, I have a pretty organized way of goofing-off. I read from a wide range of online sources and books, from health, wellness and exercise blogs to physiology text books. I constantly fiddle with new exercises to try, places to go, health tweaks, and habits. I make plans to travel near and far, where I can meet new people, and visit old friends. I even have no-thinking-required things — music playlists, and monotonous chores — which I can draw on when I need to be off-task.)

But eventually, I head into a down-turn. They vary from mild bouts of, “meh,” where I simply feel unmotivated to do any of the things I’ve set out for myself, to dark moods of depression. Regardless of the depth, when I’m heading into a motivational down-turn, my best tactic is to stop doing — to stop trying — and to simply be. It’s as if I’m at the crest of the first hill on a roller-coaster; I see what’s coming, and prepare for the inevitable ride.

At the bottom of that huge, thrill-less, depressing hill it is agonizing to lay in a puddle of “meh” and believe that this is exactly what I need to be doing right now. But that is the truth. After countless cycles of ebb and flow, I’ve learned to think: “Right now, laying in this puddle is exactly what I need.”

…and that is the key to my success.

I remind myself to roll with this down-turn, guilt-free. I try to avoid “should’ing” on myself. (I should stop this. I should do that.) I remind myself this down-turn is only one phase of a healthy cycle.

I rest.

I mope.

Maybe I watch a movie and have some popcorn. Maybe I nap. Maybe I nap in the hammock if it’s warm outside. Maybe I bask before the fire, or lay in the sun. I do whatever it is I feel like doing, which may well be absolutely nothing at all. I throw down the reigns which my executive-level mind normally holds with an iron grip. I set my thoughts and body free. They weren’t listening anyway.

And then I could write a long diatribe where I try to explain how it feels as if there’s this big, gloomy, moping, dog that sits around keeping me stuck in the down-turn. And eventually that dog gets bored and I can convince it to go away. And, honestly, it’s a stupid metaphor. Except for the fact that here I am, stuck writing some lousy metaphor, making me hate writing this, which — it turns out — is exactly the sort of perfect metaphor for feeling lousy when I’m stuck in a down-turn…

I’m going for a walk.

Just the tiniest little stroll.

But…

Walking invariably loosens up my mind. Sometimes it takes days of doing nothing interspersed with some walking before I see the light at the end of the tunnel. Soon, I find I have at least a few things on my mind that need to be unloaded. When I hear that quiet calling, I write whatever-it-is into my journal. Writing things down — moods, worries, plans, ideas — unjumbles my mind. So I record my thoughts as inspiration for future projects, and as reminders to expect future down-turns.

Eventually, I simply find the thought of working on something might actually be fun. At which point I realize I’m headed back towards the next up-turn.

When things go badly, relax; It will not last.
When things go well, relax; It will not last.

ɕ

Why Travel?

(Part 3 of 5 in series, Parkour Travel)

What shall I find?

(Part 3 of 5 in series, Parkour Travel)

It’s funny, I thought, if you could hear me, I could hang on, somehow. Silly me. Silly old Doctor. When you wake up, you’ll have a mum and dad, and you won’t even remember me. Well, you’ll remember me a little. I’ll be a story in your head. But that’s OK: we’re all stories, in the end. Just make it a good one, eh?

~ “Doctor Who

slip:4a1133.

When I travel, I am writing my story.

I am not travelling in search of something.
I am not travelling to escape.
I am not travelling as a search for fulfillment.
I am not lacking some key experience that I can only find by travelling.

What shall I find? …nothing in particular. And then I’m free to find everything.

What shall I experience?

(Part 3 of 5 in series, Parkour Travel)

Travel is fatal to prejudice, bigotry, and narrow-mindedness, and many of our people need it sorely on these accounts. Broad, wholesome, charitable views of men and things cannot be acquired by vegetating in one little corner of the earth all one’s lifetime.

~ Mark Twain

slip:4a1120.

I travel because I want to meet new people. I want to learn about their culture, their ideas, their hopes, dreams and passions, their way of thinking, their language, their ancestors, and their philosophy.

I travel because I want to see things. The world — all of it, near and far — is an amazing place. I want to see new vistas, new architecture, new mountains, new valleys, new weather, new plants, new animals, and new art.

I travel because, in the end, I am just a story. There’s no finish line, no definition of “having arrived”, “having suceeded”, or “having it all”. Hearses do not have luggage racks. I am not taking anything with me. I can spend my days sitting at home, collecting and counting and organizing my things, toiling to create a pocket of order in the chaos of the universe. Only, I remain absolutely certain that everything I collect, create, organize, build, and buy will not matter to me in the end.

In the end, I am just a story. And I’d very much like to enjoy the writing of it.

ɕ

§2 – Philosophy

(Part 2 of 13 in series, Changes and Results)

I wandered a haphazard path until I learned some philosophical lessons and made some critical, first changes. I tried many different things, keeping what seemed to help and abandoning what did not. It is only through hindsight that I can share the things which are the foundations of my progress.

The first step in my journey was realizing I was unhappy. This realization — detecting it, understanding it, believing it, surrendering to it, and finally owning it — was the first piece of bedrock on which I started building. I was clearly in a slow, downward spiral, and this realization led me to thrash around trying to change things.

( I didn’t find this until years later, but Leo Babauta has a wonderful post about, The Spiral. )

My initial progress was glacial as I began working on the twin skills of self-awareness and self-analysis. Although I began my journey blissfully unaware and ignorant, my problems became increasingly obvious. Owning up to each problem required all my fortitude and courage. Step by step I found the motivation to begin changing my life. It was the discomfort of the status-quo which motivated me to change; Without that discomfort — without the self-awareness which created that discomfort — I would simply have continued my downward spiral.

Along the way, it was also important to realize I was fragile (physically, mentally and emotionally), and that I would need to build up a tremendous, new resilience. Becoming mentally and physically resilient creates a comfort zone. It means that bumps in the road may slow, stop, or even set back my progress. But they will never turn my upward spiral into a downward spiral. In truth, I was well into building up my resilience before I understood what I was doing. But as my understanding caught up, it became possible to work intentionally on resilience.

( One article which helped solidify my understanding was about, Anchoring One’s Resilience in Your Authentic Self. )

Although I remain a work in progress, my success is entirely built on the simple philosophy of continuous self improvement. Unfortunately, it is not at all simple to implement. I tried a litany of changes — small and large, easy and hard, crazy and clever, pointless and miraculous — as I incessantly kept learning, experimenting, and building upon each tiny success and advance. The things which worked for me form the remaining parts of this series.

( It wasn’t until far into my journey that I learned of the Observer, Orient, Decide, Act (OODA) loop. )

Which would boil down to these essentials:

– I owned up to being unhappy.
– I built up my skills of self-awareness and self-assessment.
– I built up my mental and physical resilience.
– I began making continuous self-improvement changes.

ɕ

§1 – Introduction

(Part 1 of 13 in series, Changes and Results)

I’ve lost a lot of weight and gotten a lot stronger in the last few years. But how, exactly, did I get to where I am now?

In 2011, I didn’t like where I was, and I don’t mean, “I was embarrassed about being fat.” I mean I was physically uncomfortable being sweaty, physically unable to get comfortable sitting, grumpy all the time, tired all the time, and more. I really wanted to change and I knew I needed to change before the Doctor started one of those, “Let’s talk about these numbers,” conversations.

Around that same time I’d discovered a few blogs…

I’d read a lot over at Nerd Fitness. I read all of Steve Kamb’s inspirational and motivational stuff.

The big take-away from NF was the loud-and-clear message about what does NOT work: Simply getting a gym membership does not work, declaring a New Year’s resolution does not work, and generally trying to “turn over a new leaf” does not work. Fortunately, rather than come away hopeless, I took it as a big comforting confirmation that I am not alone in sucking at changes.

Whatever it is that I’d been doing, that is EXACTLY what was NOT working.

I also read everything from Leo Babauta over at Zen Habits. For example, When Willpower is Trumped By Bad Habits is a great example of Leo-zen. Eventually, I finally teased a few more threads out of the Gordian knot that was my problem:

I am weak in willpower.

I need to stop beating myself up about failures and shortcomings.

I began by slowly making progress on some “health” projects, improving my sleep and more. (I’ll go into all of that in detail in subsequent parts.) As soon as I began taking Parkour classes, it became clear that I needed to ease into actual running. I also concluded that “regular” footwear was going to act as a crutch and slow down my progress in Parkour. (Long story. Just go with it for this discussion.) So I also switched to minimalist shoes for Parkour, for running and daily wear.

The result of running and Parkour? I was stiff, achy and sore literally all the time. It became glaringly obvious that I needed to start doing “recovery work” — stretching, massage, and basic range-of-motion movement if I was to have any hope of keeping up my hard work.

…and on and on.

I built upon each small success, one small step at a time.

Which brings me to today, and this series of posts. Here I’m going to document my journey by spelling out all the things I did. Hopefully, this roadmap will inspire others.

Next up, some Philosophy!

ɕ

Crossing the Williamsburg Bridge

(Part 1 of 12 in series, Williamsburg Bridge QM challenge)

Having carefully examined every inch of the pedestrian pathway on the Williamsburg Bridge, I can authoritatively state that it is in fact, VERY long. When I stood up after 2,000 meters of quadrapedie-movement, I could hardly believe it was over! Two kilometers turned out to be possible!

The entire bit of madness started after I mentioned to several people I might be heading into NYC/Brooklyn on a particular weekend in October. Unfortunately, my plans changed and I forgot to tell Jesse.

As the weekend approached, he sent me a message, “I’ve been thinking of some good physical challenges for when you’re here…” I was just thinking, “Oops, I forgot to tell him I’m not coming into the city that weekend.” When he followed with an upbeat, “Let’s QM across the Williamsburg Bridge on Saturday!”

Now in my defense, I was feeling a little guilty that he had spent time thinking about a visit that I had to abort, and my train of thought went off the rails like this:

The problem with my schedule is that I need to be home by about 3pm on Saturday…
…actually, that gives me until about 1pm to do some QM in the city on Saturday…
…so if I went in Friday, and if we started early enough…
…sure, a little QM in the morning would be fun…
…and October’s weather has been so beautiful…

“Ok, sure! I’m in. Let’s do it!”

…and then I looked up the Williamsburg Bridge on Wikipedia, learned it was 2,200 meters long, and thought, “I have made a terrible mistake.”

ɕ

Life Return On Exercise Invested

(Part 59 of 72 in series, My Journey)

Life Return On Exercise Invested – LROEI

Exercise has been show to correlate (caution, https://en.wikipedia.org/wiki/Correlation_does_not_imply_causation) with longevity; The people who exercise more are also the people who live longer:

http://www.drbriffa.com/2009/03/06/taking-up-exercise-in-middle-age-appears-to-give-a-handsome-return-on-investment/

I had never thought about exercise in quite this way: If I’m going to exercise, and if the exact details of the exercise aren’t so important, WHICH exercise would I prefer to do?

Would I rather spend time indoors or outdoors?
…in a gym, or at a playground?
…alone, or with my friends?
…in a familiar place, or some place new?

There are many types of exercise. The way I’m pursuing exercise through Parkour ALSO happens to generate a greater LROEI.

ɕ

Yes you can

(Part 56 of 72 in series, My Journey)

Hello there! Welcome!

This post is where I’ve dumped a bunch of things intended to convince YOU that you really can do Parkour.

Why do I think you can do Parkour? Because, basically, everything the general public has heard about Parkour is wrong. You could totally do Parkour because…

I’m too old, over-weight, out of shape…

I did it, so can you.

I simply mean that when I started, I was very over-weight (BMI well over 30, definitely “obese”), very out of shape, and I was just over 40 years old. That combination is probably “worse off” than most people who end up reading this.

However, if you are older, in worse shape, or fatter than that, I do still think you can do it . . .

Do you think you can improve yourself?

Parkour is about improving yourself through challenge. So whatever is challenging for you, that’s going to be your practice. Maybe for you, it’s a warmup and then start working on some shoulder strength, but you spend a majority of the time watching class so you’re not over-exherting yourself. Maybe it’s a long talk about nutrition and diet (generally what you eat, not a specific diet fad) combined with your initial Parkour efforts.

What about that crazy stuff on TouYube?

It is NOT about big jumps! Why does everyone see the EXTREME movements, and then assume ALL Parkour has to be like that?

You can drive a car without getting into auto racing. You can do a cart wheel without being an Olympic gymnast. You can go for a jog without running a marathon. You can practice Parkour without jumping between roof-tops across an alley!

There’s nothing wrong with the extremes (in the “ultimate level of performance” sense) in any of those activities, but those extremes are NOT representative of the average activity of “driving”, “cart wheeling”, “running” or “Parkour”.

And anyway, here’s a link to my all-time favorite video of some Parkour. I think it’s spectacular, but not in the “huge jumps”, “extreme movement” sense: Julie Angel’s, Movement of Three (2’33”) http://www.youtube.com/watch?v=alxyVjbqQks

But I’m a woman…

The answer is still: Yes. Yes you can.

I do understand that there are issues (not just in Parkour) that only women face. But those issues are either societal norms, or other bullshit caused by men. That has nothing to do with Parkour per se. (It’s about men. Actually it’s about boys. Real men don’t pull misogynistic crap.)

HOWEVER, do not take my word about anything regarding the woman’s point of view. Instead, go read this:

http://www.risingtraceuse.com/2015/03/5-thoughts-that-keep-women-from-trying.html

And the question almost no one asks…

How do I figure out where and with whom to train?

This is ACTUALLY the hard part. It’s always the same: finding the right coach is mission critical. And you have to perfom this most-important step BEFORE you know much about the thing you want to learn.

So here’s how you do it: You find the nearest place/people/group that purports to teach the thing. You go there. You put your “vibe radar” on and you don’t go back if anything weirds you out. If anything is high pressure (“Jump this! NOW!”, “Sign up for a year! NOW!”) then you back away slowly, and never return. They should be welcoming, intelligent and you should feel supported by most (if not literally) everyone in the class.

ɕ

§7 – Lemons

(Part 19 of 37 in series, Study inspired by Pakour & Art du Déplacement by V. Thibault)

“Lemons” simply reminds us that sometimes we need to make lemonade from whatever lemons we find before us.

I am acutely aware of this aspect of Parkour; This searching what is right in front of me for something to do. Initially I felt like a one trick pony. Every time I’d be faced with some little area, I’d stare at it thinking, “I can only do, literally, a step vault. What am I going to do here?!” Yet somehow, I manage to force myself to stand in the face of my ineptitude and to search for inspiration.

Eventually I came up with a sort of “wedge” for the problem. I would seize on, literally, the first thing I could think of. Often that would be something even I felt was ludicrous. But this first ludicrous movement, got me moving. (That’s the wedge.) From there, I invariably saw something else.

Usually the second thing was also ludicrous, but sometimes it was better (whatever “better” might mean to me at the time). So I’d change to doing the second thing. I’d throw my shame and ego to the wind and start doing repitions of whatever that first ludicrous thing was, then the second thing if it was better, and so on. Sometimes, I could only see a single thing which I feared, and so I’d start with ludicrously simple progressions to the thing I feared.

In my mind, I called this “busting rocks”. Pick the biggest, ludicrous rock and smash it. Pick the next biggest rock, and so on. As I smashed, I’d remind myself of something I’d written years ago: “Parkour is the grueling work of self destruction.”

One day, I participated in the most surreal jam session. On a sign. It was just a slightly sloped, big flat sign with a map on it and four skinny legs into the ground. One person did something near it, “interesting,” I thought. Then a second person did a little sliding thing across it. And I thought, “I wish I could do something on there.” And the wedge happened automatically and I thought, “I can try this ludicrous move.” And I tried it, and someone said, “Craig, what are you doing?”. And I failed. And someone else said, “OH! That’s totally a thing!” And in the blink of an eye a dozen world-class traceurs — people whose abilities all boggle my mind — LINED UP to play on this little sign. And for what seemed like eternity, we all took turns trying crazy stuff on a sign, at night, in a busy public square. And passers-by stopped and some even applauded or cheered. And we all ate ice cream and drank milk-shakes as we waited our turn and pondered our next go. And I for one wanted it to never end.

It was the greatest lemon pie I have ever tasted.

ɕ

The little box on my desk

(Part 53 of 72 in series, My Journey)

A long long time ago I began collecting inspirational quotes and aphorisms. I kept them on the first version of my web site, where they were displayed randomly. But as time went on, I realized I wanted them where I would see them. Eventually I copied the fledgeling collection onto 3×5 cards and put them in a small box. As I find new ones, I add cards.

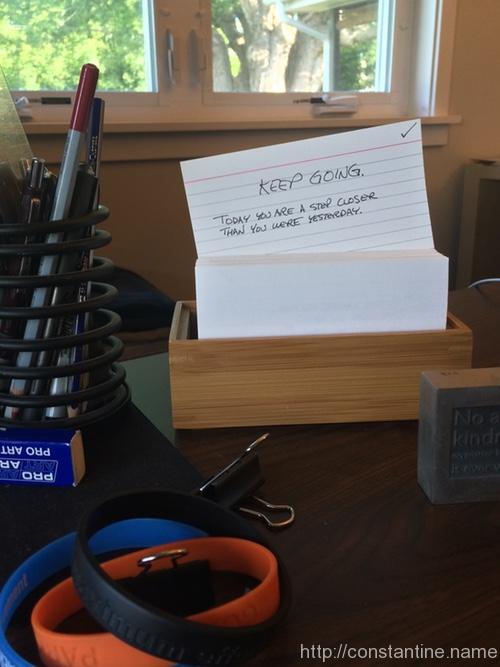
I keep the box on my desk with one card showing — just wedged in so it stands up readable. I change the card randomly, whenever the urge strikes.

Countless times I’ve pulled another card and found it eerily appropriate to the challenges of the day.

Countless times I’ve returned to my desk and felt inspired upon rediscovering an old card’s whispered counsel.

Countless times, just as I was about to throw in the towel, I was saved by an echo from the little box on my desk.

ɕ


Things have grown since this was originally posted in 2016. The box is Not so little anymore, and has become a podcast at, https://littleboxofquotes.simplecast.com/. And if you love quotes, the ever-growing collection figures prominently in my weekly email.

When the ‘me’ is obliterated

(Part 52 of 72 in series, My Journey)

When the ‘me’ is obliterated by fear or the demands of immediate survival, action is no longer constrained by social forces, and the individual is left with a sense of self-determination. […] Behavior in edgework appears to the individual as an innate response arising from sources deep within the individual, untouched by socializing influences”

~ Stephen Lyng from, Edgework, 2004

A couple years ago I tried to write something explaining what exactly it is about practicing parkour that I like so much. It turns out others are way WAY ahead of me. Julie Angel (you have read Cinè Parkour, right?) talks a bit about “edgework”; The idea of negotiating the “edges” between things like consciousness/unconsciousness, sanity/insanity, and life/death. Others (H.S. Thompson and Lyng) have talked about “edgework” in depth.

And I agree. My experience is that being in the parkour practice — even just the visceral edges where I’m pushing my physical limits while exposing myself to only manageable levels of risk — just totally strips away all the context of my work-a-day life. Everything — all the way down to my thoughts — everything falls away.

My martial arts teacher has a great phrase related to edgework: No this. No that. No delay.

ɕ

Introduction

(Part 1 of 5 in series, Parkour Travel)

I’m putting down my thoughts on “Parkour travel” for two reasons: First, I’ve found it immensely fun and rewarding, and so I hope to encourage others to travel. Second, I’ve seen enough things first-hand (as a host and as a guest), and heard enough stories, that make it clear that some bits of helpful knowledge are not universal. In this second area, I can only hope to raise some awareness.

This series will necessarily cover a wide range of ideas which I’ll try to cram into a few broad categories. Eventually, I’ll share my thoughts on all of the following (and more): Why travel at all? What do I mean by ‘Parkour travel’? How to be a good guest? Where to go?

This series is not about the nuts and bolts of traveling lightly and enjoying the experience. Although that’s a closely related topic, it’s an entirely separate series.

ɕ

§6 – I Choose To Fall!

(Part 18 of 37 in series, Study inspired by Pakour & Art du Déplacement by V. Thibault)

I’ve now read the entire book several times, and Chapter 6 never ceases to inspire!

Three thoughts:

I may not be the strongest. I may not be the fastest. But I’ll be damned if I’m not trying my hardest.

~ unknown

It ofttimes requires heroic courage to face fruitless effort, to take up the broken strands of a life-work, to look bravely toward the future, and proceed undaunted on our way. But what, to our eyes, may seem hopeless failure is often but the dawning of a greater success. It may contain in its debris the foundation material of a mighty purpose, or the revelation of new and higher possibilities.

Failure is often the turning-point, the pivot of circumstance that swings us to higher levels. It may not be financial success, it may not be fame; it may be new draughts of spiritual, moral or mental inspiration that will change us for all the later years of our life. Life is not really what comes to us, but what we get from it.

~ Chapter 14, “Failure as a Success”, from Self Control, Its Kingship and Majesty, by William George Jordan, 1907

The application in the Ways is to falls in life. To be able to take a disaster or a great failure, with the whole personality, without shrinking back from it, like the big smack with which the judo man hits the ground. Then to rise at once.

Not to be appalled at a moral fall. Yet it is not that it does not matter. The judo man tries by every means not to be thrown, but when he is thrown it does not hurt him and in a sense it does not matter. It matters immensely, and yet it does not matter.

‘Falling seven times, and getting up eight.’

~ “Falling”, from Zen and the Ways, by Trevor Leggett, 1978

ɕ

That which gets measured

(Part 47 of 72 in series, My Journey)

I’ve often heard, “that which gets measured, gets improved.” (…and you have to actually plan and work to realize improvements.)

Ten years ago, I saw 270 pounds on the scale and decided to start tracking. The first step was to work on getting proper sleep (followed by many more steps – but that’s another story.) I’ve been tracking health related things – weight, hours of sleep, dietary supplements, habits like stretching (whatever little projects I’ve had going on) for almost 10 years. This enables me to trot out amazing things like this when I’m looking for some inspiration…

Highest weight from memory: 270
Dec 2006, earliest recorded weight: 265
Jun 2012, started Parkour: 254
Jun 2014, ADAPT 1: 240
Aug 2014, rock climbing in Colorado: 232
Mar 2016: 221

Me, excited? You betcha!!

I’ve said it before: Find the smallest first step you can make towards your goal. Take that step. Tomorrow, look back and say, “well… I’ve come this far, may as well take the next step!” The hardest part of any journey is believing the journey is possible.

ɕ

Scaf 101: Epilogue

(Part 12 of 13 in series, Scaf 101)

Closing thoughts, other random clamps and ideas.

A fist full of clamps

Here are three more clamps. The first two you will certainly end up with, eventually. The third one is just a fun, sort of, “what would you ever do with that?”

Split cross

This is your new best friend, the “split cross”. This is better than sliced bread. This clamp can be opened (by tapping one of the pins out), and then placed onto an existing pipe in a structure. Note that the pins are slightly tapered. You’ll see they stick out on one side (that’s the thick end) and they are flush on the other (that’s the thin end, the end you tap).

IMG_1537

With these clamps, you can add another pipe, like this, when someone says the top one is too high…

IMG_1534

Or you can just throw a precision (or balance etc.) rail right into the middle of a build. I keep one, 10-foot-plus pipe laying around for this purpose. You can even strap on extra bars angled across the build if you bolt to the vertical poles. You can strap to two different horizontal poles, at different heights and make odd-angle slopes. There’s tons you can do with this clamp.

IMG_1533

90° single outlet

There’s a 90° single outlet tee which is handy for making really clean builds:

IMG_1536

Swivel mount

I have a few of these that I use as feet on my ground rails. Makes the pipes sit neatly on just about anything. But you could also attach these to big wooden blocks, and then use them as feet on the bottom of your scaf corners to keep it from sinking into your lawn. (Because of the set screw, these feet would move easily with the scaf when you pick it up.)

IMG_1539

The simple wooden feet are great, but in the lawn, they tend to flip over and come away when you move the scaf. So using feet that are attached to the legs would be slick.

IMG_1535

A few clamps more

Clamps are easy; point, click, ship. (Unless you’re lucky enough to live near a place that stocks them.) But as you accumulate more steel pipe, you’re going to want to start cutting it yourself.

…well, ok maybe you never end up cutting a single pipe yourself. If you buy your steel pipe from a supply house, you can just list all the lengths you want. But if you’re just going to buy a couple sticks at a time, then one day, you’re going to want to make a few cuts.

Ye ‘ol hacksaw is tedious, and the ends are never perfectly square. The gonzo method is to buy a chop saw and fit it with a metal-cutting blade. But the middle-of-the-road method is to buy a heavy duty “tubing cutter”. A steel pipe cutter will make short work of schedule 40, 1-1/4″ steel pipe. (But you will need to clamp the pipe down somehow to resist the cutter’s rotation.) For example, a “Ridgid 32820”.

The good, the bad and the clampy

I think I’ve done a reasonable job of capturing, and organizing everything (and more) that I’d wish I’d been able to find on the first day I started thinking about buying some scaf. Along the way, I had a lot of fun indulging my scaf habit and I hope you (fellow pragmatist) enjoyed reading this far.

Where to go from here? …to the clamp web sites, to the scaf supply depot, to your first scaf build party with friends!

On the other hand, if you’re in the mood to stare at your screen more, I have a #scaf tag for all the scaf posts on my site. They are mostly photos of built scaf, so perhaps you’ll find some ideas/inspiration.

Finally, a big shout out to Blake up in the Boston area for being a huge scaf-addict and spreading the scaf love. They don’t have anything scaf-specific on the web, but if you hunt them down on your favorite social medium or in real life, there’s pretty much scaf everywhere: Parkour Generations Americas Boston on DuckDuckGo

ɕ

Scaf 101: Inside the clamps

(Part 4 of 13 in series, Scaf 101)

Remember when I said I’d start by explaining everything? Well, you should understand how the clamps work, so that you understand how to put them together. If you do it wrong, they wiggle loose and come apart surprisingly quickly.

Pro-tip: Scaf should be quiet! If you hear a rattle or tapping sound stop. Something is very loose — you probably forgot to tighten something. Or, you didn’t have things lined up correctly, then after the scaf is jostled a bit, things shift and voila! Loosey goosey. Learn to pay attention to your “scaf sense”. When your scaf sense tingles, stop and figure out what’s going on.

“omg Craig shut up already and let’s build something…” This is the last background information post. We’ll start building stuff in the next post. Please read this one carefully, this gets technical. But, if you understand this material, you’ll be a happy clamper later on.

Depth

On some of the clamps, you can actually insert the pipes too far. Usually, it’s the first pipe that you insert too far. In these pictures, the first shows the pipe inserted so far that the end of the pipe has bumped into the curved body of the clamp. That’s too far! You can see how the straight line of the side of the pipe looks out of whack. Tightening the screw will not fix this; although it will get tight. You will have two problems: 1) The overly inserted pipe might be in the way of some other pipe’s space, messing up alignment/lengths. 2) Things don’t turn out square/correct because when you start tightening everything else, this clamp is fighting the additional angle added by the mis-aligned pipe. If you get it right, your pipes make nice 90° (or 45° or whatever) angles.

WRONG:
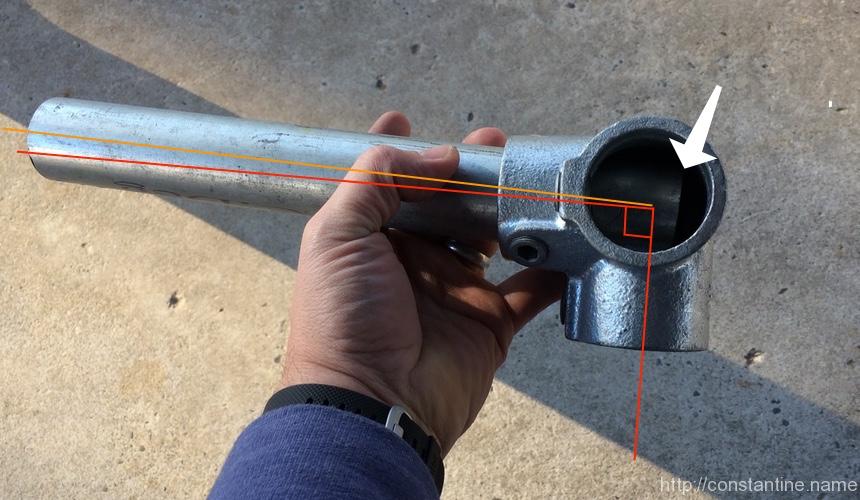
pipe_insert_wrong

RIGHT:

pipe_insert_right

Bear in mind that the problem comes up when you cannot really see the angle you’re making. You have to sort of feel that the pipe is inserted correctly, while holding a pipe up over your head, or holding three pipes at once and aligning the clamp. You’ll get the hang of it.

More depth

But wait, it’s worse. Next you have to be thinking about whether each pipe will interfere with the other pipes. So in the “RIGHT” photo above, the pipe is still inserted too far. Why? Well the pipe inserted from the bottom of the photo looks like it has enough room. But the pipe inserted from your point of view probably should go father into the body. Or maybe it shouldn’t; maybe all three pipes need to be equally inserted for this setup. My point being that you have to pay attention. First, pay attention to my assembly hints. Later, you’ll understand intuitively how “an extra pipe width here”, or “a half pipe width there”, adds up to make your assemblies fit, or not fit. If I have included a close-up photo that shows the ends of pipes inside a clamp, then I’m thinking the insertion depth is really important in that clamp. As we go farther along with these setups, I’ve assembled (and photographed) some mistakes on purpose, and I’ll show you how it ends up messing up the setup and how to correct it.

Lands

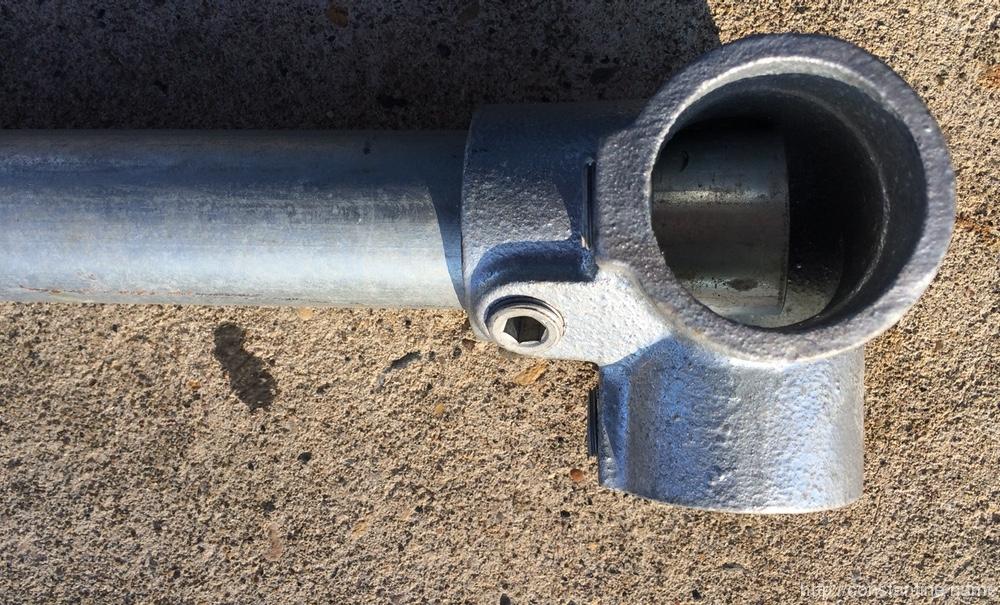
In machining, a “land” is the accurately machined part (of something) that some other thing is supposed to rest on. Pipe clamps are not machined (they are cast in molds) but they do have lands; the places where the clamp actually touches the pipe. In Kee Klamps, the lands are circumferential raised ridges on the interior of the clamp. Each set key presses on the pipe midway between the two lands; it’s like how you might press down on the middle of a board resting on two saw horses as you cut the end off. The set key is pressing in the middle, and instead of flat saw horses, the clamp has round ridges that cradle the other side of the pipe. Here are photos of some pipe lands:

IMG_1359

Above: One land deep inside the clamp is easy to see. The other land is at the very face (closest to you in this view) of the clamp. (The already-inserted pipe is surely in far enough to be over both of its lands; in fact, it might be in so far as to hit the clamp body and cause that alignment problem discussed above.) When inserting a pipe in this view, the set screw will drive the pipe upward until it touches both lands, at the top of the photo.

IMG_1375

Above: Lands are the extreme nearest and farthest sides of this clamp. Set screw is pressing from the right, so the pipe will touch the lands on the left. Also, the pipe will have to go all the way through (protruding slightly) on both sides of this clamp.

In the next photo is a similar clamp where the pipe is not through (upwards towards the viewer) far enough to reach the land at the top opening of the clamp. This pipe could wiggle loose. As it is now, tightening the screw will drive the pipe into the clamp body. It looks like the end of the pipe will touch the clamp body where the body is rounding from one side-out to the other side-out. There, the body is curved (convex) enabling the pipe end to wiggle; compared to the land (concave) at the pipe opening face which would cradle the pipe.

IMG_1403

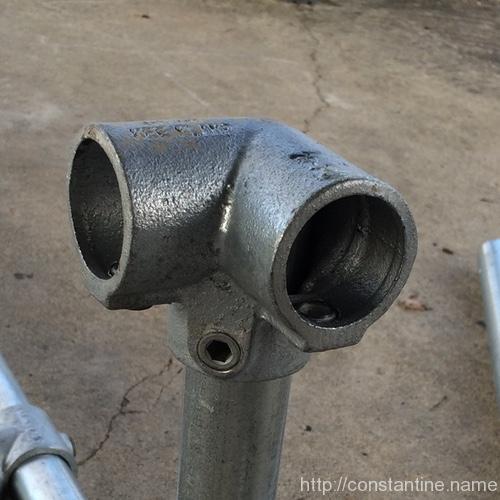
Next is just another shot of a clamp, its lands and the set screw on the bottom. Remember, you have to understand, and insert the pipes correctly when you cannot actually see what’s going on.
IMG_1458

Once you get the feel for this, you’ll recognize when you have it right. The pipe will be loose in the clamp initially. As you tighten the screw, the pipe will move to the opposing side of the clamp. Ideally, if you have it all lined up right, it reaches the lands at the same time (or things are loose enough that the clamp pivots easily to bring the second land into contact). When you do it wrong, you get one land, and the pipe hits the clamp body or the mis-aligned clamp just torques against the screw-and-one-land. That’s a recipe for wiggling-loose.

At this point, you should see why you don’t simply stuff the pipes into the clamps as far as possible and then tighten the screws. It’s all about having sufficient insertion depth to reach the lands.

Next is a photo of “this looks good”. It’s a good sign when all the space is on the side with the screw, and you can see the pipe is flush up against the other side (i.e., against the land). What you cannot see, but have to feel, is whether the pipe “registered” (i.e. “found it’s correct location”) when the end of the pipe in the clamp was driven to its land.

IMG_1364

One last item: Now that you know where the six lands in this clamp have to be, you understand how you could choose how far extra to insert the pipes. Any one of these three could be inserted (roughly) an extra half-pipe-width to occupy the central hollow of the body. Or, all three could be democratically not inserted beyond the interior land.

Mastery

In the next photo, you should now have an “a-HAH!” moment about why the threaded pipe ends are a bad thing. (Which, we’re only dealing with because this is “getting started with scaf on the cheap.”)
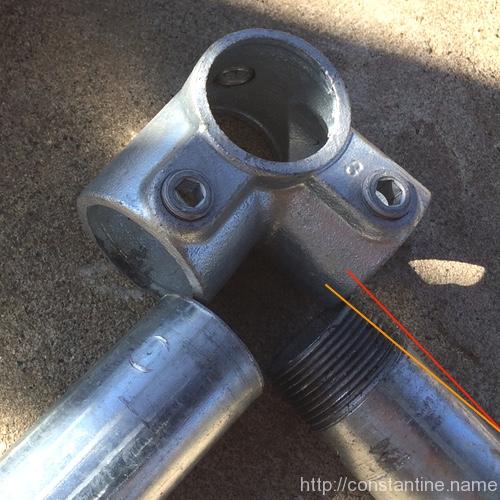
IMG_1488

I’ve drawn the red line parallel to the pipe’s side and offset a little so you can still see the pipe. I’ve drawn the orange line parallel to the threads (and offset a bit so you can see the threads.) Now, the pipe on the left could touch the inward land at the end of the pipe (because no taper). But the pipe on the right has it’s diameter reduced slightly by the thread cutting producing a tapered end. So if you put the threaded pipe in so the threads just reached the inward land then the pipe (or the clamp) will be pulled slightly on an angle as the pipe end has to be driven just a smidge farther to reach the land.

So it turns out that if you know this little detail you can do things like orient all the 3-foot pieces (which all have a thread on one end) the same way, and insert them all father into the clamp body so the unthreaded pipe body reaches the inward land. To do that you have to not insert some other pipe into the clamp and occupy the middle space. You’ll see an example of this in the first build. And this little trick about how to insert threaded ends just a little farther only makes sense once you understand lands and how the clamps work.

Look away, insanity ahead: So know you understand that pipe threads are bad for our scaf build. What to do? Easy, buy all your pipe by the bundle via freight without the threads. (Wee! …thousands of dollars.) Or, on the longer pieces where an inch doesn’t matter (you know, those 7-foot pipes Depot cut for you from 10-foot sticks) just cut the threads off the end of each pipe with a hacksaw. Or cut all the threads off all the pipe and deal with the fact that your scaf all has an inch missing here and there. Or, go full-on insanity mode, buy a lot of extra pipe from Depot, cut all your scaf pipe in perfect integral-foot sizes withOUT the threads, and recycle all the odd-sizes you end up with. (Bring the pipe home uncut, start with a 10-footer, cut off an inch, cut off a 7-footer, cut off a 2-footer, throw away the other few inches. etc. You can make a 9’10” stick, one-8-and-one-1, 7-and-2, 6-and-3, 5-and-4 if you’re willing to make a ZILLION hacksaw cuts.)

Whizardy

In the beginning, remembering which way to orient the 45° single outlet tees can be tricky (because they go onto different pipes at different times as you’re assembling). But beyond that, angle braces are actually pretty hard to assemble well.

Exercise: Let’s look at this photo and make some wild guesses about of what might be going on…

angle_braces_suck_actually

  • The set screw towards the bottom of the photo is snug. Gap is on the screw side. But probably not fully tightened because the screw seems to be a little proud (sticking out too far.) Opposing side of pipe has no gap, good.
  • No idea if the pipe is in so far that it’s hitting the other pipe, instead of resting in the inward land. Hmmm, would have to feel that as it was put together. WAIT… why is that screw so proud? Maybe the end of the pipe is hitting the upper pipe, that would twist the pipe clockwise, I can see the outside land is tight. Oh, the pipe is in too far. Or the pipe is being held by hand and that screw isn’t tight at all. Gah! …this is hopeless.
  • The upper screw seems to be not at all tight because the clamp is resting on the pipe (down toward the concrete.
  • IF the lower screw is tight, and IF the lower pipe is correctly landed, then the orientation of the angle brace is off; it needs to have it’s left end (out of the photo) moved clockwise. What? Why? …look at the alignment of the clamp at the very top edge and that side of the pipe. The whole clamp needs to rotate clockwise.

The best way to assemble these angles is to slide the clamps along their side pipes, and insert the brace pipe into both clamps at once. Then, get one end of the brace pipe on both lands (without inserting it so far that it hits the other side pipe in the tee), and tighten the screw moderately. Next, do the other end of the brace. Hopefully, you can still wiggle and shift the clamps on the side pipes, because you need to orient the brace so that both of the clamps will land correctly when you tighten the screws to lock them onto the side pipes. You will only be able to make all four lands on the side pipes touch if the corner is close to a 90° angle. Sometimes you land/clamp the ends onto the brace piece, only to discover that you can then not get the clamps to land perfectly on the side bars. But, if you get all eight lands to touch, you will have an insanely strong corner. Unfortunately, building good angle braces is something you just have to learn by doing.

Bam! You’re now a clampion. (What’s with the puns? I know, right!) But, as I sad at the very beginning, I wish someone had put all this together in one place when I started. Having read to this point, you have now just saved yourself about a year of “learning the hard way” about how to build with scaf.

ɕ