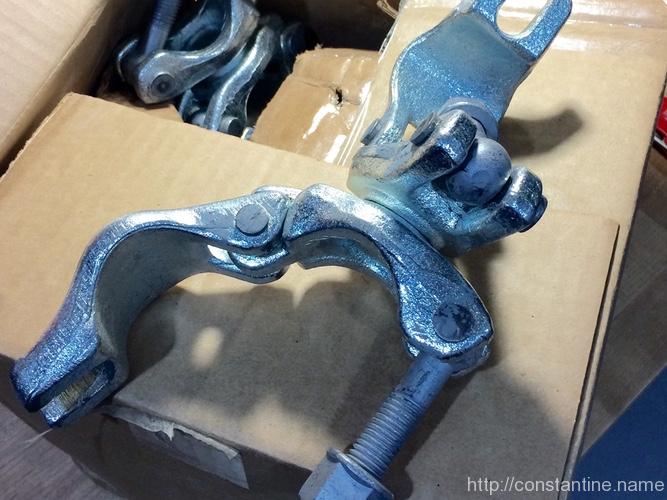
Eventually, you will want to purchase swivel clamps. They can be quite expensive. But, I found this place, which sold them to me for an unpublishably, insane, low price: https://www.associated-scaffolding.com
ɕ
This series explans how to build with pipe scaffolding (“scaf”) and pipe clamps. In the Parkour world, more and more people want to build things to train and play on. When I started building with scaf I had to do a lot of learning by trial and error. This is the series I wish I could have found on day one.
Eventually, you will want to purchase swivel clamps. They can be quite expensive. But, I found this place, which sold them to me for an unpublishably, insane, low price: https://www.associated-scaffolding.com
ɕ
Closing thoughts, other random clamps and ideas.
Here are three more clamps. The first two you will certainly end up with, eventually. The third one is just a fun, sort of, “what would you ever do with that?”
Split cross
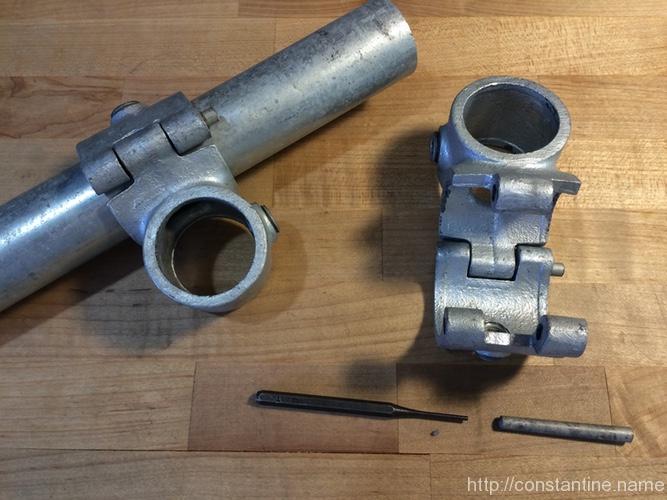
This is your new best friend, the “split cross”. This is better than sliced bread. This clamp can be opened (by tapping one of the pins out), and then placed onto an existing pipe in a structure. Note that the pins are slightly tapered. You’ll see they stick out on one side (that’s the thick end) and they are flush on the other (that’s the thin end, the end you tap).

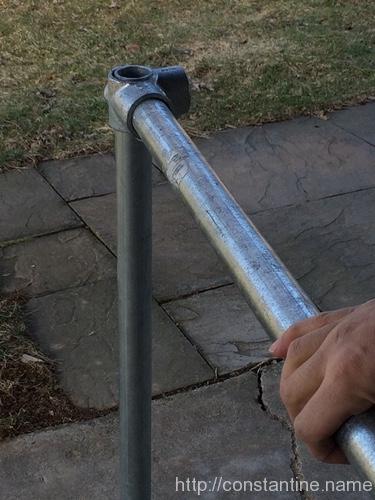
With these clamps, you can add another pipe, like this, when someone says the top one is too high…

Or you can just throw a precision (or balance etc.) rail right into the middle of a build. I keep one, 10-foot-plus pipe laying around for this purpose. You can even strap on extra bars angled across the build if you bolt to the vertical poles. You can strap to two different horizontal poles, at different heights and make odd-angle slopes. There’s tons you can do with this clamp.

90° single outlet
There’s a 90° single outlet tee which is handy for making really clean builds:

Swivel mount
I have a few of these that I use as feet on my ground rails. Makes the pipes sit neatly on just about anything. But you could also attach these to big wooden blocks, and then use them as feet on the bottom of your scaf corners to keep it from sinking into your lawn. (Because of the set screw, these feet would move easily with the scaf when you pick it up.)
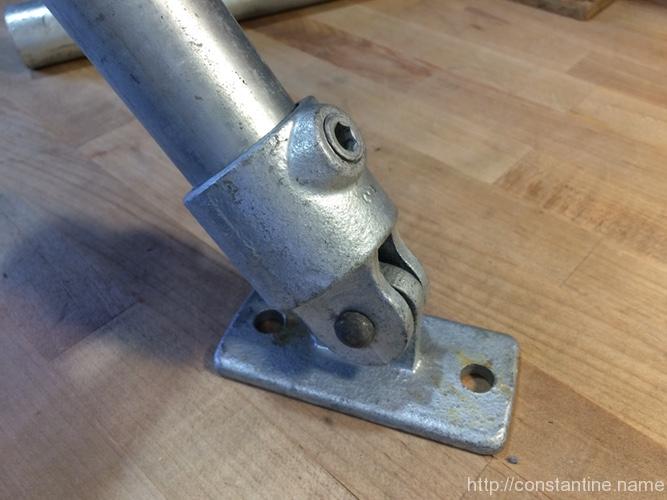
The simple wooden feet are great, but in the lawn, they tend to flip over and come away when you move the scaf. So using feet that are attached to the legs would be slick.
Clamps are easy; point, click, ship. (Unless you’re lucky enough to live near a place that stocks them.) But as you accumulate more steel pipe, you’re going to want to start cutting it yourself.
…well, ok maybe you never end up cutting a single pipe yourself. If you buy your steel pipe from a supply house, you can just list all the lengths you want. But if you’re just going to buy a couple sticks at a time, then one day, you’re going to want to make a few cuts.
Ye ‘ol hacksaw is tedious, and the ends are never perfectly square. The gonzo method is to buy a chop saw and fit it with a metal-cutting blade. But the middle-of-the-road method is to buy a heavy duty “tubing cutter”. A steel pipe cutter will make short work of schedule 40, 1-1/4″ steel pipe. (But you will need to clamp the pipe down somehow to resist the cutter’s rotation.) For example, a “Ridgid 32820”.
I think I’ve done a reasonable job of capturing, and organizing everything (and more) that I’d wish I’d been able to find on the first day I started thinking about buying some scaf. Along the way, I had a lot of fun indulging my scaf habit and I hope you (fellow pragmatist) enjoyed reading this far.
Where to go from here? …to the clamp web sites, to the scaf supply depot, to your first scaf build party with friends!
On the other hand, if you’re in the mood to stare at your screen more, I have a #scaf tag for all the scaf posts on my site. They are mostly photos of built scaf, so perhaps you’ll find some ideas/inspiration.
Finally, a big shout out to Blake up in the Boston area for being a huge scaf-addict and spreading the scaf love. They don’t have anything scaf-specific on the web, but if you hunt them down on your favorite social medium or in real life, there’s pretty much scaf everywhere: Parkour Generations Americas Boston on DuckDuckGo
ɕ
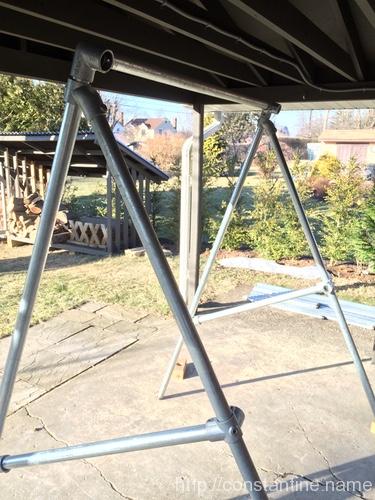
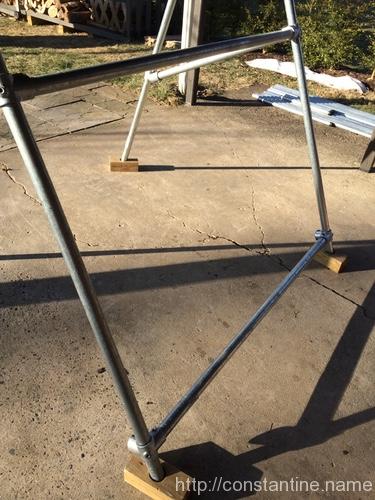
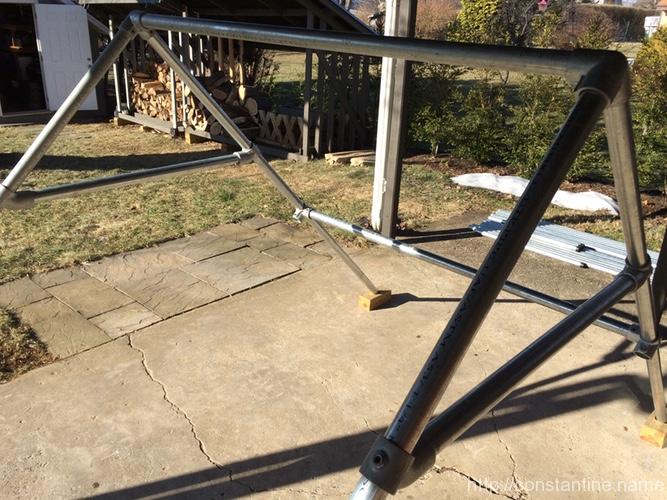
There are some non-obvious ways to use clamps to build unusual things. Early on, in the first “cube” build, I mentioned you could do pullups and work climb-ups. But this build is way better for building a stable, nearly 7-foot high bar.
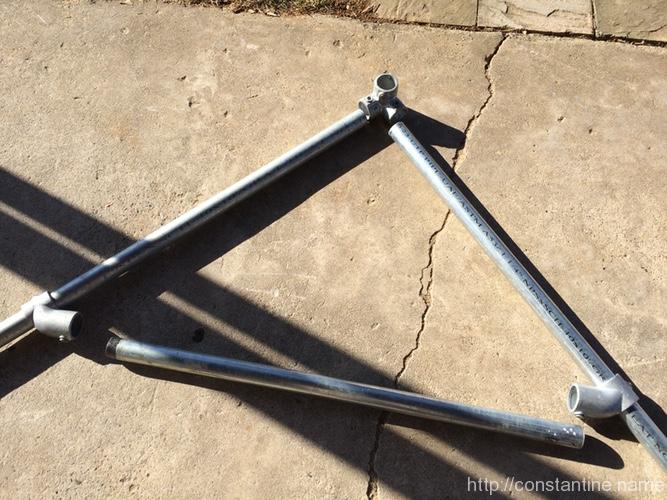
There’s no layout shot per se, but here’s a pair of assembled 45° apex A-frames. (Note that the unused outlets in the middle both face up.)
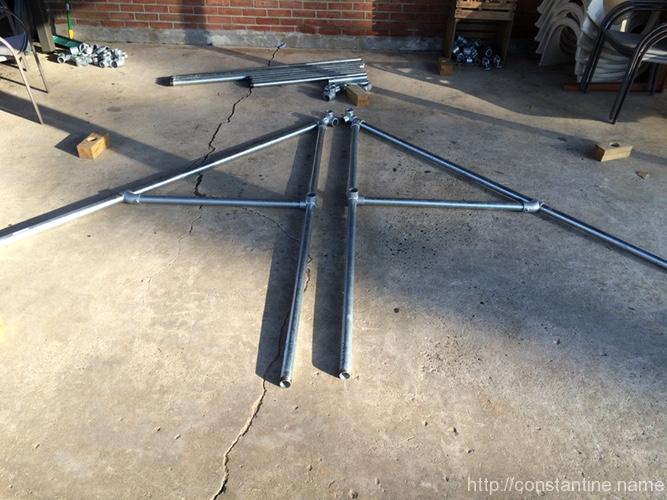
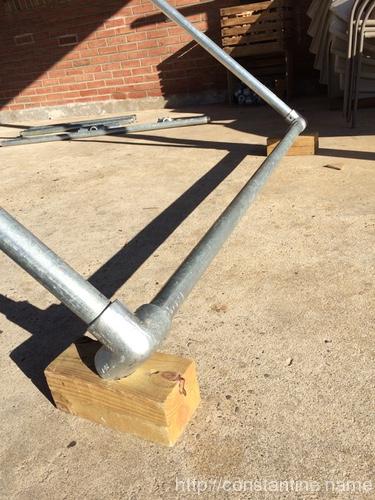
There are two 90° two outlet tees in the middle of the photo, 45° tees on the left and right and 3-foot brace pipes. This looks totally asymmetric, right? Here’s a close up of the tops of the A-frames:
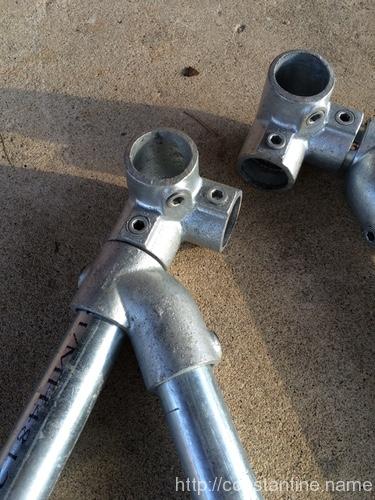
(I know, right? Does this work?)
Here’s a detail of how you put the top cross bar into the clamps; do not over-insert the ends because we need the width to be correct.

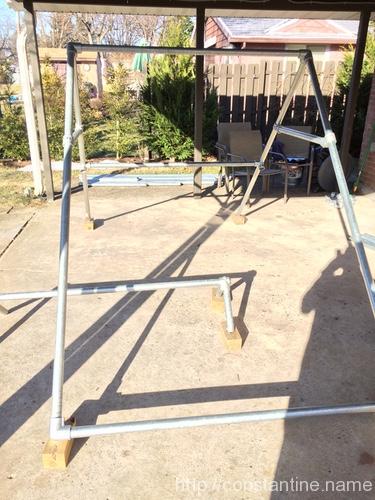
Wait, this is a thing? It totally is…

Very tall, very stable for climbing/hanging and you can swing a bit (if you like sketchy swing sets).
We have 5-foot pipes and tees left, so let’s add some more side pipes:
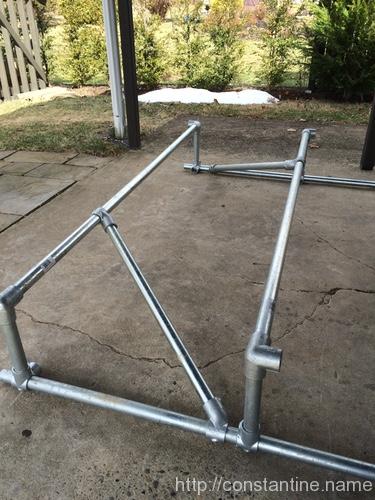
I love how the outlets on those tees we used early on, suddenly are just perfect for a cross bar. Obviously, that lower one could go anywhere on the set. If you have extra 45°s, you can add some 1-foot diagonals on any (not the top – won’t work up there) of the cross pipes. I’d put two diagonal doing down from the mid-height cross-pipe; that would give a huge stability gain without being in your way.
There are other variations to this build: You could have used 5-foot pipes for the cross-bars when you laid out the A-frames. They’d be much lower down on the sides. You’d still have the fourth 5-foot pipe to make that mid-height cross-bar. And of course in both variations you have 3-foot pipes that can be added as diagonals if you have the extra 45°s. Remember the rail precisions build, with the diagonals that were “off” but still sort-of fit? You could get a 3-foot diagonal up on the top most cross-pipe.
I really like this build. It’s a sort of “sleeper” build where you start feeling like your wasting clamps at the apex of the A-frames and then it turns into this very unusual geometry. Most scaf (except of course Blake’s scaf in Boston) ends up being all 90° and 45° systems.
ɕ
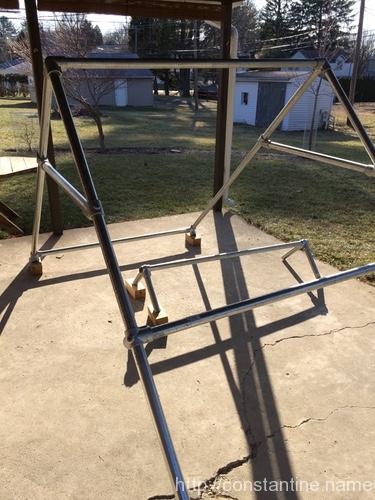
By now, you should be pretty comfortable with these builds. So for this one, I’m going to start off by making a poor decision, so you can see how it doesn’t work out at the end. Then I’ll make a change and show it rebuilt.
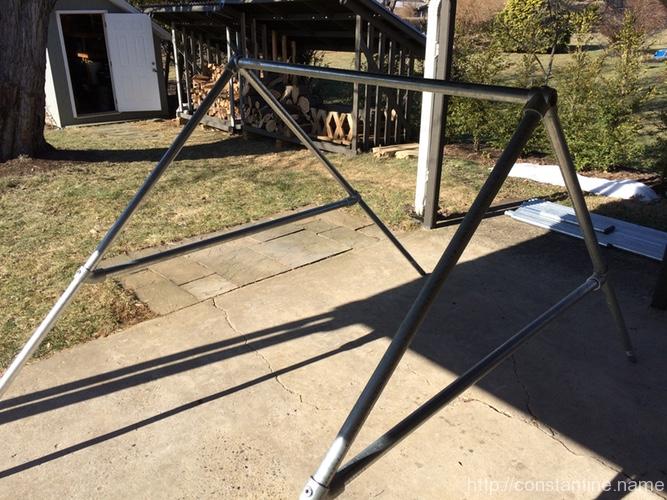
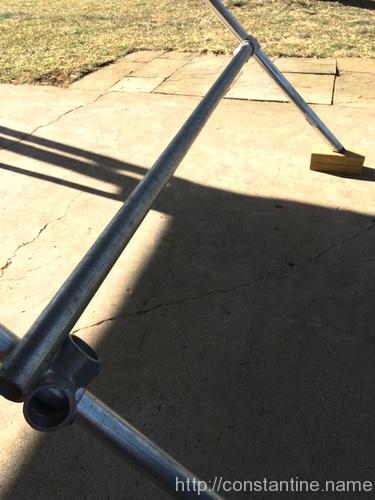
Here’s a layout shot for one A-frame end of a “swing set”. If you look at the apex closely, you’ll see I was considering using a side outlet elbow. (Two 7-foot legs, and a 3-foot cross pipe.)
At which point I thought this might be an interesting teachable moment. So I swapped in the 90° two outlet tee. This seems like a good idea right? We’re going to use a 5-foot pipe across the top, one end of it has threads, I can slide this clamp further in from the end and it’ll get a much stiffer top corner.
Advanced: If you have the extra 45° single outlet tees you could add awesome little 1-foot braces on two of the corners at the top too. But DON’T – spoiler – we’ll use the 1-foot pieces for something else at the end.
So I assembled one A-frame side and put in the 5-foot top pipe. You can see the other A-frame side is also assembled on the ground. The 7-foot pipes in this set all have threaded ends, and I’ve left them all facing down so the A-frame top clamps are more stable.
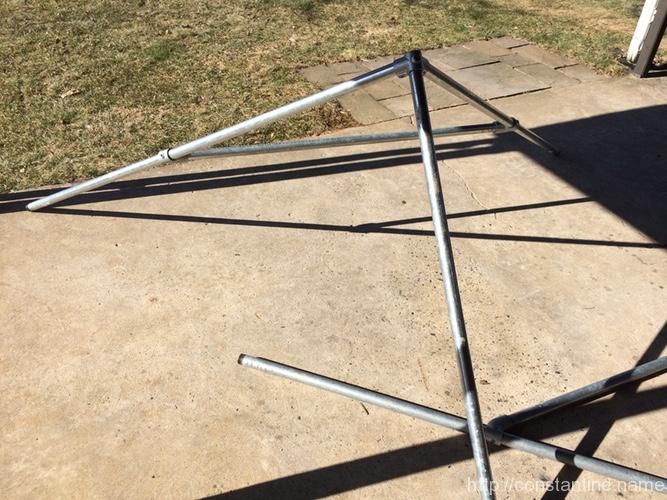
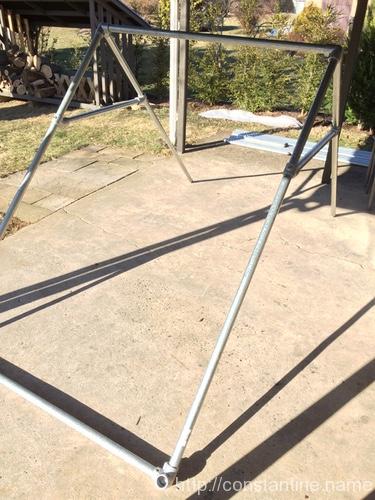
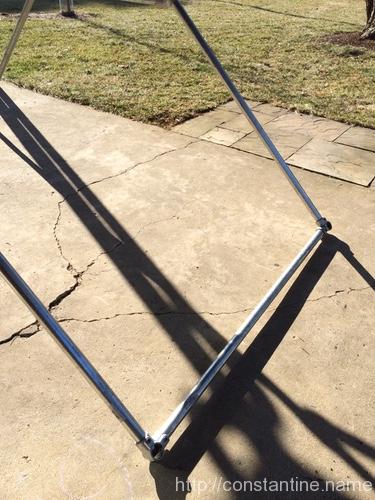
And here’s the assembled A-frame swing set. It’s about 5 feet high and is surprising stable because of the very wide 90° angle at the top.
So can we make this more interesting or more stable? Let’s put a 5-foot base across the bottom of one side, just to stiffen it up. (But it can also be a laché precision target too.) Two elbows, a 5-foot pipe, and you’ll see the 5-foot seems long, so bury as much of the pipe’s ends in the clamps as you can. You get this:
We still have two elbows left, so we could do this on the other side and call it a day. But we also have two more 90° two outlet tees, so maybe we could put a bar, across the other legs, but up higher; just to make it interesting? Here you realize that using the two 90° two outlet tees on the top of the A-frame means the entire thing is too narrow to pull this off. In the photo, I have the far side clamped, and the near side just snugged and resting so I could take the photo; it’s clearly too long. If you slid this down low, you could just stretch/spread the legs, but up at this height, it’s a no-go.
At this point (if not sooner) you’d realize that you cannot get those top clamps out and swap them. You have to tear the entire thing down; thus my thought that this would be good to show, so you never have to do it. :)
Here’s a do-over layout shot for the clamp change, and the finished do-over (with that low base with elbows installed).
Now we can add some fun stuff. You can use the two outlet tees (you have four left) to put a base on the other side (note the clamp orientation).
But we have that on the other side already, so you can flip those clamps and position this 5-foot pipe anywhere. You have a “window” on one side too!
We really should flip the elbows on the other side, so they “sit” into the feet better. Now we also have a “ground rail” on one side. Perfect to start from before jumping/reaching to swing on the bar, or as a laché landing target:
Done? …not hardly! We have clamps left over. Grab that last 5-foot pipe and your four 1-foot pieces, two 90° two outlet tees, and you can make a bomber ground rail (because you made all 8 wooden feet way back when).

Finally, you still have two 3-foot pipes left. If you have the extra four 45° single outlet tees, you could add those pipes in somewhere. As diagonals to the base, or in the window, or something crazy like connecting the free ground rail to the A-frame somehow.
So this build ends up being full of options. Climbing/gap challenges around the side braces; balance/cat-on-a-rail challenges; precisions; swinging. This is one of my favorites that you can build with this set.
ɕ
This is a very stable, adjustable setup for learning rail precisions close to the ground.
Here’s the layout shot. The 1-foot pieces will be vertical.

In this build, I’m going to use 3-foot braces incorrectly; I’m going to build them out-of-plane, where all the angles are just a bit off. Turns out it’s close enough to work because the brace pipes are 3-feet long. This wouldn’t work with shorter braces. (Look at it closely when you put it together to see what I mean.)
Here are closer layout shots of the two types of corners in this build. First, a corner with a brace:
…and the corners without a brace. The upper clamp that holds the precision rail has an extra outlet we won’t be using.
Put the 90° two outlet tees on the 7-foot bases. This is a little trick to make the pair on each pipe have matching alignments. This also makes their set screws super easy to tighten. Set the distance between the clamps (on each pipe) to be the distance of the precision you want to end up with in the finished setup.
Put all the verticals in place. Since each of the elbows has an outlet I’m not using, I’ve turned them out/away from the jump-gap.
Put the cross bars (the ones you’ll jump on) in place, and build the 3-foot braces. You can adjust the distance by loosening 3 set screws and sliding one side. (Another spot where you can use the wooden feet to prop up the ends of the 7-foot base pipes so yo can get at the set screws that are on the ground.)
Minimum is about 2-feet, limited by the angle braces:

…maximum is nearly 7-feet. If you never plan on going out to seven feet, you could also do the build using the other 5-foot pipes as bases. (Sorry about all my other scaf pipe sneaking into the shot. All of these builds I’m doing with just “the set” described in the beginning.)

ɕ
This is another variation on the cube (the next build I’m going in a totally different direction ;). basically, take the 7-foot side pipes and turn them into stabilizing legs, so you can do some limited laché (there’s a better build for that though), pullups, climbing and under-bar stuff.
Here’s the layout shot:

Assemble the ride side (which will be vertical). Do the two uprights and the top 3-foot first. Note the 45° single outlet tee on the righthand vertical.

Next, clamp the verticals to the 90° two outlet tee (we’re not using one of its outlets though.) Then clamp the 90° two outlet tees to the 7-foot base pipe. I just eyeballed the centering.

Stand this side up, and put a 7-foot pipe into one side. Remember to slip the other 45° single outlet on here. (Again, I snug these clamps down a bit so they don’t go sliding.)
Assemble the other side; verticals, top pipe and bottom. Remember the 45° single outlet on the opposing vertical. Position the two assemblies like this:
Stand up the side, lift up the 7-foot pipe and convince them to line up:
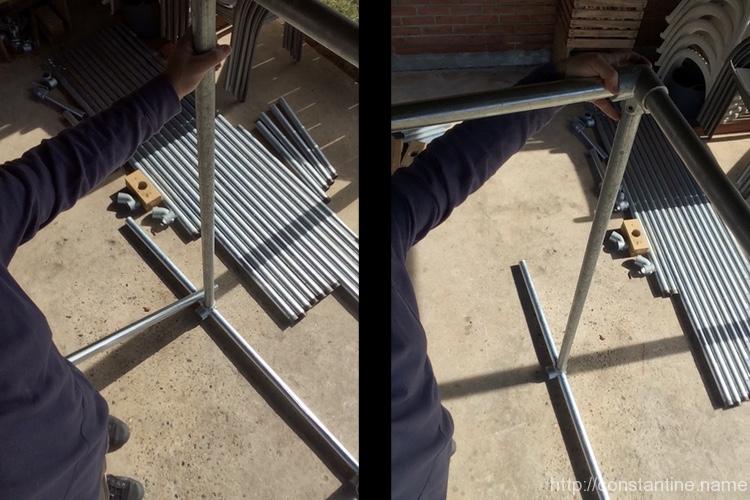
Fiddle the other 7-foot long side pipe into place. Make up both braces. (Bonus, if you have the extra 45° single outlet tees, you could add two more braces to this build.) Stick the feet on it (otherwise the 7-foot base legs don’t actually touch to add stability – but you could shim them with whatever.)
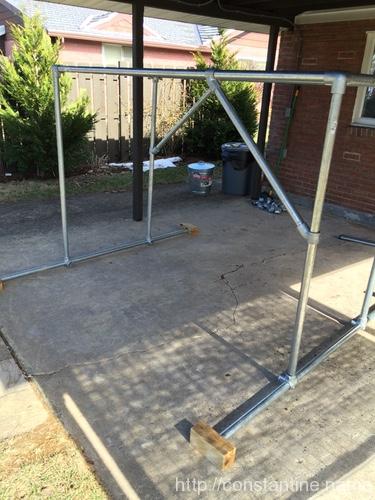
I took the above shot at about eye level – obviously, it’s a 5-foot tall setup. And stable enough to do climbing and some gentle swinging.

ɕ
I wonder what this turned into…
ɕ
This is simply a slight variation on the “cube” build. You can either assemble it this way, or slide the 90° two outlet tee clamps along the vertical legs when you’re done with your cube.
In the cube build, when you’re assembling the upper frame – the second half of the build – simply lower the position of the 90° two outlet tees. Alternatively, you can convert the cube into this by loosening the 90° two outlet tees on the four corners and then slide the frame down the verticals. (Truth be told, I had to coerce the frame down with a rubber mallet.)
ɕ

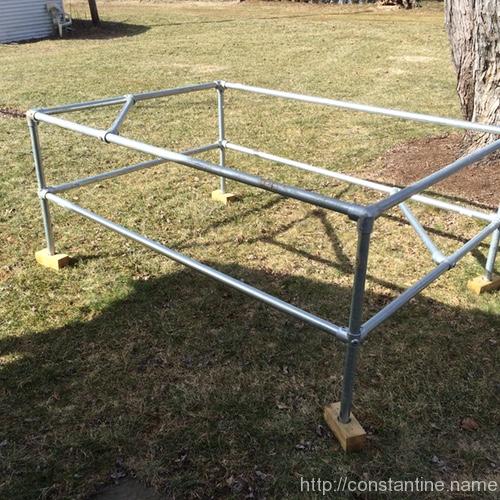
This first build is the most obvious thing to assemble and you can do a lot with it. (Yes, it is not actually a cube; I suppose it’s a right cubic rectangle.) I’m going to give a TON of detailed instruction on this build with a million photos. On subsequent builds I’ll be brief.
Advanced: As I’m assuming this is the first build you have ever done, I’m keeping the diagonals to only two. However, if you bought the four extra 45° single outlets, you can add two 1-foot diagonal braces to the mid-sized sides. I’ll mention how to do this as we go along.
Begin by clamping the four 3-foot pieces into the elbows. Note that the threaded ends go in the elbows.
Notice the orientation of the clamps. The two set screws that will be used later, are facing the pipe. You’ll be happy these screws are facing up a few steps from now.
Why are we putting the threaded ends in these clamps? You’ll see why when we clamp the other ends of these pipes. For now, recall the discussions about inserting the pipes a little farther so the body of the pipe – i.e., not the tapered threads – is touching the inward land in the clamp.
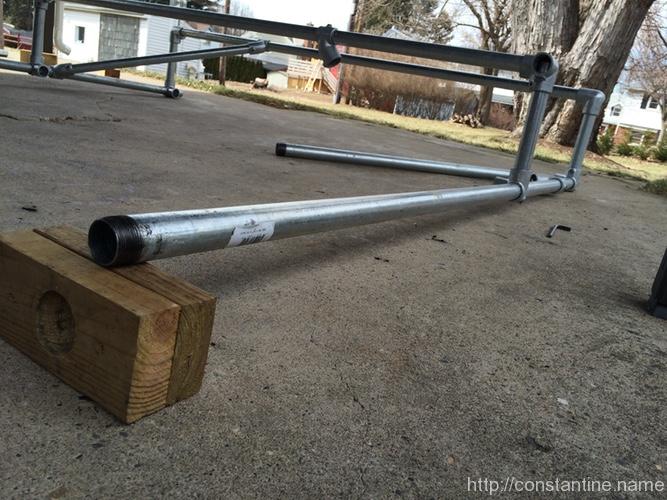
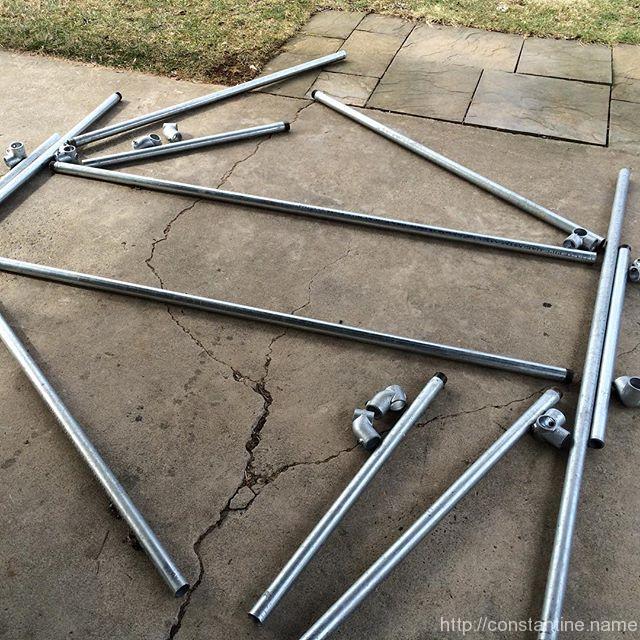
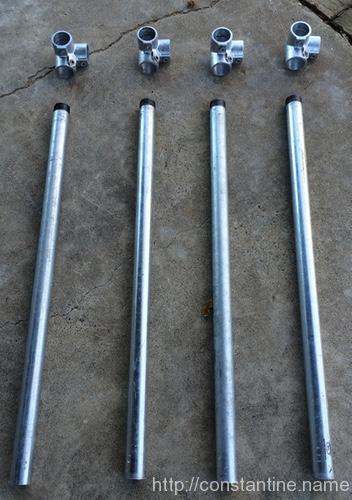
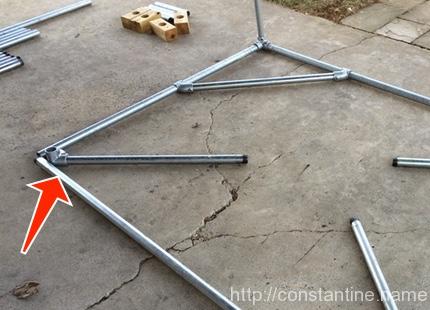
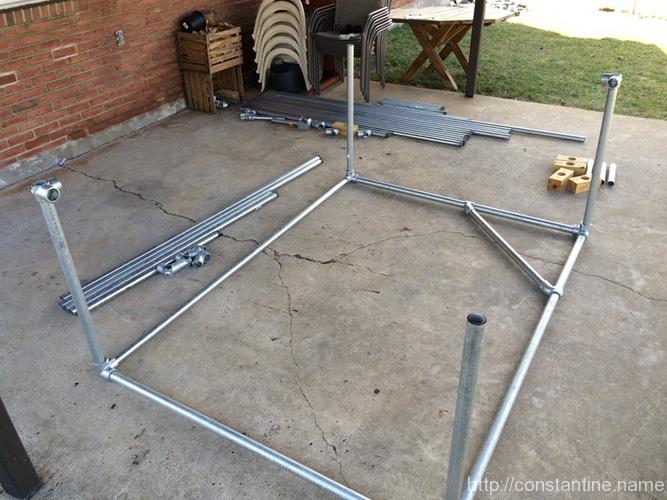
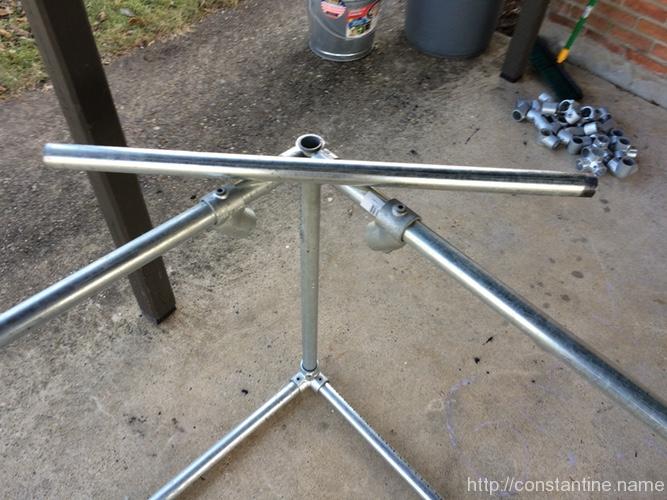
Introducing the “layout” shot. I find it really helpful to lay everything out (until you get really good at scaf) so you can see that you have all the pieces you need. This is just a partial layout; it’s obviously not all the scaf for this build. In later builds, I’ll take an entire layout shot so you can see the mess. I think the layout (looking at a photo before it’s built) helps you visualize how you convert the loose junk into the finished product. Anyway, here’s the layout shot for the first corner:
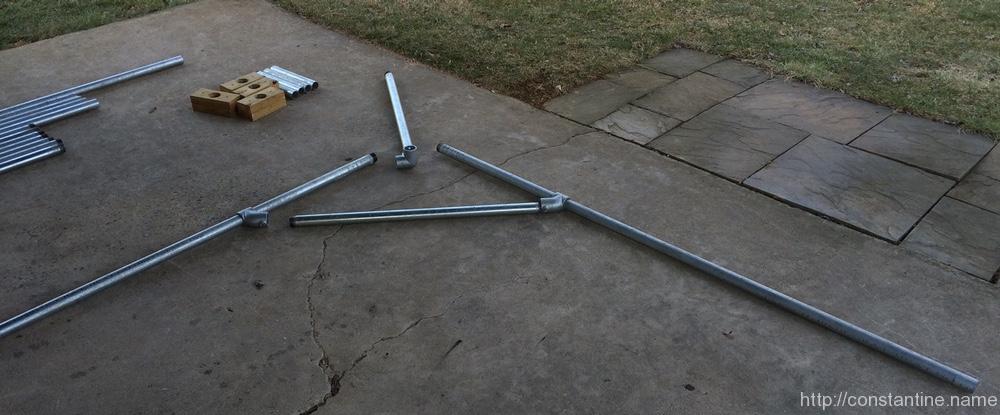
Of particular interest in the above shot: I’ve slid the two 45° single outlet tees onto the side pipes. That’s a 7-foot pipe on the right, a 5-foot pipe on the left, and the cross brace is another 3-foot pipe.
Below is, basically, another layout shot. Notice that I’m putting the threaded ends of the side pipes into this clamp. Can you guess why?
This is a hair splitting detail to deal with the fact that this pipe has threaded ends. This clamp already has the first pipe pushed a bit into the center space. So the next two pipes are not going to be able to be inserted extra to get their non-threaded bodies to the lands. (Boo!) But this problem has to happen somewhere in the build, right? So I’m doing this here, where there is a corner brace that will beef up this corner. Because all the pipes have one threaded end, this “fixes” two of the twelve threaded-end problems in this build.
Advanced: Turns out we’ll have both ends of the 3-foot pipes occupying the clamp bodies. So all of the 5-foot and 7-foot pipes’ threaded ends aren’t going to land perfectly. (Because, taper.) So, if you have the extra 45° single outlet tees, you can add a brace on each of the 3’x7′ sides. That will brace two more (one per each brace) of the remaining four threaded ends. Again, I’ll explain more as we go along.
Next is a finished shot of this corner assembly. Here you’ll see another reason why I love those wooden feet. Things like this are so much easier to assemble with the feet doing a little propping up. Note that this prop trick doesn’t always work. It’s handy here for this brace, but after this, the setup has to stay flat on the ground. We’ll do another angle brace soon, and it will be on the top face, so no need to prop it up.
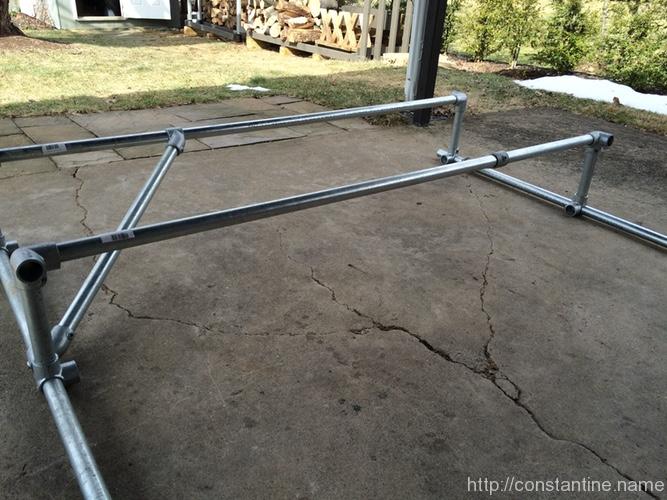
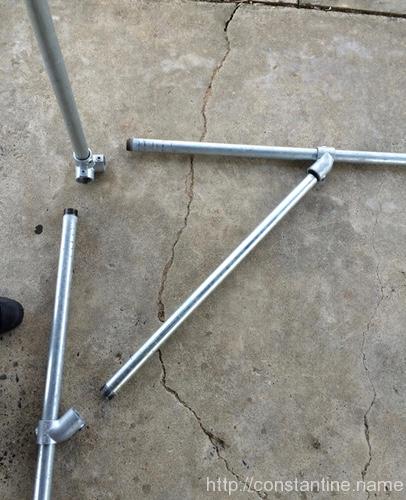
The next photo is the layout shot for the rest of the parts for this “lower” part of the cube.
Please notice that the next few photos incorrectly have the vertical 3-foot pipes with the threads out. Right after I took these photos, I realized it would be better with the threads in – which is how it’s described above, to this point. So I flipped the pipes around… and promptly forgot to retake these photos. When I realized these shots were wrong, I didn’t feel like doing the entire build all over… because this space is already full of other scaf. :^P
Advanced: If you have the extra 45° clamps, and want to add a brace, you should add a clamp where I have the red arrow. That’s the end of the 7-foot pipe that has a thread, and would most benefit from bracing. The clamp should angle towards the corner, since you’ll put the other clamp for this brace on the 3-foot, vertical pole. I’m splitting hairs here about where to put braces. But, this is meant to be educational, ‘ya know?
The next photo shows two more verticals, and the 7-foot side clamped tight. Just the fourth vertical, and the last, 5-foot side remain to be installed.

At this point, insert the 5-foot pipe into the clamp (the one towards the top of the photo.) The pipe, of course, will just lay there when you let go. Then clamp the fourth vertical to the pipe. (That’s the clamp/set-screw where the Allen wrench is laying.) You’ll have enough swing/wiggle in the 5-foot for this to be easy even with one hand always on the vertical pipe.
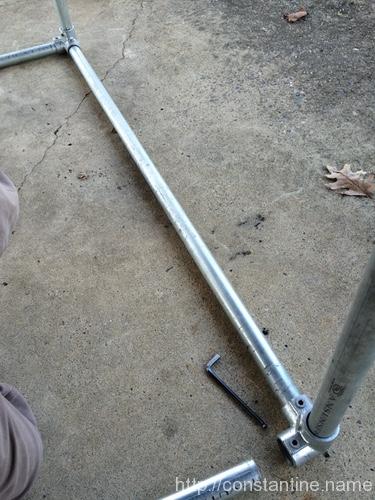
Why? Diatribe about safety: Yes, this build is pretty harmless. But as you build bigger things, you will live longer if you are always thinking, “when I forget and let go” or “when I slip” or “when I get stung by a bee and drop this part”. At this instant in the build, that fourth vertical looks like it’s attached – it’s clamped to the 5-foot side pipe, but the pipe is free to rotate but you cannot tell at a glance. The vertical may even stand for a while before falling over. This is exactly how someone gets hurt. Something that looks stable, actually isn’t clamped yet.
Now tighten the other screw on the vertical pipe’s corner clamp which fixes the 7-foot pipe into this corner.
Anything else? Yeup, the other end of that 5-foot pipe. Learn to keep track of what’s tight. Learn to spot proud set screws that need to be tightened (or whose clamp alignment needs fixing so the screw goes in farther). While you’re at it, give the structure a couple shakes, and then go check every set screw.
Pro-tip: Soon you will have a feel for “this is how much I torque these things” and you’ll go around and just sort of torque torque torque them quickly. In an instant, you can apply “just that right amount of torque”, and when the screw doesn’t move, you’re happy. This is another way to spot good scaf builders: They do not go around and actually tighten each screw a little bit more each time. (The screws cut hickies the tighter you make them.) Good scaffers know what a tight set screw feels like before it moves.
Mastery-tip: The set screws scratch the steel pipes and move the Zinc coating. That leads to a tiny bit of corrosion between the pipe and the screw, which makes the set screw stick in place. That’s a good thing because it helps prevent things wiggling loose. So if you’re in the habit of actually moving each screw when you periodically check things, then you’re messing up the one time when corrosion is actually working in your favor.
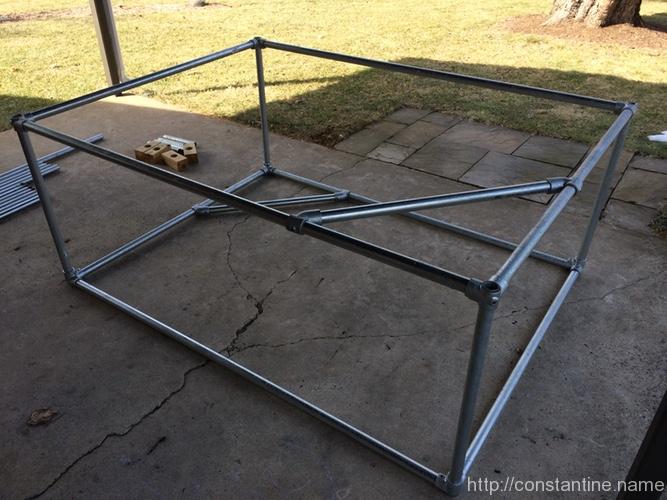
So, here’s what you have, everything tight and ready for the upper frame (except, of course, your 3-foot verticals are not upside-down like mine are in the photo):
Advanced: If you’re doing the extra brace, you need to drop the second 45° angle outlet clamp onto the vertical (arrow). Later – no, do not do it now – we will install a 1-foot brace where the line is.
Attach two of the 90° two outlet tees to the tops of two diagonally opposite vertical pipes. Be sure the pipes are inserted far enough so the cut off end lands correctly.
This is why the 3-foot pipes are threads-down. If the threads were currently UP, well, the threads would have to stick out. On the other hand, if you assembled this entire thing with the threads UP, when you flip it over, those threads would be PERFECT for dropping into those neat wood feet. This is how I actually set this cube up when I use it flat. I DON’T put the thread into the clamps at the very first step and then I flip the entire build over and use the wooden feet. It’s actually just like the “railings” build that we’ll do next. But I’m getting ahead of myself.
Anyway, here’s the status shot with two clamps on two of the verticals:
Here’s another layout shot showing the 7-foot pipe (with 45° single outlet tee) and the 5-foot pipe that will be added next. Notice I’m putting the threaded end of the 7-foot pipe down where the second diaglonal brace will go.
Advanced: The second 1-foot diagonal will go on the last 7-foot pipe, on the other side.

Another diatribe about safety: Loose clamps on poles lead to the “sliding death clamp” problem. You’ll experience this some day. You’ll pick up a pipe, and somewhere on the part that is NOT in your field of view, there will be a loose clamp. You’ll hear the sliding sound of a clamp… and you have a split second to figure out if the clamp is coming your way and about to pinch your fingers on the bar, or if it’s going the other way and going to hit someone else. Bonus points: if the clamp falls off, the pipe balance changes quickly and you have the slap-stick, not-funny, swinging pipe joke.
…so when you put “middle” clamps on pipes that you are going to lift or carry, snug their set screw so they don’t move.
Pickup one of the 90° two outlet tees in your right hand. (Bear with me, this is clever.) Stand inside the setup, pickup the 7-foot pipe and put the left end (with the threads) into the corner clamp:
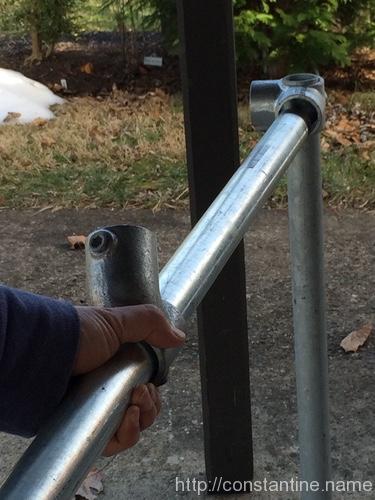
Drop the clamp onto the vertical pipe. This is not how we’ll install this clamp, I’m just using it as an extra hand. If you’re paying attention, you’ll realize this entire build can be done by yourself perfectly safely. (Nit-picking: I was also holding a camera through all of this. I should have flipped that clamp so the screws were on the other side… you’ll see in a moment.)
Boop! I no longer have to hold that 7-foot pipe; it’s trapped on both ends. Now go to the other end – the end we inserted first – and lock it in place with the set screw. We don’t want it coming out, and we may need to pull on it in a moment.
Next, pick up the 5-foot pipe and put the right end into the corner clamp:
No photo for this part, but: Rest the left end on top of the 7-foot pipe, and then lock the right end of the 5-foot pipe into its corner. Like the 7-foot pipe, we may need to pull on it and we don’t want it coming out.
Now, holding the 5-foot pipe in your right hand, lift the 7-foot pipe and the clamp – and here I had to stop and flip my clamp, but you can just – rotate the clamp to receive the 5-foot pipe. (Happiness: You can’t drop either pipe because their out-of-sight ends are already locked in.)
Line them up holding the clamp. Since we had the forethought to already clamp the other ends, the other ends won’t fall out on us as we wrestle this part.
Now this gets tricky. You may have to coerce the vertical pipe to come over and want to go into this clamp. (If you’re doing the advanced version, the extra 1-foot brace would fight us at this time.) Eventually, you get this:
Now tighten up all three screws on this corner clamp.
Advanced: Now you can assemble and tighten the 1-foot corner brace that is on this vertical pipe.
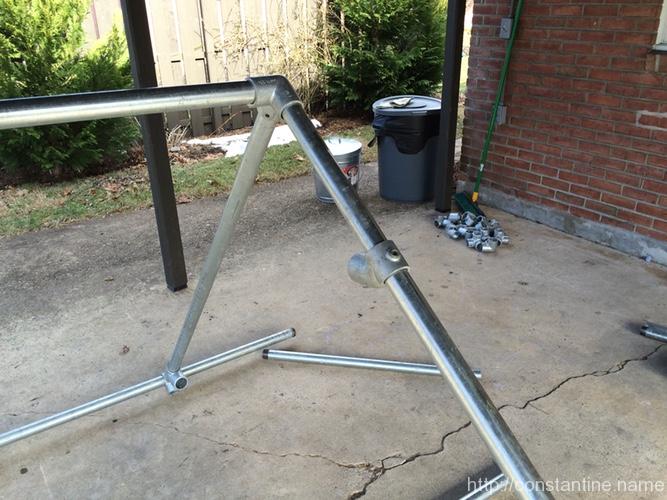
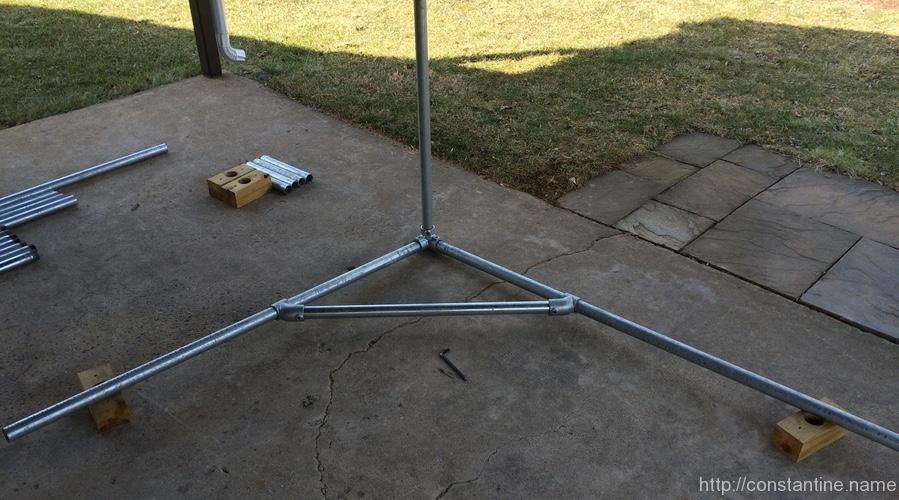
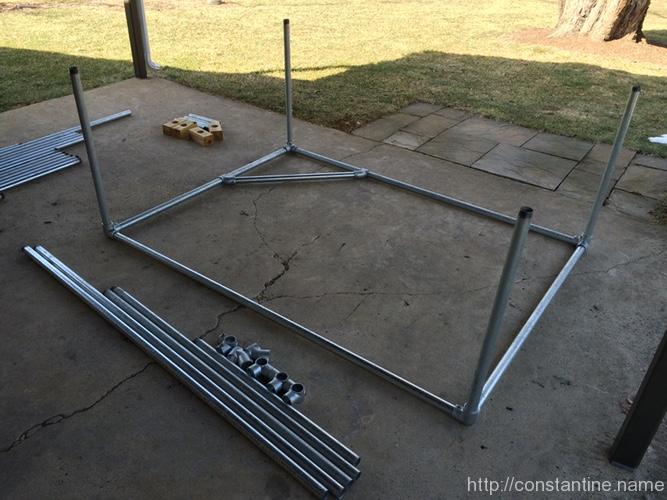
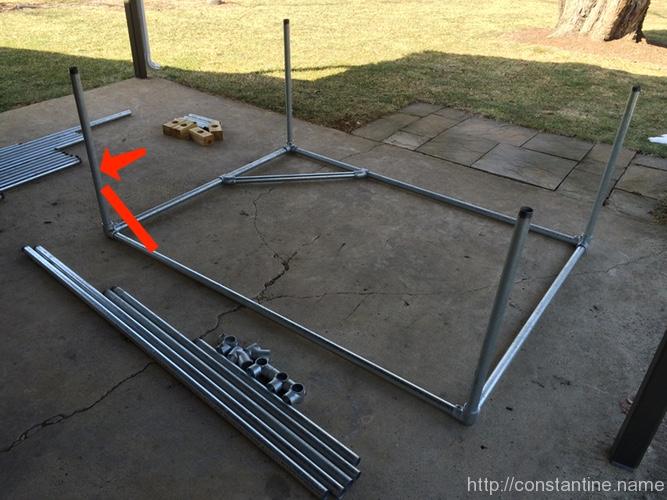
Finally, you now have half of the upper frame:

Place the last 5-foot pipe into the right side; Put the threaded end to your right (towards the braced corner.) Notice the 45° single outlet tee clamp for the top face’s corner brace is on this pipe. Use the last clamp to hold the end for you. Tighten up the far end of the 5-foot pipe. (We’re going to be pulling/pushing on this pipe like we did on the other corner.)
Advanced: If you’re doing the extra 1-foot braces with your extra 45° single outlet tees, drop the one of the 45° brackets onto the vertical pipe angled upwards.
Advanced: 1-foot corner brace? Slip your last 45° single outlet onto the 7-foot pipe, angled facing the vertical.
Slip the left end (farthest away in the next photo) of the last 7-foot pipe into the far clamp. Rest the pipe on the 5-foot pipe or temporary clamp, and tighten the far end.
Pick up the 5-foot pipe and the clamp with your right hand, rotate the clamp to accept the 7-foot pipe:
Make up the corner and coerce it into alignment:
Tighten all three screws on this corner clamp.
Advanced: Make up that last 1-foot corner brace!
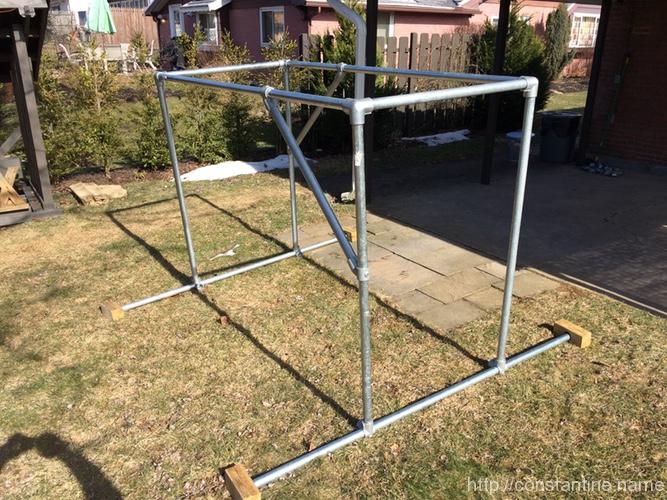
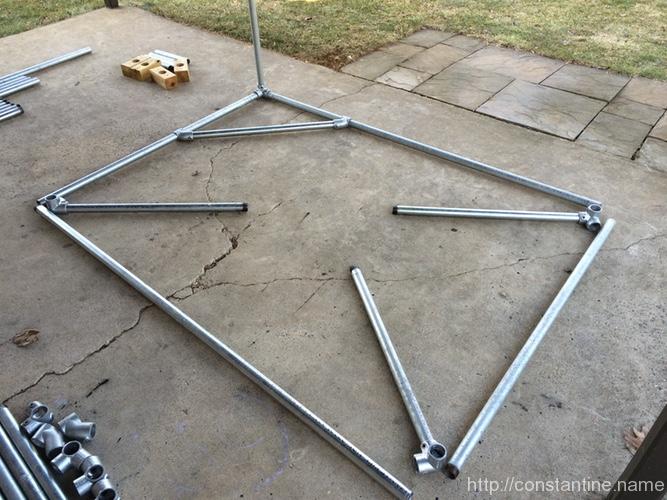
Finally, finish that 3-foot corner brace on the top face:
Flat: You can use it with the round-faced outside corners down (as you assembled it), or flip the slightly more rough 90° two outlet tees to the bottom, or (bonus points) assemble threads up so they’d be sticking up at this point, then flip it over so the threads disappear inside the feet you made!
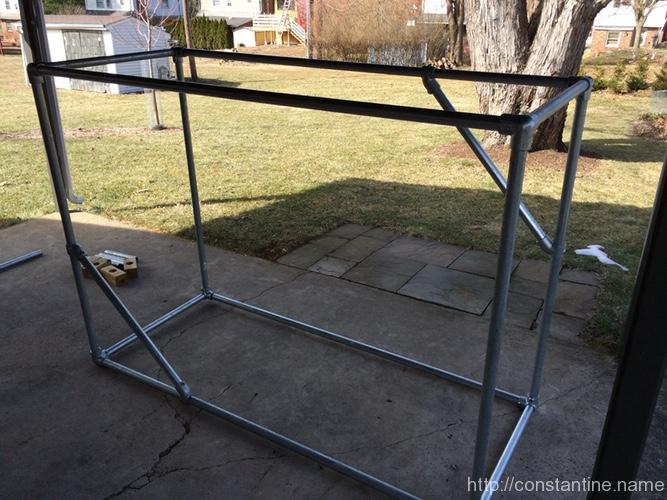
Side: Flip this way for 5-foot high climb-ups etc. You’ll learn how sturdy it is. (Answer: reasonably.)
Tall: Finally, stand it up all the way for pullups or climbing challenges etc.

ɕ
Remember when I said I’d start by explaining everything? Well, you should understand how the clamps work, so that you understand how to put them together. If you do it wrong, they wiggle loose and come apart surprisingly quickly.
Pro-tip: Scaf should be quiet! If you hear a rattle or tapping sound stop. Something is very loose — you probably forgot to tighten something. Or, you didn’t have things lined up correctly, then after the scaf is jostled a bit, things shift and voila! Loosey goosey. Learn to pay attention to your “scaf sense”. When your scaf sense tingles, stop and figure out what’s going on.
“omg Craig shut up already and let’s build something…” This is the last background information post. We’ll start building stuff in the next post. Please read this one carefully, this gets technical. But, if you understand this material, you’ll be a happy clamper later on.
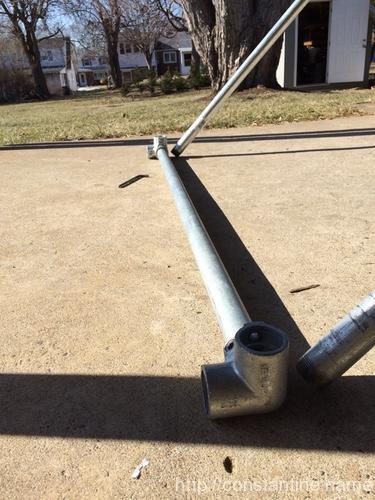
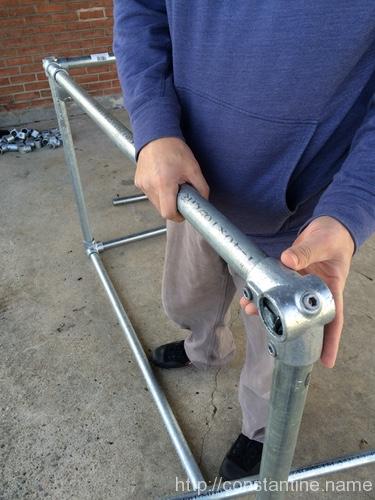
On some of the clamps, you can actually insert the pipes too far. Usually, it’s the first pipe that you insert too far. In these pictures, the first shows the pipe inserted so far that the end of the pipe has bumped into the curved body of the clamp. That’s too far! You can see how the straight line of the side of the pipe looks out of whack. Tightening the screw will not fix this; although it will get tight. You will have two problems: 1) The overly inserted pipe might be in the way of some other pipe’s space, messing up alignment/lengths. 2) Things don’t turn out square/correct because when you start tightening everything else, this clamp is fighting the additional angle added by the mis-aligned pipe. If you get it right, your pipes make nice 90° (or 45° or whatever) angles.
WRONG:
RIGHT:
Bear in mind that the problem comes up when you cannot really see the angle you’re making. You have to sort of feel that the pipe is inserted correctly, while holding a pipe up over your head, or holding three pipes at once and aligning the clamp. You’ll get the hang of it.
But wait, it’s worse. Next you have to be thinking about whether each pipe will interfere with the other pipes. So in the “RIGHT” photo above, the pipe is still inserted too far. Why? Well the pipe inserted from the bottom of the photo looks like it has enough room. But the pipe inserted from your point of view probably should go father into the body. Or maybe it shouldn’t; maybe all three pipes need to be equally inserted for this setup. My point being that you have to pay attention. First, pay attention to my assembly hints. Later, you’ll understand intuitively how “an extra pipe width here”, or “a half pipe width there”, adds up to make your assemblies fit, or not fit. If I have included a close-up photo that shows the ends of pipes inside a clamp, then I’m thinking the insertion depth is really important in that clamp. As we go farther along with these setups, I’ve assembled (and photographed) some mistakes on purpose, and I’ll show you how it ends up messing up the setup and how to correct it.
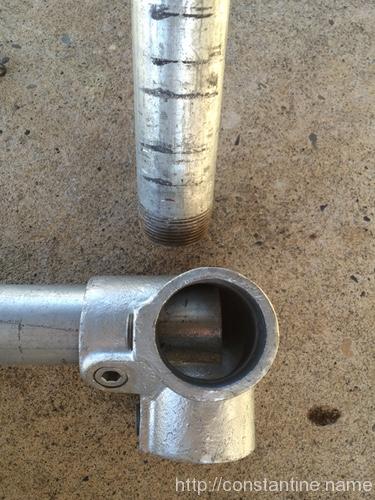
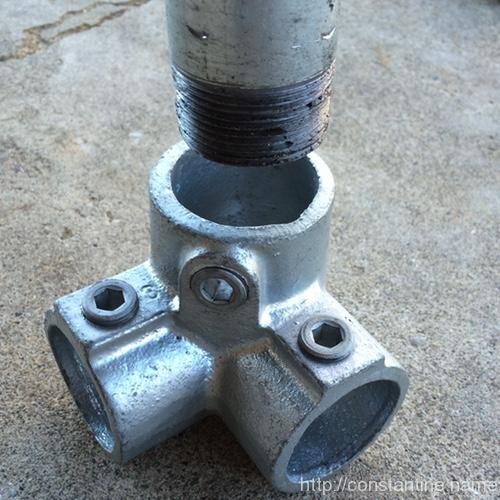
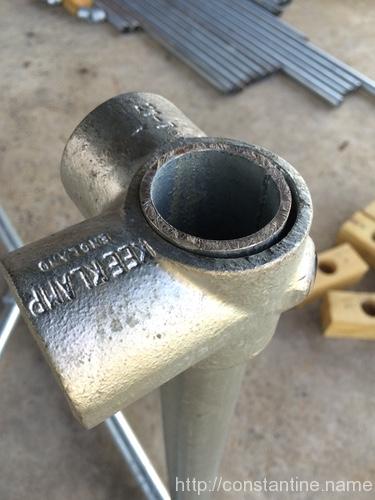
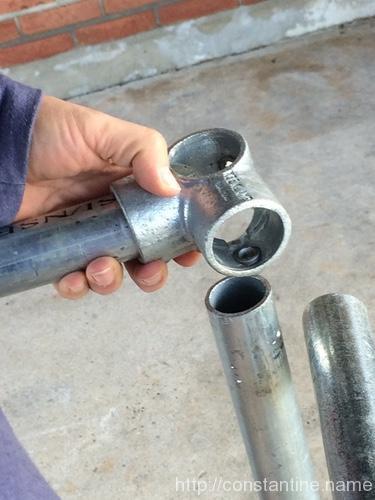
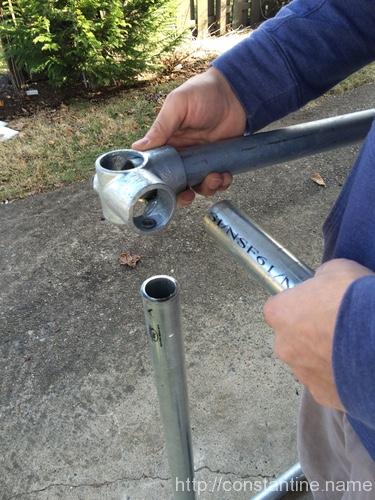
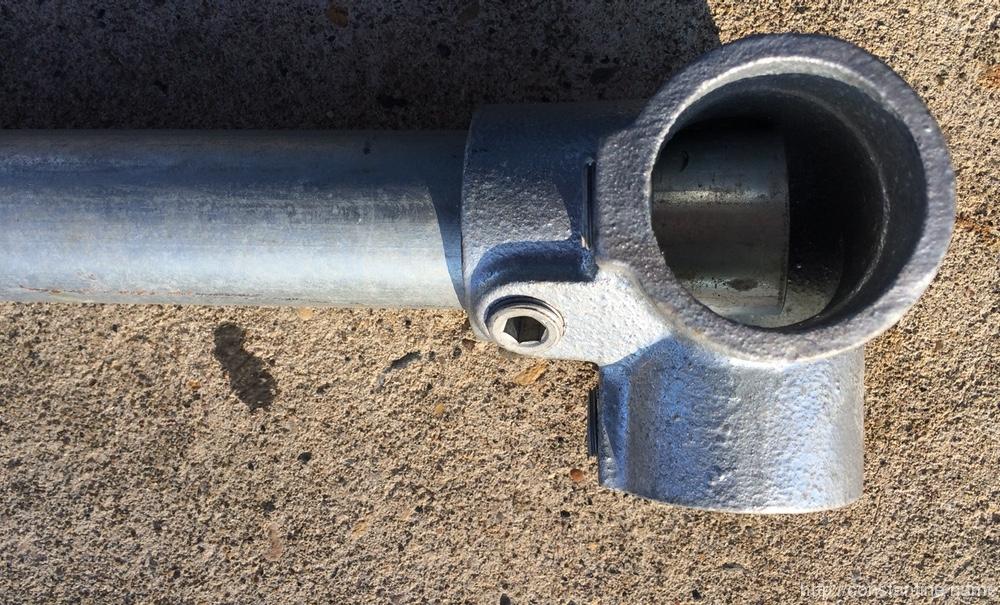
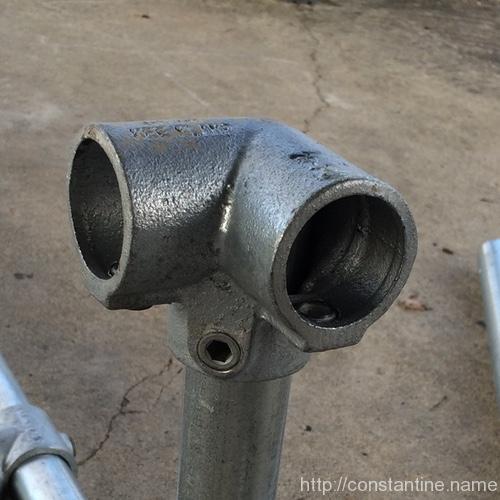
In machining, a “land” is the accurately machined part (of something) that some other thing is supposed to rest on. Pipe clamps are not machined (they are cast in molds) but they do have lands; the places where the clamp actually touches the pipe. In Kee Klamps, the lands are circumferential raised ridges on the interior of the clamp. Each set key presses on the pipe midway between the two lands; it’s like how you might press down on the middle of a board resting on two saw horses as you cut the end off. The set key is pressing in the middle, and instead of flat saw horses, the clamp has round ridges that cradle the other side of the pipe. Here are photos of some pipe lands:
Above: One land deep inside the clamp is easy to see. The other land is at the very face (closest to you in this view) of the clamp. (The already-inserted pipe is surely in far enough to be over both of its lands; in fact, it might be in so far as to hit the clamp body and cause that alignment problem discussed above.) When inserting a pipe in this view, the set screw will drive the pipe upward until it touches both lands, at the top of the photo.
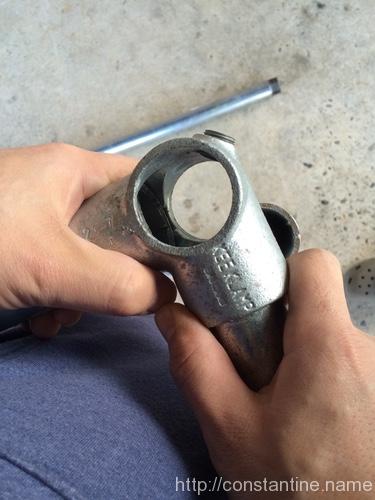
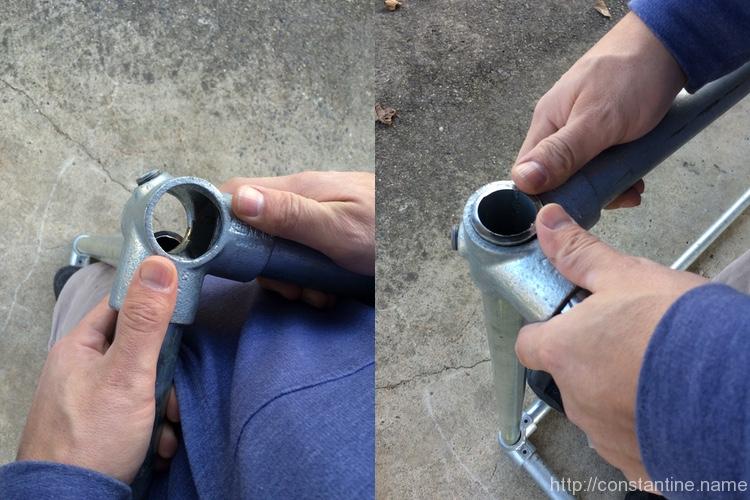
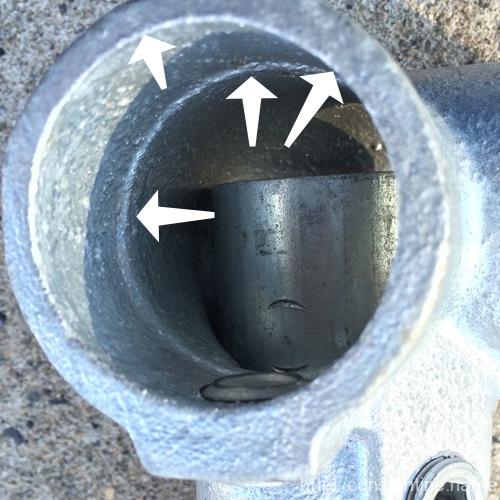
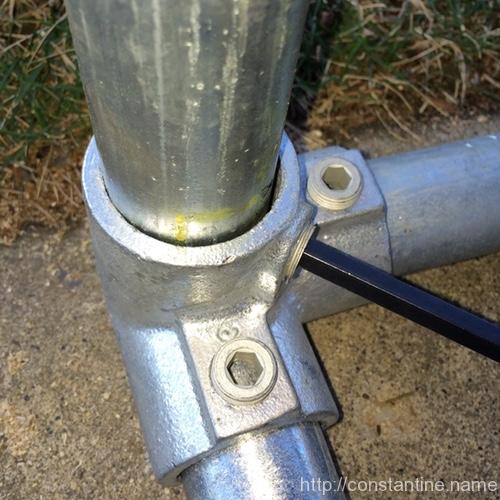
Above: Lands are the extreme nearest and farthest sides of this clamp. Set screw is pressing from the right, so the pipe will touch the lands on the left. Also, the pipe will have to go all the way through (protruding slightly) on both sides of this clamp.
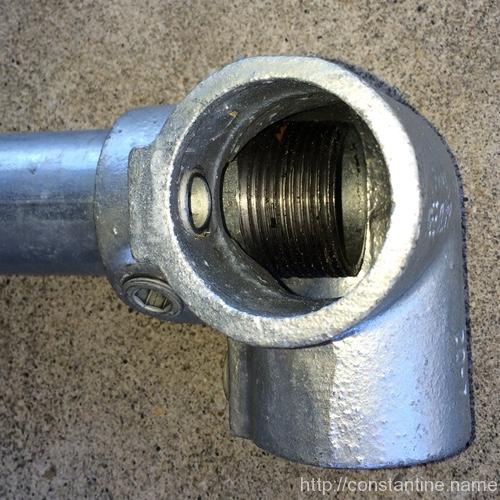
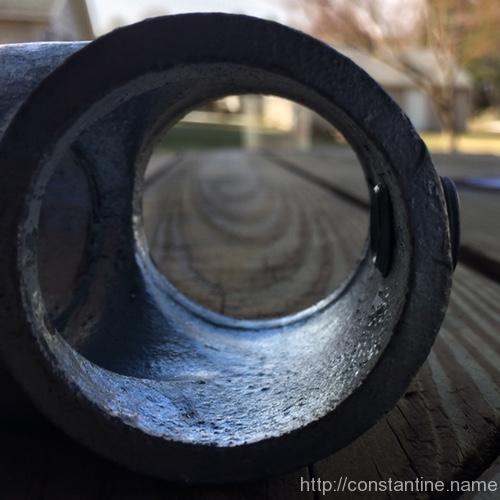
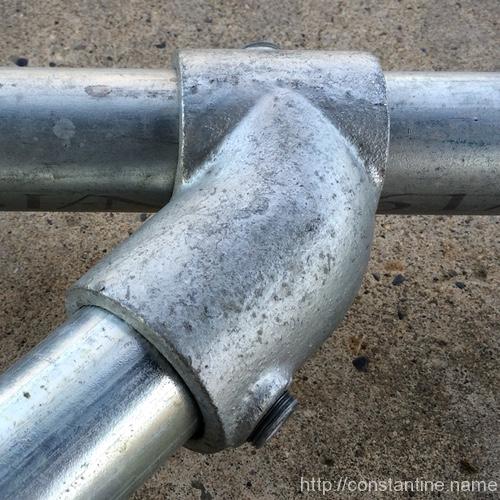
In the next photo is a similar clamp where the pipe is not through (upwards towards the viewer) far enough to reach the land at the top opening of the clamp. This pipe could wiggle loose. As it is now, tightening the screw will drive the pipe into the clamp body. It looks like the end of the pipe will touch the clamp body where the body is rounding from one side-out to the other side-out. There, the body is curved (convex) enabling the pipe end to wiggle; compared to the land (concave) at the pipe opening face which would cradle the pipe.
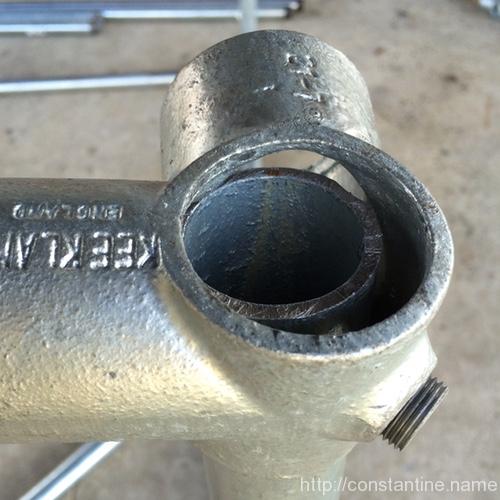
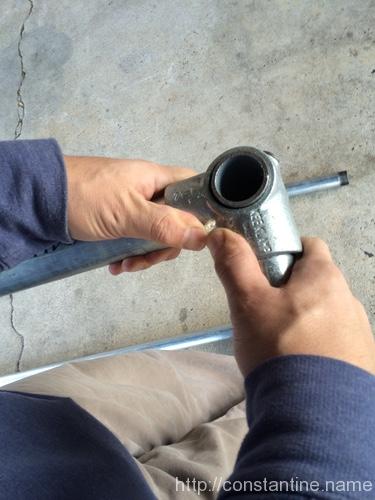
Next is just another shot of a clamp, its lands and the set screw on the bottom. Remember, you have to understand, and insert the pipes correctly when you cannot actually see what’s going on.
Once you get the feel for this, you’ll recognize when you have it right. The pipe will be loose in the clamp initially. As you tighten the screw, the pipe will move to the opposing side of the clamp. Ideally, if you have it all lined up right, it reaches the lands at the same time (or things are loose enough that the clamp pivots easily to bring the second land into contact). When you do it wrong, you get one land, and the pipe hits the clamp body or the mis-aligned clamp just torques against the screw-and-one-land. That’s a recipe for wiggling-loose.
At this point, you should see why you don’t simply stuff the pipes into the clamps as far as possible and then tighten the screws. It’s all about having sufficient insertion depth to reach the lands.
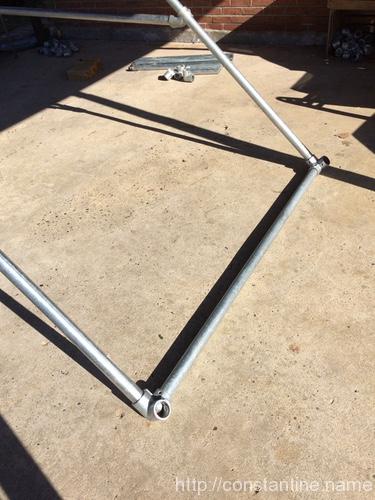
Next is a photo of “this looks good”. It’s a good sign when all the space is on the side with the screw, and you can see the pipe is flush up against the other side (i.e., against the land). What you cannot see, but have to feel, is whether the pipe “registered” (i.e. “found it’s correct location”) when the end of the pipe in the clamp was driven to its land.
One last item: Now that you know where the six lands in this clamp have to be, you understand how you could choose how far extra to insert the pipes. Any one of these three could be inserted (roughly) an extra half-pipe-width to occupy the central hollow of the body. Or, all three could be democratically not inserted beyond the interior land.
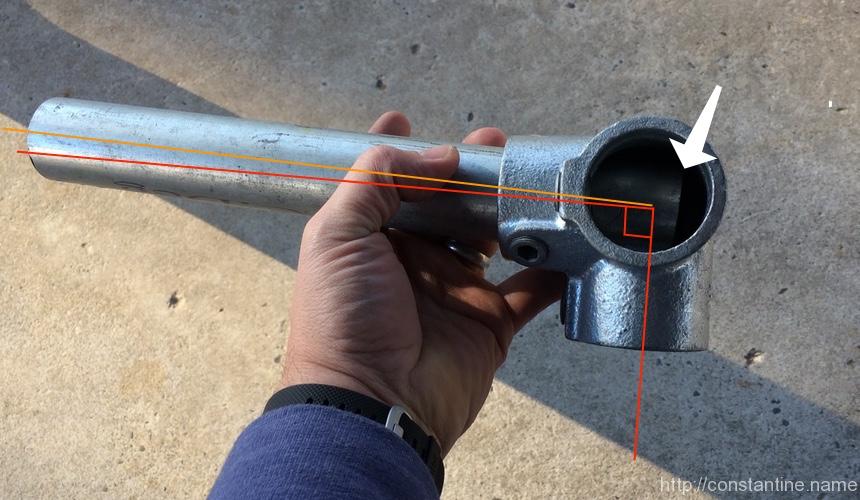
In the next photo, you should now have an “a-HAH!” moment about why the threaded pipe ends are a bad thing. (Which, we’re only dealing with because this is “getting started with scaf on the cheap.”)
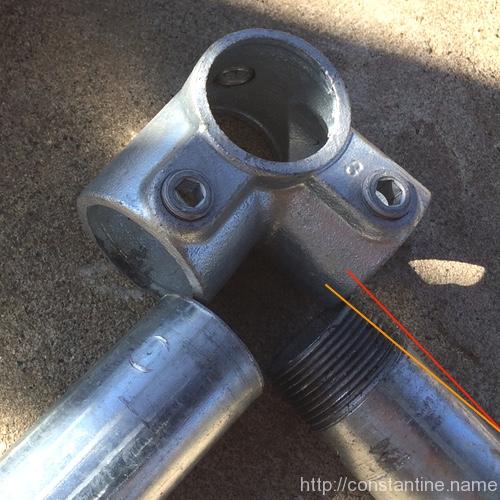
I’ve drawn the red line parallel to the pipe’s side and offset a little so you can still see the pipe. I’ve drawn the orange line parallel to the threads (and offset a bit so you can see the threads.) Now, the pipe on the left could touch the inward land at the end of the pipe (because no taper). But the pipe on the right has it’s diameter reduced slightly by the thread cutting producing a tapered end. So if you put the threaded pipe in so the threads just reached the inward land then the pipe (or the clamp) will be pulled slightly on an angle as the pipe end has to be driven just a smidge farther to reach the land.
So it turns out that if you know this little detail you can do things like orient all the 3-foot pieces (which all have a thread on one end) the same way, and insert them all father into the clamp body so the unthreaded pipe body reaches the inward land. To do that you have to not insert some other pipe into the clamp and occupy the middle space. You’ll see an example of this in the first build. And this little trick about how to insert threaded ends just a little farther only makes sense once you understand lands and how the clamps work.
Look away, insanity ahead: So know you understand that pipe threads are bad for our scaf build. What to do? Easy, buy all your pipe by the bundle via freight without the threads. (Wee! …thousands of dollars.) Or, on the longer pieces where an inch doesn’t matter (you know, those 7-foot pipes Depot cut for you from 10-foot sticks) just cut the threads off the end of each pipe with a hacksaw. Or cut all the threads off all the pipe and deal with the fact that your scaf all has an inch missing here and there. Or, go full-on insanity mode, buy a lot of extra pipe from Depot, cut all your scaf pipe in perfect integral-foot sizes withOUT the threads, and recycle all the odd-sizes you end up with. (Bring the pipe home uncut, start with a 10-footer, cut off an inch, cut off a 7-footer, cut off a 2-footer, throw away the other few inches. etc. You can make a 9’10” stick, one-8-and-one-1, 7-and-2, 6-and-3, 5-and-4 if you’re willing to make a ZILLION hacksaw cuts.)
In the beginning, remembering which way to orient the 45° single outlet tees can be tricky (because they go onto different pipes at different times as you’re assembling). But beyond that, angle braces are actually pretty hard to assemble well.
Exercise: Let’s look at this photo and make some wild guesses about of what might be going on…
The best way to assemble these angles is to slide the clamps along their side pipes, and insert the brace pipe into both clamps at once. Then, get one end of the brace pipe on both lands (without inserting it so far that it hits the other side pipe in the tee), and tighten the screw moderately. Next, do the other end of the brace. Hopefully, you can still wiggle and shift the clamps on the side pipes, because you need to orient the brace so that both of the clamps will land correctly when you tighten the screws to lock them onto the side pipes. You will only be able to make all four lands on the side pipes touch if the corner is close to a 90° angle. Sometimes you land/clamp the ends onto the brace piece, only to discover that you can then not get the clamps to land perfectly on the side bars. But, if you get all eight lands to touch, you will have an insanely strong corner. Unfortunately, building good angle braces is something you just have to learn by doing.
Bam! You’re now a clampion. (What’s with the puns? I know, right!) But, as I sad at the very beginning, I wish someone had put all this together in one place when I started. Having read to this point, you have now just saved yourself about a year of “learning the hard way” about how to build with scaf.
ɕ