These plans are for building a vault box. This is not easy. You’ll need some good circular saw skills, patience and a lot of labor. Read on!
The original, in case you have a hardcopy, is online at
https://constantine.name/vault-box-build/
Drop me an email: Comments, questions, and suggestions for improvements are welcome. Best of all would be if you sent me some photos of what you built, preferably a big group photo of you on them, or using them or whatever. My email is my first name, craig, at this domain. (Yes, this is a “.name” domain.)
(The original design of this project is still available at, How NOT to build a vault box.)
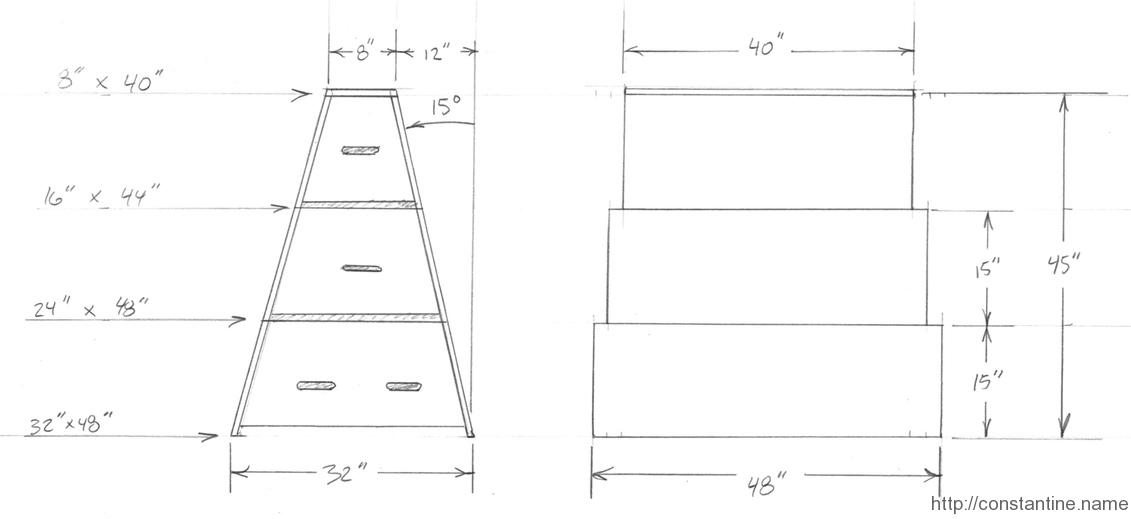
Overview
Notes
Read these notes. They are IMPORTANT.
- SCREWS – Do NOT use “drywall” screws! (They are too weak.) Use screws which are intended for building decks. “Deck Mate” is a brand commonly available. This entire project uses 2-1/2″ screws. The screws should come with the driver bit inside. The number of screws specified in the plans is also important.
- PILOT HOLES – You should drill a 1/8″ pilot hole for EVERY screw. (Through the plywood and way into the 2x4s. The screws will still have plenty of purchase.) In the corners, you’ll be putting a lot of screws in close spacing; Pilot holes keep the 2x4s from splitting.
- COUNTER-SINK – If you want the box to come out really nice, use a purpose-built “pilot hole bit” that has a countersink shoulder on it; Pilot hole and countersink in one drilling. That way the deck screws will go in flush without having to smash-drive the screw down into the plywood. (Which can cause some splitting/peeling of the plywood near the edges.)
- GLUE – If you want to ensure the box never squeaks, put a little wood glue between the surfaces before you screw them together.
- CIRCULAR SAW CUTS – Circular saws are seriously dangerous. Circular saws do not “cut” you, they will AMPUTATE your fingers, hand or leg. (Only chain saws send more people to the hospital.) Know what you are doing! To get the box to work out well, you have to make laser-straight cuts; So you have to understand how to cut with a saw guide. Don’t cut freehand. It won’t work out well.
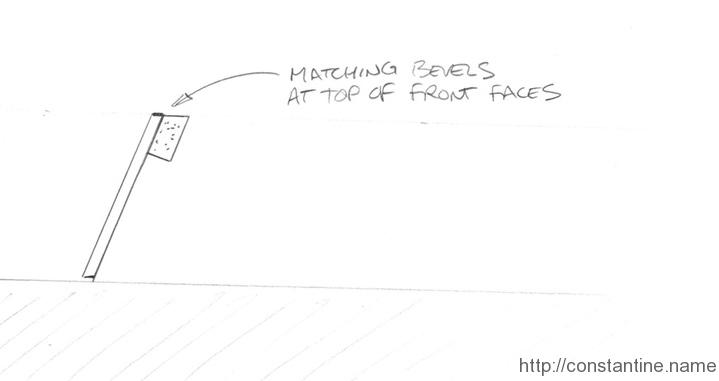
 BEVELS – The plans call for “bevels” in many places. This always means: Set the bevel angle on the saw and pay attention to the direction of the cuts. Because circular saws only bevel in one direction, if you cut in the wrong direction, the bevel will be backwards!
- HANDLES – The plans don’t explain how to make the handle holes. Just draw a line, mid-height on the end of the finished box. Drill two 1″ holes about 5″ apart. Cut between them with a reciprocating saw, and file the edges. (We put two handle holes on each end of the biggest box.) You DO need the handle holes because . . .
- RATCHET STRAP – You need one ratchet strap. When you stack all three boxes, you’re likely to dislodge them. So you hook the bottom box via one handle, pass the strap through the top box’s handle holes, and then back down to the bottom box on the other side. Then ratchet the stack into a rigid block.
- SANDING – This isn’t furniture, but a quick, (if you use an orbital sander) pass with 60 grit will really improve the surface of the boxes before . . .
- PAINTING – Is of course optional. The two sheets of plywood have a total area of 64 square feet. Very little ends up being scrap, but you also have some edges and handle holes to paint. So just use 64 square feet when figuring out how much paint you need. (We mixed fine sand into gray deck paint.)
Material List
- Five, 8′ 2x4s. Cherry pick the lumber; you need straight, square, etc. …the best you can find.
~ $15 - Two sheets of 3/4″ plywood, (not OSB – Oriented Strand Board.) You can buy whatever plywood you like, but you should be able to get “good enough” plywood for less than $30 per sheet.
~ $60 - About 190, 2-1/2″ deck screws, and a 1/8″ bit for pilot holes. “Deck Mate” brand screws come in 1 pound (~$7, ~84 screws), 5 pound (~$25 ~420 screws) and 25 pound (~$100, ~2100 screws.) Buy screw quantities based on how many boxes you actually build. But for one box:
~ $20 - Paint, if you’re painting, for 64 square feet, (and fine sand to mix in if you want to go all out.)
- …and one 12 foot ratchet strap.
~$12 (for four straps)
End faces
All of these cuts are with a 0° bevel.
- Cut a 45″ piece from one sheet of plywood. (Save the 48″x51″ piece for making the tops of the boxes.)
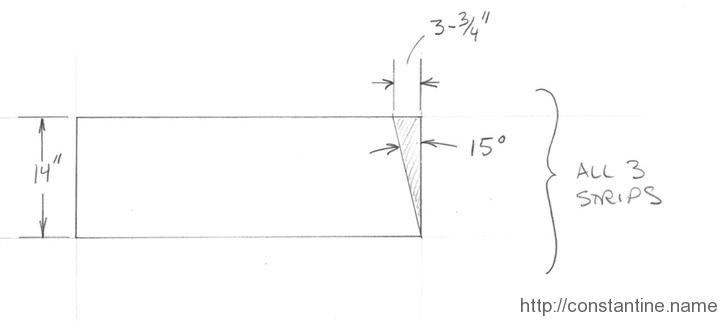
- Cut three, 14″ wide strips. Cut parallel to the 45″ edge so each strip is 45″x14″.
- For all three strips: Measure 3-3/4″ from one corner, and cut diagonally across to the other corner. (This 3-3/4″ cutoff, on the 14″ wide strip, makes the 15° angle for the front faces’ slope.)
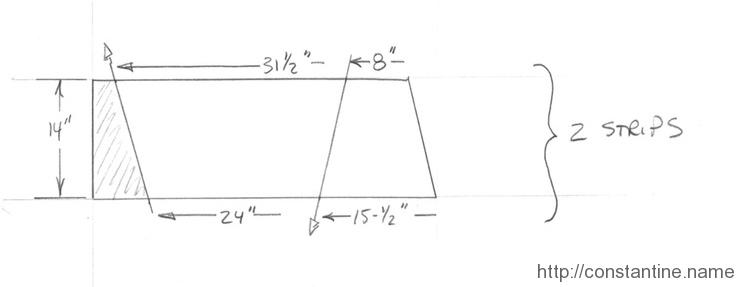
- Cut two of the strips as follows: Measure 8″, and 15-1/2″, as shown, and cut. Then measure 31-1/2″, and 24″, as shown, and cut. (Repeat on the second strip.) These four pieces will be the end faces for the top and bottom boxes.
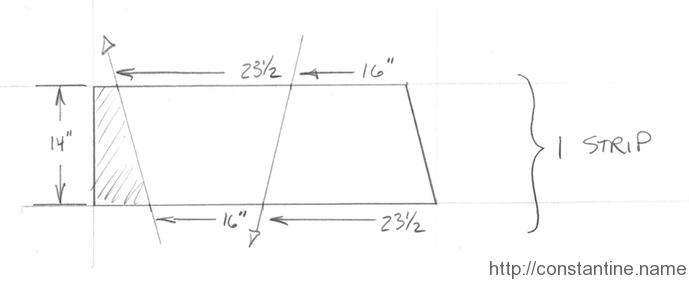
- On the third strip: Measure 16″, and 23-1/2″, as shown, and cut. Then measure 23-1/2″, and 16″, as shown, and cut. These will be the end faces for the middle box.
Front faces
- Put a 15° bevel on the 48″ edge of the other full sheet of plywood. (Trim as little as possible off.)
- Cut (15° bevel) off five strips 15-1/2″ wide.
- Reverse cut (15° bevel) the last strip to 15-1/2″. (Support the right side of the plywood and drop the narrow cutoff to the left.)
- Set aside two of the strips to be the front faces of the bottom box.
- Cut (0° bevel) 4″ off two of the strips. (The front faces of the middle box.)
- Cut (0° bevel) 8″ off the last two strips. (The front faces of the top box.)
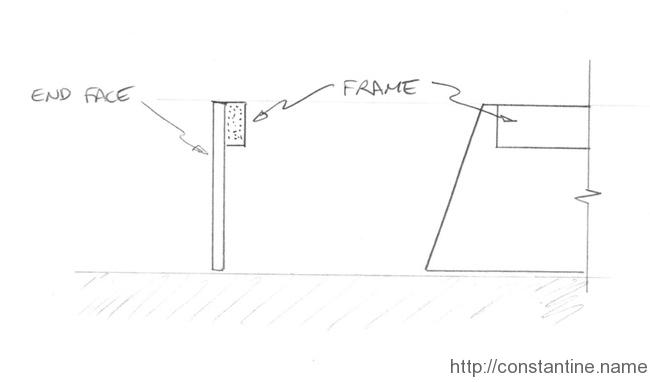
End faces framing
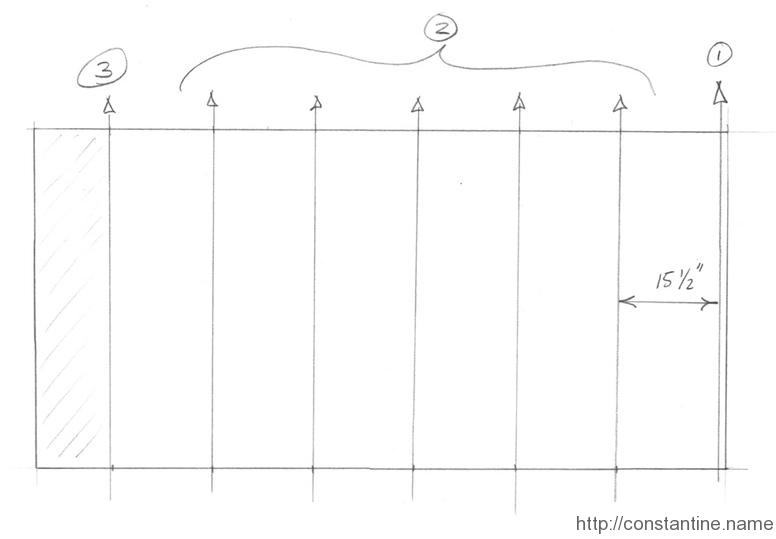
- Cut (0° bevel) one 8′ 2×4 into six pieces: two pieces 23-1/2″, two pieces 15-1/2″ and two pieces 7-1/2″. (There will be about 3″ of 2×4 scrap.)
- Attach one piece to the top, (the shorter edge) of each of the six end faces. Use a line of wood glue, and three, four and five screws to attach the three different lengths. (24 screws total for the six end faces.)
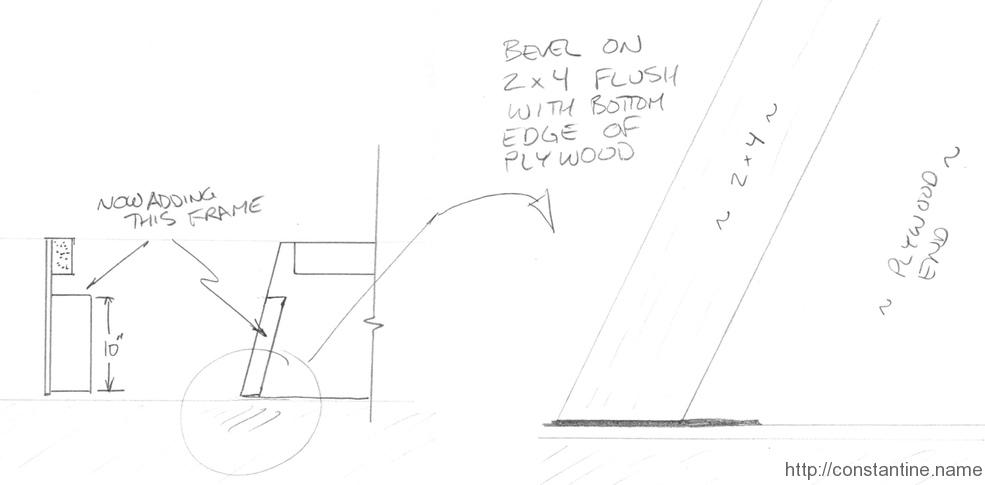
- Using two 2x4s: Cut (15° bevel) six, 10″ pieces, leaving a ~36″ piece. (So you have twelve 10″ pieces, and two 36″ pieces.) Save the two 36″ pieces.
- Attach a 10″ piece to both edges of all six end faces. Use four screws on each 10″ piece. (48 screws total for the six end faces.)
Front faces framing
- Rip (15° bevel, removing a little as possible) two 8′ 2x4s.
- Cut (0° bevel) both 2x4s into 30″, 30″ and 36″ pieces. (So you have four 30″ pieces, and two 36″ pieces.) Save the two 36″ pieces.
- Attach the four 30″ pieces to the top edges, (centered) of the TOP and MIDDLE front faces only. Use five screws on each 30″ piece. (20 screws total.)
Assembly
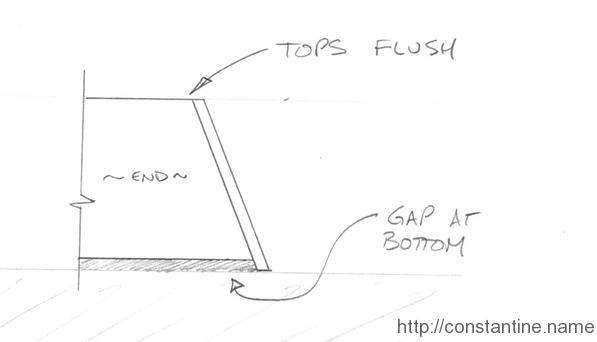
- Screw the front faces to the end faces. Put four screws, through the front face at each corner. (48 screws total.) Be sure you align the TOP edge of all the faces. (That will leave a ~1″ gap at the bottom of the end faces.)
Box tops
- Put a 15° bevel on the 48″ original edge. (It’s important to start on the correct edge.)
- Reverse cut (15° bevel) a strip that fits the full width of the top box. (Should be about 9-1/2″ wide.)
- Cut (0° bevel) the strip to length. (Should be cutting off about 8″.)
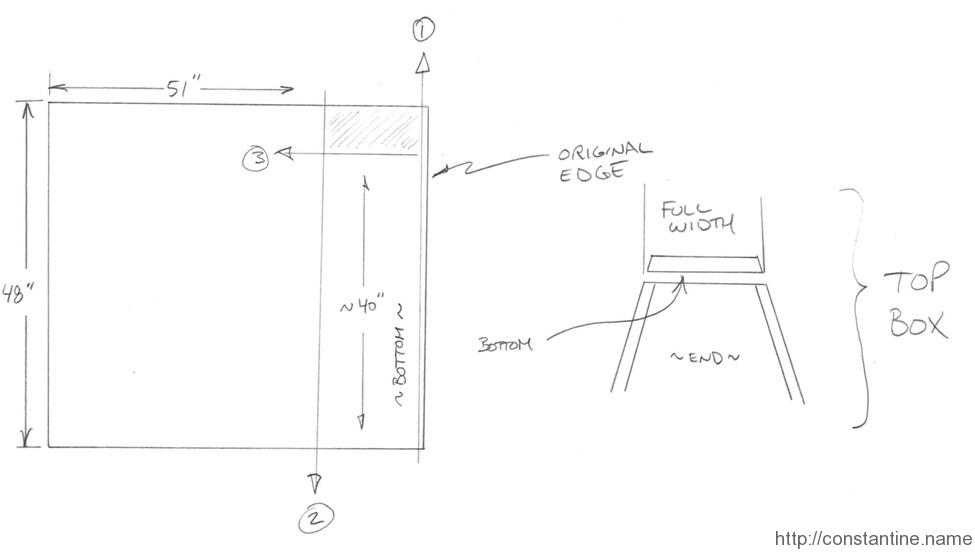
- Attach it to the top box using three screws on the end face edges, and five screws on the front face edges. (16 screws for top box.)
The tops for the middle, and bottom, boxes are done slightly differently:
- Put a 15° bevel on the 48″ edge, (the edge you just reverse cut.)
- Measure the inside width of the box above; Measure right at the bottom edge of the box’s sides, but find the smallest width and use that measurement. Reverse cut (15° bevel) that width.
(Compared to before where you measured the width of the top of the box, this ensures the “mouth” of the box above will fit over the top of the box.) - Cut (0° bevel) the strip to length. (You’ll cut about 4″ off for the middle box, and the bottom should use the full 48″ as-is.)
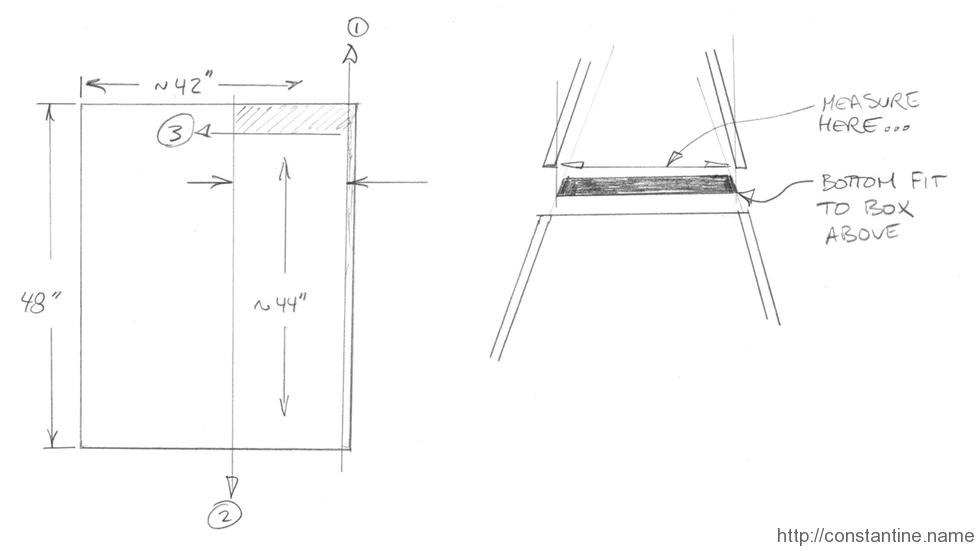
- Middle box: Attach the top using three screws on the end face edges, and five screws on the front face edges.
Bottom box: Attach the top using just three screws on the end face edges.
(22 screws for these two boxes.)
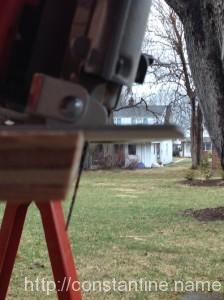
Finally, the bottom box needs framing to support it’s top.
- Flip the bottom box upside down.
- Cross braces: Using two of the left-over 2x4s, (the pieces without a bevel) trim them to length (15° bevel) so they fit against the underside of the top of the box. Both ends of each 2×4 should be beveled to touch the front faces of the box. Space them evenly and lay them in place.
- Ledgers: Using the two left-over 2x4s, (the pieces that have bevels) position them against the box’s front faces. They should lie against the front face, and the beveled edge goes against the cross braces to support them.
- Stand on the ledgers to press them against down onto the cross braces, and put five screws through the plywood into each ledger. (Watch your feet! :)
- Flip the box right-side up.
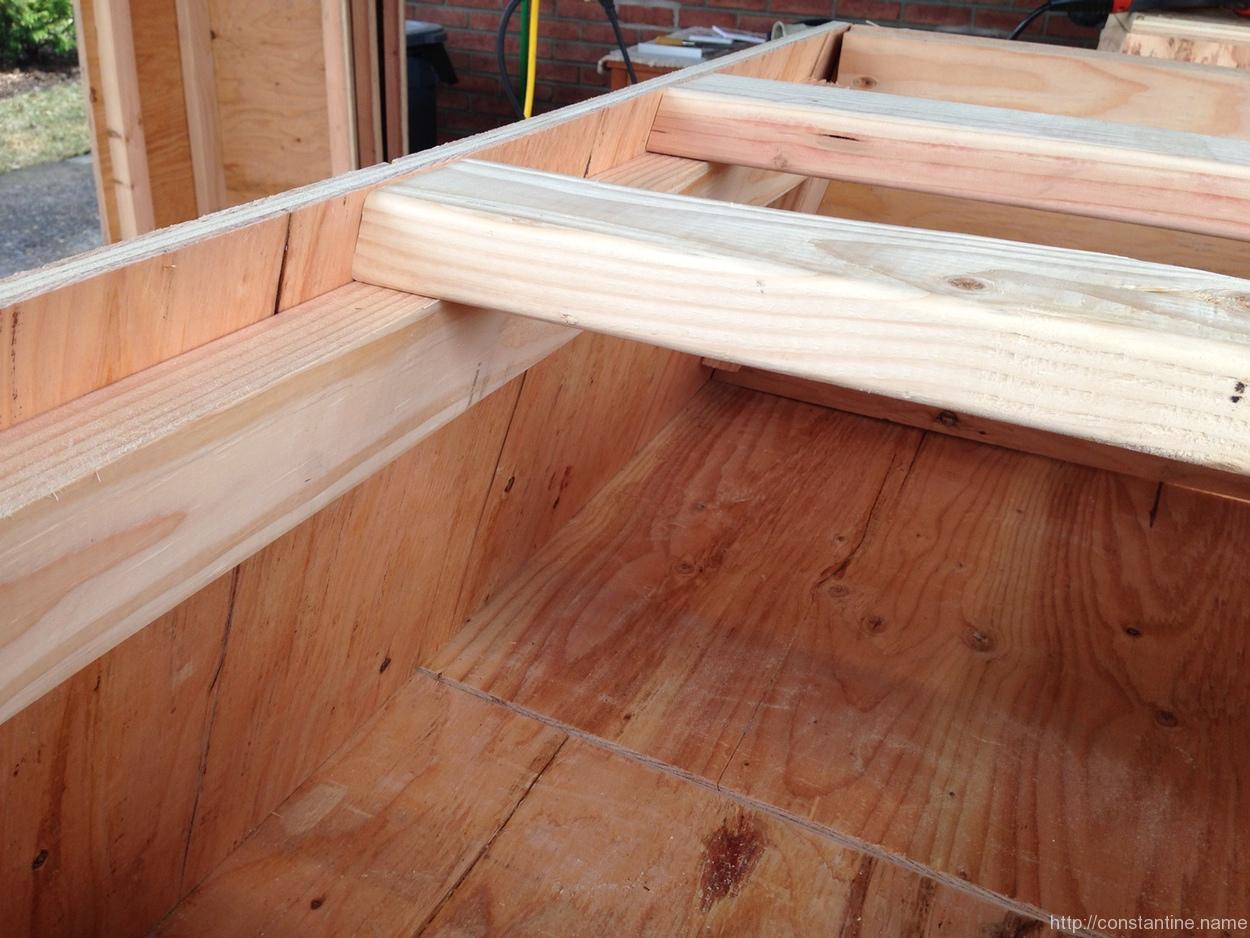
- Put two screws, down through the top of the box, into each of the cross braces. (Just to prevent them moving or rattling.)ASIDE: Here’s a photo of a bottom box, without it’s top sheet of plywood, so you can see how the frame works to support the top sheet. You can assemble it this way too: Use clamps to hold one horizontal ledger in place, fit the cross-braces, clamp the other ledger, and then screw the ledger in place. You can screw into the end of the cross brace, or get longer screws and drill down into the ledger. Throw the top sheet on and put a couple screws down into the cross braces.
Copyright
"Vault box design 2, stepped sides"
Copyright (C) 2014 Craig J Constantine

This information is free; you can redistribute it and/or
modify it under the terms of the GNU General Public License
as published by the Free Software Foundation; either version
2 of the License, or (at your option) any later version.

This work is distributed in the hope that it will be useful,
but WITHOUT ANY WARRANTY; without even the implied warranty
of MERCHANTABILITY or FITNESS FOR A PARTICULAR PURPOSE. See
the GNU General Public License for more details.

You should have received a copy of the GNU General Public
License along with this work; if not, write to the Free
Software Foundation, Inc., 51 Franklin Street, Fifth Floor,
Boston, MA 02110-1301, USA.
Revisions
- April 2014 – First version of these plans.
ɕ