§1 – Introduction

(Part 1 of 5 in series, Travel Gear)

This series covers all the physical things I’ve discovered which make light-weight traveling easier and more fun. (My thoughts on the philosophy, etiquette, and mindset of traveling are in a separate series.) This series of posts is only meant to give you ideas; I certainly don’t expect you use the exact same solutions. For me, the challenge was not to pack as light as possible, but to pack as light as is reasonable.

I’ve read countless articles on travel, written by everyone from ultra-light hikers to seasoned business travelers. Sometimes, I stumbled over useful ideas and then figured out how to apply them. At other times I went searching for a solution to some specific problem I was having. Over the years, I’ve come up with a collection of items, and related tips and tricks, that I find extremely useful.

It’s obviously important to know what to pack, and to be able to pack well. But I believe the most important part of traveling “light” is developing two habits: unpacking and reviewing. Unpacking ensures I’m always ready, and reviewing ensures I’m always improving. The next two parts of this series will go into these two habits.

Why

But first, why travel lightweight? Why not simply grab the largest bag I have, stuff it with everything I might need, and head out the door? Why spend time and money fiddling with travel gear and solutions? I found my answers to those questions by sorting out the following: I’m most free when I have just the clothes on my back, but I will be unhappy, stressed, or in physical danger when I don’t have whatever-it-is that I happen to need. So at the most basic level, packing light is simply the balance of freedom versus preparedness.

There is also a deeper mental level to that balance. Do I feel free and relaxed, or am I worried? For me, it turns out that simply packing more things does not make me feel more prepared or relaxed. Rather, it’s the idea that I know I am prepared which enables me to be comfortable.

Clearly, the less I have to carry, the easier physically are my travels: In a packed car, my bag can fit on my lap. On a bus, it fits in the over-head, where it’s handy through the trip. On a plane, I can travel with just a carry-on-bag, saving me time and money on checked baggage. It’s also easier to not unpack — to just live out of the bag at my destination. It’s quicker to settle down in the evening, and quicker to pack out in the morning. It’s even easier to keep track of my stuff the less of it there is.

Certainly, there are lots of challenges and trade-offs with traveling light. It is not all champagne and roses. But by investing the time to solve problems and get better at the process, I’m able to have a lot more fun. So my challenge was to pack as light as I can, and still have everything I need.

My first task was then to figure out, “What exactly do I need?”

How

The more I dug into these ideas, the more I realized that the only way to know I was prepared — to truly feel prepared — was to thoroughly examine what I was packing and carrying. I wound up asking myself a litany of questions and exploring the answers and solutions: Why am I uncomfortable right now? What could I have brought that I could use right now? I never used this thing-i-packed, so why did I bring it? I’m exhausted after carrying my pack all day; Why does it weigh 30 pounds?

This process of examining all my worries, habits, and situations led me to search for solutions. My habits of unpacking and reviewing, which I mentioned at the beginning, are the result of all this questioning and refining of my travel gear.

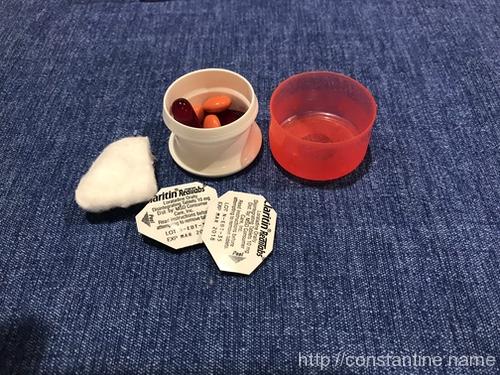
Along the way, I learned to not pack based on fear or uncertainty; To not pack anticipating everything that might go wrong. Instead, I learned to prepare only for the scenarios that matter — safety items, spare cash, medication. I also learned to feel comfortable in knowing what I could obtain at my destination if things didn’t go according to plan. This became a sort of “anti-packing,” where I learned what not to pack.

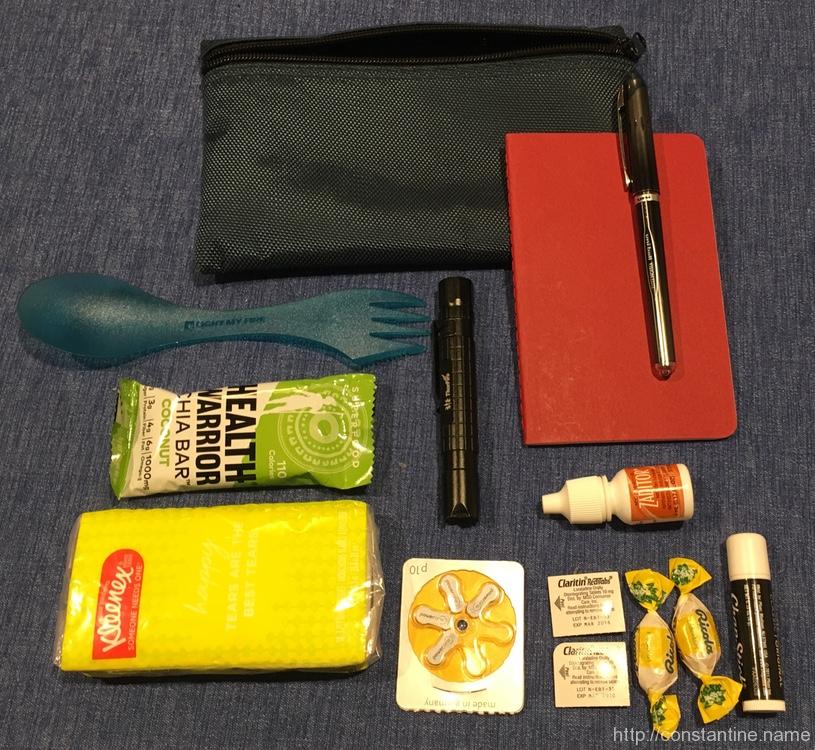
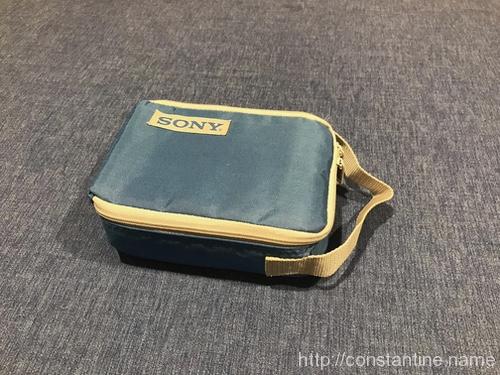
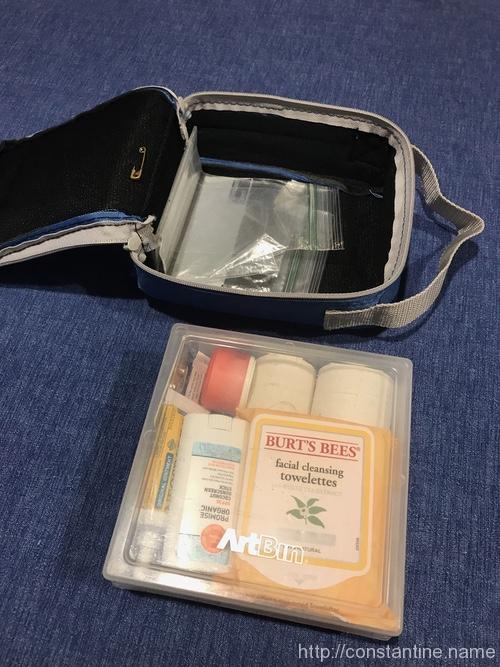
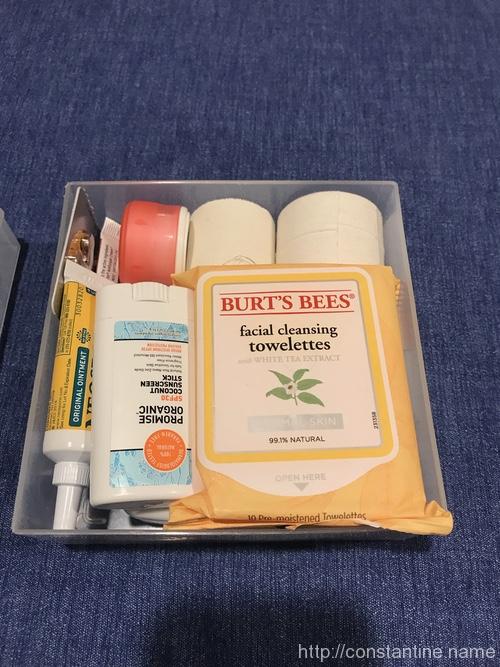
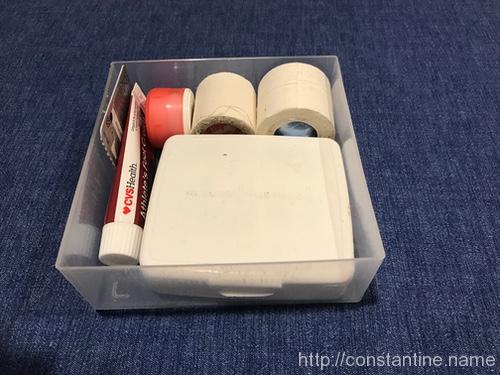
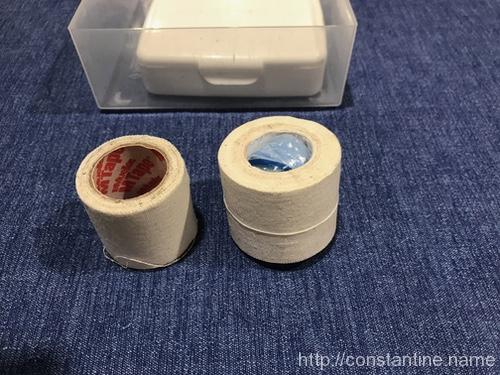
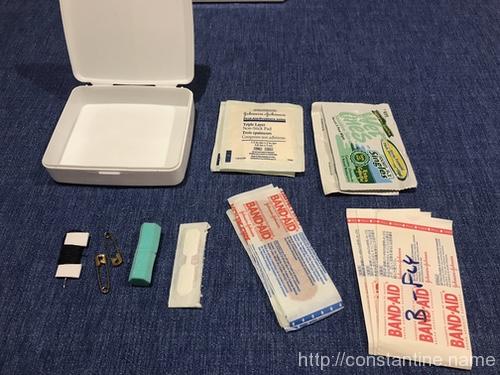
Eventually, I wound up with “systems”, or “kits”, for just about everything. A sleep system, in one stuff sack, that has everything I need to sleep on a bare floor. A bathroom kit, in one zipper-bag, which has everything I need for bathing, shaving, etc. A medical/urgent kit (the “m’urgency” kit) that has what I frequently use, plus what I feel is sufficient for common urgencies.

The more I tuned my gear and systems, the easier packing became. These days, I don’t grab my toothbrush out of the bathroom, find my razor, and wonder what soap may be at my destination; I pick up the small, black, zipper-bag that is my bathroom kit. If I might be sleeping on the floor I grab my sleep system. I always grab the m’urgency kit. I grab the clothes I want, and a stuff sack to pack them. I add in various other things, (described in coming posts,) grab my favorite backpack, stuff the contents, and go!

An exercise

If you really want to get a feel for how much your packing improves, try doing a “test packing” as a starting point for future reference. Note the time, and go pack for a 5 day, 4 night Parkour trip. Let’s presume mild weather, sleeping indoors but on a bare hardwood floor. Let’s say you will be training 3 of the days. Pretend you have no idea what the host conditions are, but assume you have access to a bathroom, shower, wifi and whatever electricity outlets you are used to. (Dealing with not-your-usual electrical systems is a post in this series.) When you are ready to walk out your door, note the time again. Now weigh your stuff and write down the time it took to pack, the weight, and maybe some notes about how you’d feel carrying all that stuff while trying to board a bus, a plane or hop in a car.

Now, as you put everything away, imagine dropping all that on the floor at your host. What if they have to move it while you’re out for the day? Is their dog/cat/toddler going to get into your stuff? Maybe also note your worries: I don’t have a sleeping bag or pad for sleeping on a floor! How do I dry my hair? Look at all these clothes! What if this trip had been to a place with weather extremes, say, you had to train outdoors in freezing temps? What if you knew you’d be video recorded during one of your training days? What if your destination had different electrical power? What if someone threw, or sat on, your bag?! What if… What if…

Recall the two habits I mentioned: unpack and review? You have just done your first unpack and review after an imaginary trip!

ɕ

§2 – Unpacking

(Part 2 of 5 in series, Travel Gear)

Every time someone was looking for something my grandfather would bark out:

Put it where you got it! It’ll be there when you go for it!

When I was little, I thought that was pretty cool. Turns out it’s a variation of the old adage:

A place for everything, and everything in its place.

Unpacking begins with things having a place

In certain productivity and self-improvement circles there is an idea called Clearing to Neutral. Simply put, when ceasing work on something think ahead to the next time a task will be worked on, and eliminate as much start-up friction as possible.

Having all your travel and packing items in their place means packing for a trip is simply taking things out and putting them into your bag. (And perhaps some things should simply be kept in your bag.) That’s as close to zero-friction as possible. So clearing to neutral suggests I prepare for the next trip by immediately putting everything away.

So where to keep the stuff? The first iteration is to simply have a pile of things on a shelf, or in a drawer, where you know you keep “the travel stuff.” The next iteration might be a dedicated bag, or large box. But the best solution I’ve found is to use translucent plastic filing tubs. (For example, these filing tubs.)

These tubs are perfect; you can see what is in them and they are easy to handle. I have one which holds things I grab most frequently; for example, my micro-flashlight and M’Urgency kit. I have another tub which holds the less-used random stuff; for example, the replacement o-rings for my flashlight, those little toothpaste tubes the dentist gives me, refills for my cartridge razor, and my rarely used, travel laundry kit. When packing, I just pull the tubs out and grab what I need.

The tubs can be stored on a high shelf, on the floor in the back of a closet, or in the garage. Regardless how exactly you store your travel gear, it should have a dedicated home where things don’t get dirty, lost, or eaten by your cat.

Exploding

So now everything has its place, and I’m mentally prepared to spend time putting things away when I return. But I have a problem: When I return, some — often most — of my stuff is not ready to be stored.

I gave out a bandaid from my M’Urgency kit which needs to be replaced. The sheet from my sleep system needs to be washed. I lost a zipper-pull on my backpack that needs to be replaced. My flashlight needs a new battery. My razor needs a new cartridge. I need a new bar of soap. …and on and on.

Each of these issues is a very small thing to take care of, and it is tempting to leave these small tasks for later. But this is exactly the moment where a little work now leads to zero-friction later. This is where the magic of clearing to neutral shines. All of those little issues would slow me down — or worse, leave me in the lurch during a trip — when next I pack to travel. By taking care of them when I return, I eliminate all the friction and make packing a breeze when the next opportunity arises.

If I’m exhausted, I may simply set my bag down and go to sleep. But when I’m ready to unpack I explode everything in one place. I pull everything out and if it’s ready to store, (that is to say, it is ready to use again when I next travel,) I put it away immediately. If it needs something, I leave it in the exploded area. Normally, this is right in the middle of the floor, in the middle of a room. So the goal is to clean up the entire pile. Laundry into the laundry basket, or better yet, right into the washing machine. Get a fresh battery, change it and put the flashlight away. Grab a spare zipper pull and fix the backpack. Grab a bandaid and razor cartridges from the spares tub and fill up the M’Urgency and bathroom kits; then put them away. Zip, zap, done.

Aside: I clear everything to neutral. Years ago, my Hueco backpack came with spare zipper-pulls. I put them in a ziplock bag, with a 3×5 card that says “spare zipper pulls for Hueco” in the tub of less-used items. By the time I lost a zipper-pull, I had completely forgotten it had come with spares. But I knew that _if_ I had spare zipper-pulls, they’d be in the less-used tub. And there they were!

Using processes like this will expand outward into the rest of your life. I just used the last of the spare razor catridges from the storage tub to refill my bathroom kit? Add “razor cartridges” to the shopping list that we keep in its assigned place, so everything is on the list when someone goes to the market. Go to the market, buy what is on the list.

As you’re unpacking, sorting, cleaning, repairing, etc all your stuff, you’ll find you’re automatically reviewing; Which is the next part of this series.

ɕ

§3 – Reviewing

(Part 3 of 5 in series, Travel Gear)

This third part — the last of the think-y pieces, I promise! — is about the process of reviewing and continuous improvement. The subsequent parts of this series are small ideas and inspirations about the literal things to take with you traveling.

Hey, great trip. Welcome home. Drop your bag. Sleep if you need to. But now it’s time to review!

Overture: Missing or broken.

Here you’re reviewing the things you did not have with you. You’re trolling your recent experience in search of things to add to your packing. Either things to always carry, or maybe just things to have on hand, ready to pack, to give you more options on future trips.

If you recorded any notes, (“I wish I had brought…,” “Widget is broken,”) go over those notes and turn them into decisions:

Buy some thing, (or add it to your general list of things to do, “buy this thing when I have spare cash”,) find a solution for some problem, (or add “find solution to the problem” to your to-do list,) etc. Then get rid of the notes!

Aside: Those notes are the result of what is called “capture.” You had an idea, you captured it, but that’s not a solution. You have to convert that “captured” item into something; buy it, fix it, or turn it into however you keep track of things to do.

Beginner level: Did I use it?

As you handle everything you’re unpacking, ask: Did I use it?

YES? Great, put it away. (Working it to neutral of course! Wash it, refill it, fix it, etc.)

NO? Why did I pack it? Should I pack it next time?

Some things always get a pass. For example, my medical/urgency kit usually does not get used, but I’m always going to carry it. Ditto for a few things like my travel flashlight. I put all of these “they get a pass even though I did not use them” items away first.

Anything left? Great! These are your first batch of things to review. Ask yourself: Why did I pack this in the first place? What was I thinking? What was I preparing for? In the future, would I be ok without this?

Aside: I once went over-night hiking along the Appalachian trail. Although we were planning to stay in a shelter, we brought a tent in case the shelter was full. I carried a hammer in case we had to drive tent stakes. I brought a hammer on a hike along a mountain full of rocks on the chance we might need to drive tent stakes. By the end of that hike, I had learned a very important lesson about carrying things which I only _might_ use.

Intermediate: Start keeping track of what you pack.

Along the way, I started keeping lists– eventually very detailed lists– of everything I packed. I started by writing a list of what I was thinking of packing. Then as I packed, and added or decided against packing items, I kept the list up to date. When I returned, I would sometimes add notes about things I didn’t use, along with my decisions about whether I should pack that next time. For me this was particularly helpful for some of the less-used things I kept forgetting.

At the “Beginner” level, we gave a pass to anything we used. But at this level, we want to start thinking about anti-packing things even though we’ve used them.

Advanced: Actively removing items and weight.

Once you know what you are packing, you can go after obvious things to save weight and space:

One of the heaviest things in my bag turned out to be my iPad with its attached keyboard-cover in a Pelican case. I realized that for $20 I could buy a smaller version of the same keyboard cover, which not only weighed less, but also fit into the next size smaller Pelican case. This ended up being a huge weight and volume savings.

I travel with an external battery and charge devices from the battery. I charge the battery when power is available. I realized that I never drained the battery completely, and sometimes I’d go entire trips without recharging the battery. Since I was already carrying the charging cable and power brick, I bought a smaller battery which weighs half as much.

Soon I had “minimized” all the big items, and reached a point where I could fit everything I needed into my bag. At this point I was traveling comfortably. As my trips became more complicated and involved more movement, (walking longer distances, more complex transportation combinations, etc..) it became obvious that weight was the limiting factor.

I eventually went so far as to weigh everything. I literally weighed every individual item, to the gram, and put them in an outline with sub-totals. I can literally pack using the outline and predict what the final pack will weigh.

Why on Earth would I want to do that?!

When I had things in an outline with sub-totalled lists, I could look at each unit, (M’Urgency kit, bathroom kit, sleep system, etc) and look at the heaviest ones. I could then search for solutions to shave weight a tiny bit at a time. It adds up, and I was easily able to turn a 30 pound pack into a 25 pound pack, and know exactly what to pack if wanted to set a weight limit. (For example, if I know I have to be out-and-about for long periods with my entire pack. I can pack ultra-light sacrificing some comfort of course.)

Wrap up

This part concludes the large introduction pieces of this series. The following parts are actually the parts of the series which I first began writing. As I collected and organized them, I realized I needed to capture all the information in these first posts.

I hope you’ve found these introductory parts useful, and I hope you find more useful ideas in the following posts!

ɕ

§4 – Handy Items in a Grab Bag

(Part 4 of 5 in series, Travel Gear)

The bag

http://www.cumberlandconcepts.com/shop/medium-zipper-bags-2/

Cumberland Concepts “medium” bag (available in a slew of colors).

This bag is quite small. That’s the point: It’s it’s easy to grab and easy to stuff into whatever it is you’re carrying that day.

What and why

This little bag provides convenience and a bit of insurance. (Its exact purpose depends on what you decide to keep in the bag.) It is easy to prepare this bag, and it requires very little maintenance to keep it ready-to-go. By purposefully setting it up, you will beginning thinking intentionally about packing. You will begin building the habit of thinking about why are you packing, what do you need, what do you want, and balancing the answers against how much you want to carry around.

Following is a list of ideas intended to spur your thinking. I have no idea what you will want to put into this bag. There are surely some items you’ve wished you had, but which would be impossible to individually remember to always bring, and there are some important-in-a-pinch items that could be priceless insurance in rare situations. As you read this list, imagine scenarios where you would smile when you realized, “oh! I have [item] with me!”

  • Small notebook and pen/pencil
  • Epi-pen
  • Pocket knife
  • Medication
  • Micro flashlight
  • Pack of tissues
  • Some spare cash
  • Something to eat
  • Spare identification

ɕ

§5 – M’urgency Kit

(Part 5 of 5 in series, Travel Gear)

I sometimes call this the “M’urgency” kit as it covers both emergency and urgency situations. After the small convenience bag, this is my most-used, ready-to-go item.

First off, you have to decide wether you need a full, commercial, medical kit. If, like me, your primary concern is the common items you need, then I recommend going the route described here. There’s an unavoidable trade-off between size/weight and preparedness which you have to evaluate for yourself.

Deciding what to include was difficult. I began by searching the internet for emergency kits, but all of them had way too much stuff. On the other hand, I could create two separate kits: A micro-sized kit of a few ounces, and a larger one for more serious traveling. In the end, I settled on the kit described here as the best of both worlds. It is worth its weight in gold. Any time I have a bag, this kit is inside.

I’m a huge believer in having things pre-packed. “Containerizing” everything does use some additional space and weight, but it’s worth it if you can find the perfect size containers. For this kit, you want a sturdy container that will resist crushing, since this kit is going to take tons of abuse; It will be thrown around, leaned on, jostled and stuffed in/out of bags countless times before that one day when you need it.

My kit began with a clear-plastic “art box” — unfortunately, I’m not sure where this box came from. In my first iterations, I used this box, held closed with some rubber bands. One day I realized that this box would fit inside a zippered-bag I had laying around. The bag was an ’80s cassette-tape case, which I literally had from the ’80s for storing cassettes. I tossed the cassettes and the internal hard plastic organizer, and the art box fits easily but cannot open once zipped inside.

Eventually, the already tired case came apart and I had to buy a new one off eBay. You might have trouble finding these now because I bought most of them off eBay when I realized they were becoming rare. Since they are different colors, they are easy to find when rummaging in a backpack. (Another one of these bags will appear in a subsequent post.)

  • large, heavy-duty plastic bag for every time I wish I had a bag for trash, food… and emergency phone storage when getting soaked unexpectedly.
  • safety pin; pinning, but also can eject SIM cards
  • …and the plastic box; the really hard part is to pack the box so it does not rattle when you shake it :)
  • facial towelettes are awesome; a bathroom sink, one of these used for more than “face”, and a clean shirt.
  • I don’t normally use sunscreen; but the day you need it a swipe-on stick of facial sunscreen can save you and several friends
  • next layer down (I’m a child of Tetris :)
  • save some athletic tape rolls near their end and they fit. Useful for taping anything of course. Similar to wrapping some tape around your water bottle for random use
  • there’s a space in the tape rolls!
  • on the right is a tiny plastic bag with 3 nylon gloves. Yes three, because you always tear one.
  • this tiny little pill holder is amazing. You can open it with one hand by pinching it anywhere around it’s middle and it *clicks* open immediately.
  • packed in here are my preferred selection of drugs. A few standard pain killers and my preferred allergy drug.
  • the cotton ball ensures things don’t rattle. Here, it’s important to keep the pills from jiggling into powder as well as to eliminate noise.
  • top row…
  • a small band-aid box I found somewhere. It was a standard pack of various band-aid sizes which I’ve repurposed.
  • couple of small gauze pads and some alcohol wipes
  • bottom row…
  • a needle and a few yards of thread
  • two safety pins
  • disposable ear-plugs
  • small and large butterfly “sutures” and band-aids

Clearly, this also requires some maintenance. What I usually do is any time I use something (say, I give someone some Advil) instead of refilling the pills, I toss ALL the pills and replace the stockpile to keep them fresh. Anything you keep in here can go out of date or dry up etc. and keeping this kit “fresh” is as important as creating it in the first place.

As I said at the top, I don’t expect you to build this exact kit. :) But I do hope that it has given you a few ideas for what you might want to keep on hand.