Scaf 101: Parts list

This entry is part 2 of 13 in the series Scaf 101

You need about $450 for everything in the set I’m describing in this series. You’ll need a bit more if you need all the tools, and want to make the wooden “feet” too. …or a smidge less if you have the tools already and skip the feet. (But I suggest you build the feet too. You’ll be happier down the road.)

Clamps

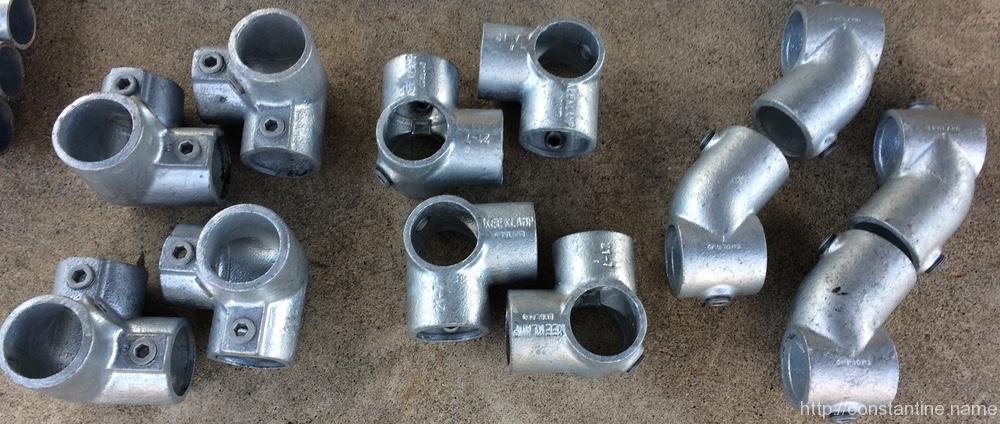
You need only 12 clamps for this set. They’re pictured below, left-to-right.

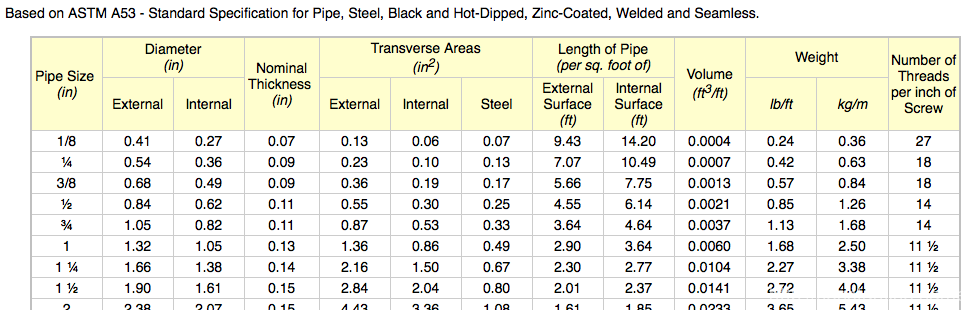
4 of Kee Safety Klamp 20-7 – “Side Outlet Elbow”, Size 7 aka 1-1/4″ Dia. $17.50 each

4 of Kee Safety Klamp 21-7 – “90 Degree Two Socket Tee”, Size 7 / 1-1/4″ Dia. $14.00 each

4 of Kee Safety Klamp 12-7 – “45 Degree Single Socket Tee”, Size 7 / 1-1/4″ Dia. $15.75 each

kee_clamps_examples

The best place I’ve ever found for clamps is Global Industrial. Here’s the link to the Kee Safety family of clamps:

http://www.globalindustrial.com/g/storage/fittings-framing-rail/Kee-Klamp-Fittings/galvanized-kee-klamp-pipe-fittings

Currently, you have to choose brand “Kee” and then choose pipe size “1-1/4” to narrow the page down to showing just the clamps you want. The 12 clamps listed above are $170 (circa Feb 2016). When they add tax and shipping, the total comes to just under $200.

Skip to the exciting part: No don’t. But I will say, if you have just a little extra money — about $65 more — buy four additional 45° single socket tees. Way down the road, in the later builds, I’ll mention, “Hey, you’ll notice you have some 1-foot pieces you’re not using in this build! If you have those extra 45°, add a brace here…”

Pipe

7 pieces of 10 foot, galvanized steel pipe, size 1-1/4″, ~$220.

(The “breakdown list” is further down explaining the lengths to cut it into.)

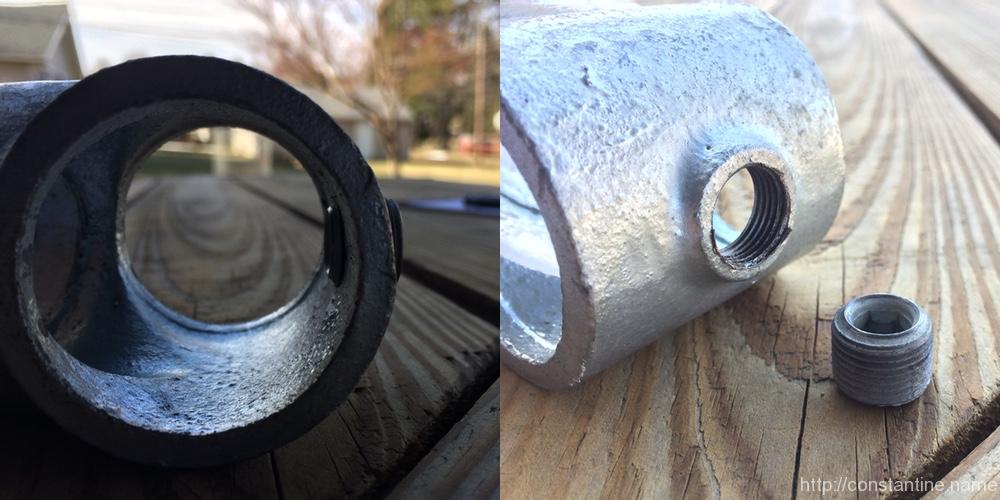
Pro-tip: Steel pipe is dirty, and the threaded ends have grease on them. Don’t expect to simply toss this stuff in your car. Almost all of it will fit in a trunk, but the 7′ long pieces may give you trouble.

When I first bought this pipe it was about $23, then it was $27, and most recently $29. Since this pipe is just standard schedule 40 pipe, you can call around and price shop. But remember, you need someone to cut it for you, or you have to do a LOT of hacksawing. You definitely CAN get a better per-foot cost, but you may have to buy “bundles” of pipe. As a bonus, it won’t have any threads on it. But the pipe will be longer than 10-feet lengths, and probably delivered as “freight” by a truck. Again, the whole point of this series is to get you started on the cheap. So just buying 7 pipes from Depot is the way to go. (But don’t take my word for it, call around.)

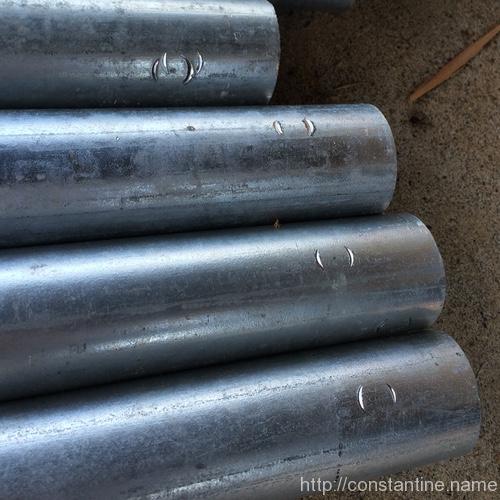
Home Depot will cut the pipe for you. The pipe is sold with threaded ends. (They receive it that way. They don’t sell it without the threaded ends.) They charge $1 to cut the pipe AND put threads on the ends. Depending on the employee, they may cut the pipe for free (since threading the ends is the tedious part). But, if they charge you $11 for the eleven cuts (see below), be happy. $11 is WAY better than hacksawing steel pipe.

One last note about cutting the pipe. If you have Depot do it, they use a machine that grabs the pipe and spins it (it makes sense when you see it done.) The machine leaves a few little marks in the pipe. You can feel them, but they’re harmless.

clamping_marks

Tools

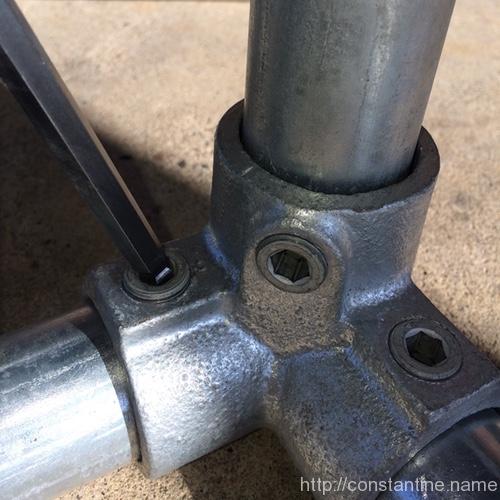
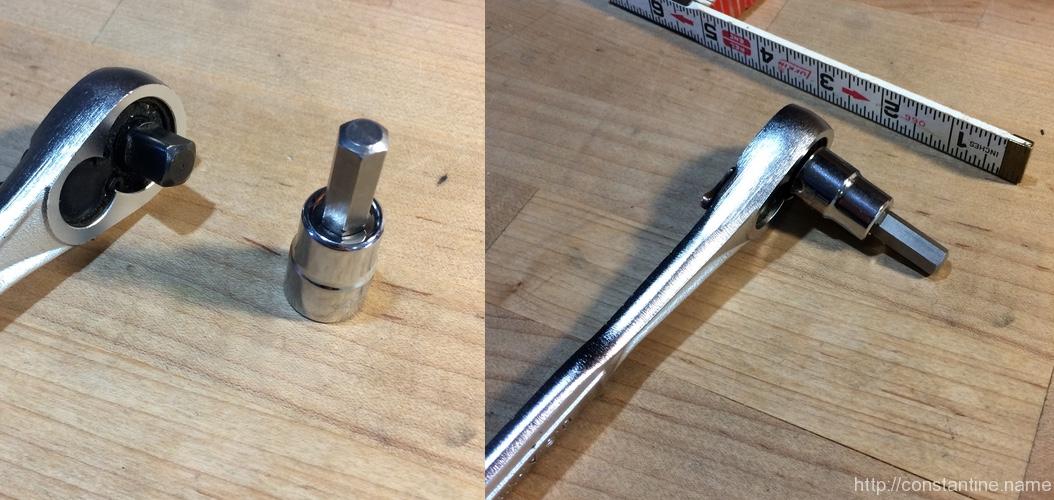
You need an 8mm Allen wrench. You’ll be happier if you have more than one because your new scaf set means you’re going to have new friends who you can put to work. Does this really need explaining? …fine, here’s a photo of a hand model holding a wrench:

allen_wrench

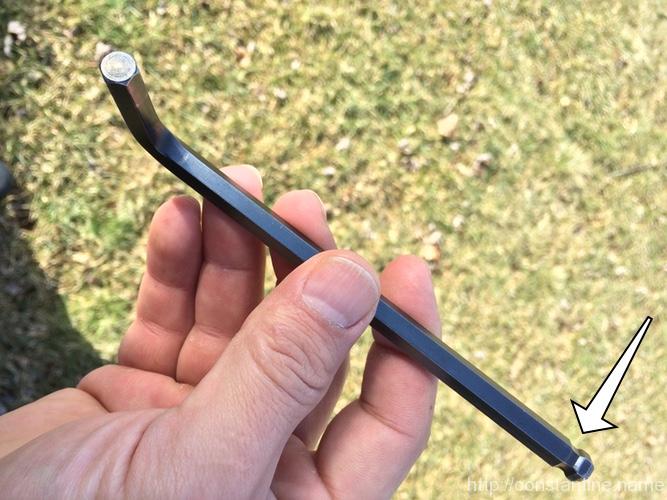
See that neck on the end of the wrench? That allows you to insert the wrench on a slight angle and spin it quickly with your fingers. Really handy to keep the upper L-bend from swinging into pipe/clamps — you’ll discover that happens ALL THE TIME, and is why people use rachet wrenches after a while of this. Seriously Craig? You took a photo of the angled Allen wrench? Yeup:

angled_allen_wrench

You can use a regular wrench as pictured, which has the advantage of keeping you from over-tightening the screws. The downside of this little wrench is you have to work pretty hard and it’s tedious to use.

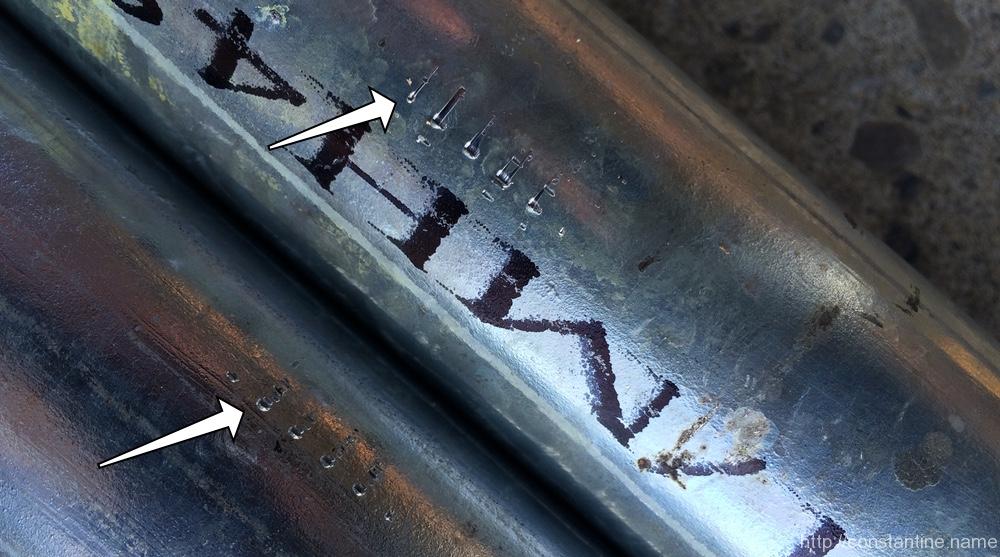
Euphamism alert! The screws cut little pairs of curves into the pipes, making the scaf pipe look less sexy. The light marks (shown below) from reasonably tight screws I like to call “set screw kisses”, and the really deep gouges — that can sometimes cut your hand (none shown below) — from really tightened screws, I like to call “set screw hickies”. Yes, I’m a simple creature, easily amused.

set_screw_marks

Alternatively, you can buy the Allen driver to fit into a standard ratchet wrench if you already have one of those sets. The 8mm socket attachment should come as a 3/8″ drive socket – meaning it fits the “medium” sized driver. (Some people also buy the 3/8″-to-1/2″ drive socket adapter so they can put the 3/8″ drive socket onto the large, 1/2″ drive handle.)

IMG_1528

One last word about those set screw “kiss” marks: On the ends of the pipes, it’s not that big of a deal. The pipes will almost always be hidden inside clamps. But some of the clamps you will be positioning in the middle of the pipes. If you tighten the screws really hard, you make deep marks in parts of the pipe that you WILL be later stepping or grabbing. Experienced scaffers (did I just invent a word?) are more gentle on mid-pipe clamps, returning to snug them later, rather than tightening the daylights out of them immediately.

Break down

You need to make the following cuts. The employee at Depot is unlikely to appreciate the four, one-foot cuts. I recommend smiling, being polite and asking nicely. :)

Cut 2 pipes in half (i.e. at 5 feet.)
Cut 4 pipes at 7 feet.
Cut 1 pipe into 4 one-foot pieces, and 2 three-foot pieces.

You’ll end up with 18 pieces of pipe:
4 x 7′
4 x 5′
6 x 3′
4 x 1′

R&D digression: A bit about how I came up with this set: I have PILES of scaf and clamps. What I did was come up with small sets of parts and then figure out what I could build. I kept adding/removing/changing the pipe/clamp combinations to see what could be built. I also kept in mind that starters have to buy 10′ pipes; doesn’t make sense to go, “oh, we need just one more 4-foot piece” when they then have a 6-foot “extra”. So it’s a balance of cost, what you can cut from 10-foot pieces and how many clamps are needed. Way WAY at the end of this series I’ll mention a few places where having a few more 45-single outlets would let them add some bracing in the setups where they are not using the little 1-foot pieces. You can toss a little 1-foot angle brace in almost anywhere and it makes for bomber builds. I digress.

Extra credit: Feet

I bought a pressure treated 2×4 and made feet for the scaf. If you’re setting it up on concrete, the pipe WILL dig up the concrete when you have it set up certain ways. (The “A” frames for laché, the “railing” setup where the pipe ends rest on the ground, etc.) If you have these feet, you can just set the pipe ends in the feet.

scaf_feet

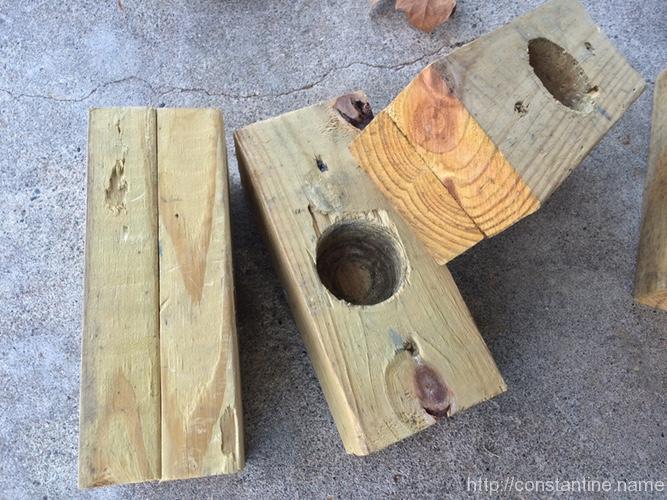
Mark out 8, 10-inch cuts on the 2×4. Use a 1-3/4″ (or whatever) hole saw to drill through 4 of the pieces. Then cut the 2×4 into pieces and screw them together. Viola!

Pro-tip: If you’re making feet, make more than 4 because the 2×4 is plenty long. You’ll use the feet down the road when you have more scaf. A lot of scaf designs I see have clamps and pipes right down on the ground to avoid the naked pipe ends resting on the floor/ground. Well, if you have feet for those pipe ends, you have a whole range of options where you move the pipes up from ground level (changing clamps of course) to give you more intermediate bar options. It will all makes sense once you are fully addicted to Pipe Culture. Anyway, if you want to go full out, make 8 feet (mark 16 10-inch pieces, drill through 8 of them) and you’ll use them on my last example setup.

ɕ


Scaf 101: Introduction

This entry is part 1 of 13 in the series Scaf 101

This series of posts (12 total, navigation is at the very bottom of each post) is intended to give you enough basic information to get started with scaf. I’m going to give you a specific list of things to buy — what I’m calling “The Set” — while trying to keep the cost as low as possible. I’m also going to show you a number of completely different things you can construct using the set.

In the initial posts, I’ll assume you know nothing and I’ll explain everything. As I show various setups, I’ll initially explain every step of assembly so you understand how to put things together without killing yourself (by working too hard, or by dropping pipe on your, or your friend’s, head). I do not recommend skipping to the end because the instructions on the later setups assume you understand what’s going on, and they only mention the “this is unusual or interesting” parts.

Once you spend some time building, and playing on, scaf, you’ll understand what is easy to build, what is hard to build, what is pretty stable and what is not. But how do you get started? The hard part is figuring out what should be the very first pile of stuff you buy. You want enough to have fun and options, but not more than you need, because scaf gets very expensive very quickly. VERY roughly, it’s almost $20 for every clamp, and almost $3 per foot of pipe.

This entire set is about $400 and will build you some really neat setups. There is a detailed parts list and buying instructions/links in the next post in this series.

Safety

Hey! Let’s get this out of the way now…

This sh*t is DANGEROUS. Seriously. You have been warned. I’m not being hyperbolic here.

The easy-to-get pipe used in this set comes with threads cut into the ends. The threads are razor-sharp. (The clamps cover the ends of the pipe.) I know what I’m doing, and still I’ve cut myself many times.

Steel pipe is heavy. If you lose control of even a seven-foot piece as you stand it on end, it will KILL someone if it falls on someone’s head. But what about pinched fingers and dropped-it-on toes? …I’ve had too many to count. Plus the old (not funny at all) slap-stick humor of carrying pipe, turning and striking someone with the end behind you. Steel pipe is heavy. There’s no “oops, sorry bro’,” just lacerations, crushed fingers, concussions and broken bones.

…and there’s the danger of the clamps working loose. You are planning to jump on, step on, swing from and generally use this NOT in the way the manufacturers intended. You have to learn how to align the pipe in the clamps, (or everything will wiggle loose even more quickly). You have to learn how tight to make the clamps, (so as not to break things, but tight enough to hold). You have to be smart enough to check and tighten things occassionally.

…and THEN there’s the danger of falling OFF the scaf. Or having it topple over ONTO you, or with you ON it. …or IN it.

Terminology

Back on day one of my Life With Scaf, this was very confusing and I wished someone had written a getting-started guide. So, here it is:

Kee Safety Klamps – This is a brand name of a type of pipe clamps. There is a whole collection of clamp types with neat names like “side outlet elbow”, “90 degree two socket tee”, etc. The set I describe in this series contains just three types of clamps that will get you started. As you buy more — and you will buy more because scaf is a highly addictive habit — you’ll have no problem figuring out what the other clamps are for.

kee_clamps_examples

Set screw – Each clamp has several screws (one screw for each pipe the clamp accepts) that are threaded into recesses in the body of the clamp. You will need an 8mm Allen wrench to tighten them. Clamps come with their set screws but there’s no wrench. This isn’t IKEA. (More on wrenches later.)

kee_clamp_set_screws

Schedule 40 – You don’t really need to know this, but it’s common to encounter the terms “schedule 40”, and “schedule 80”, when talking about scaf pipe. A “schedule” is a giant table of specific details like exact dimensions, and strengths for each of the various sizes of pipe. It’s used when building engineered structures where they’re computing loading for realsies with math. What we need to know for this series is that you want “schedule 40” pipe. (If anyone should ask you, that is.) Schedule 80 is much heavier, and therefore stronger, but is the same EXTERIOR size. So it fits all the same clamps as schedule 40 pipe. Down the road, you might want to shell out for a special schedule 80 pipe or two if you’re doing a lot of gonzo bar precisions or something. Anyway. You’ll have a good understanding of schedule 40 pipe after you play with this set. The longest pieces in this set are 7-feet, and they’re going to feel pretty nearly “bomb proof”.

steel_pipe_schedule_40

1-1/4″ pipe – The least obvious thing about scaf is what size do you use? It turns out that this size is the best balance of weight, cost and strength. So the most commonly used size is “Size 7″. (For clarity: That is the seventh pipe size in schedule 40, also the seventh row in the table, and is known as 1-1/4″ or one and one-quarter inch.) Home Depot or other Big Box stores will just label it as 1-1/4”. Here’s the confusing part: There is NO dimension on 1-1/4″ pipe which is 1-1/4″. The interior diameter is close to 1-1/4″. Anyway. Just learn: “Size 7, otherwise known as 1-1/4″ pipe.” Kee Safety clamps have their size molded into their body; They have two numbers, like “20-7”, meaning clamp style 20, size 7. Again, after you play with this set, if you ever encounter a clamp that’s not size 7, it sticks out like a sore thumb. (I once received a pile of clamps in a box, and there was one number 8 incorrectly included… it was instantly obvious.)

kee_clamp_markings

Galvanized steel – You want “galvanized steel pipe.” You will also find “black pipe” at your local Big Box store. Do not use “black pipe”. For one thing, it feels different to the bare hands, and I like it less. For another thing, it will rust if you have it outside. “Galvanized” means the steel is coated with some Zinc. The Zinc will corrode away before the steel rusts, and black pipe is NOT galvanized. For yet another thing, I have NO IDEA about the strength of “black pipe”. When you cut pipe, you expose steel which is not galvanized, and lo and behold! …it rusts. The pipe in the photo never got wet, that’s just good old humidity and oxygen doing their thing. (“Rust never sleeps!”)

galvanized_pipe_cut

Summing up

We’re building this scaf set with size 7 Kee clamps, an 8mm Allen wrench, and schedule 40 galvanized steel pipe.

ɕ


A thought on health

This entry is part 37 of 72 in the series My Journey

Of this I am certain: Unless you take the time to study how your body’s biology and chemistry work, you will never figure out what you should actually be eating. Your health is your number one priority — your children, your parents, your spouse/significant-other… you cannot help them if you don’t have your own health.

Take just a bit of time to start reading about metabolism, diet (the general idea of what you should consume, not a specific set of instructions to lose weight), biology, and chemistry. Just spend a little bit of time reading to investigate the things you believe are true, and to verify the things you believe are false.

ɕ


Practicing mindfulness

This entry is part 15 of 37 in the series Study inspired by Pakour & Art du Déplacement by V. Thibault

Mindfulness is an inward directed practice of contemplation. It is a continuous process of being present. For me, because it was initially unfamiliar, it was more difficult to approach than the obvious physical activities such as running, jumping, and climbing. But after some practice, it became a critical part of the foundation on which I’ve placed many other parts of Parkour.

There are many ways to practice mindfulness at large in one’s life. For example, Leo Babauta, of Zen Habits, has a great piece titled, 9 Mindfulness Rituals to Make Your Day Better I am a firm believer that mindfulness across the full breadth of daily life yields big benefits. But in this post, I’m focusing on the practice of mindfulness within Parkour.

In many ways, mindfulness is like any other skill that you can practice intentionally. But unlike other skills, failing to be mindful leaves me with blindspots. These blindspots, which are closely related to the Dunning Kruger Effect, create space for “unknown unknowns” to lay hidden.

Worse, lack of mindfulness is akin to: Failure of attention, which leads to injury; Failure to notice moods and emotions, which leads to loss of interest in the short term and training plateaus in the longer term; Failure to notice signals from my body, which leads to chronic injury and developmental imbalances.

Options for practicing mindfulness

One option would be to set out explicitly to practice mindfulness. (“Today, instead of practicing vaults, I’m going to practice mindfulness.”) Unfortunately, I would need to be highly mindful in order to stay on task working on being mindful. But, if I could be that mindful, I wouldn’t need to practice being mindful. (Which is a Catch-22 that makes my brain hurt before I even start doing anything.) In the end I find that saying, “I’m going to practice mindfulness,” is simply too vague to be motivating.

Another option is to passively rely on fellow traceurs, or coaches, to call me out for “not being mindful”. (Or for them to set up specific “mindfulness practice.”) But mindfulness is too important for me to simply rely on other people to hold me to it. It’s much better for me to practice it intentionally.

To make the options more complicated, it is not at all clear how I switch from being NOT mindful to being mindful enough to notice that just-a-moment-ago I was NOT being mindful. Heavy stuff that. In reality, I usually notice my mind has wandered, (“I’m paying attention to irrelevant things around me,”) or I notice my practice has become unmotivated, (“When did this get boring?”)

Shoelaces

So how do I practice mindfulness? I think of it like tied shoelaces. It’s important my shoelaces be tied, but I don’t obsess over them by constantly checking my shoes. I simply tie them when I notice they are untied.

I practice mindfulness when I notice I’m not being mindful.

My mindfulness drill

So when I notice, what can I do, exactly?

I locate a small jump. The jump needs to be well within my ability; not something risky or overly tiring. I want a relatively easy jump that I know I can do without thinking. It must be any easy jump, because there can be no nervousness or doubt. I’m purposely selecting a jump to set myself up to be lulled into NOT being mindful.

I physically prepare to jump. I position myself, arrange my limbs, engage muscles, etc. Eventually I arrive at that point in space and time which would normally be the last point before I jump. At this exact point, I wait. I am poised, comfortable, ready, willing and perfectly able to jump. I know I’m in at the correct point when I suspect that if someone startled me, I would jump involuntarily.

I find my thoughts are like birds flitting around a cavernous room. Some thoughts are on-task as they seem related to the jump: The way my body feels; The anticipation of being in the air; The expectations of the landing. But depending on how mindful I am, there are more or less other “off-task” thoughts flitting about the room.

The sky is blue.
How much time is left?
I’m thirsty.
There’s an ant where I’m going to land.
What’s for dinner?
People must be looking at me funny.
…and on and on and on.

I am alone with my thoughts, and I am simply an observer in a room with these harmless, incorporeal, flitting birds. I notice as many of the thoughts as I can, taking special notice of the ones that I believe are related to the jump. I don’t fight with the thoughts, because I cannot catch nor chase away any particular bird. In fact, chasing them is worse than useless because they simply loop around to become “the thought about the thought I just tried to chase away.”

Gradually, some of the extraneous birds fly away. When I think the number of extraneous thoughts in my head has reached a point where it’s as good as it’s going to get . . .

I jump.

ɕ


§5 – Moment to moment

This entry is part 14 of 37 in the series Study inspired by Pakour & Art du Déplacement by V. Thibault

I reached section 5, and got stuck.

It’s obvious the key idea of section 5 is mindfulness. So I started by thinking about “mindfulness in Parkour practice.” But I wasn’t able to find a compelling thread to unify my thoughts. I came away from a few writing sessions with nothing of value. Eventually it occurred to me to circle back and reconsider my writing process.

I reread this whole series and — aside from, “Wow, I suck at writing!” — it struck me that I have been “unpacking” each of the first four sections. My process has been to sift each section for a key idea, and then simply spend time thinking about that specific idea:

What exactly does the idea mean?
Do I already know and understand the idea?
How does it relate to my Parkour practice?
What other areas of knowledge does it relate to?

But section 5 is already short and to-the-point and doesn’t need to be unpacked.

I’m so META Even This Acronym:

Stop the presses! It seems I have just discovered the concept of being mindful of the writing process. /sarcasm

Next up:

I am actually writing something about section 5 now that I have a different plan.

ɕ


Point “B”; the me of tomorrow

This entry is part 13 of 37 in the series Study inspired by Pakour & Art du Déplacement by V. Thibault

Over the last few years it seems I have — finally! — learned some key lesson about pace; the idea of enjoying the journey. The idea of focusing on what I can control. The truth that some of these projects I will not finish, some places I will not see, and some people I will not manage to spend enough time with. These ideas are patently obvious and unequivocal, but learning the Lesson, and deeply and truly making it part of your work-a-day life and personal philosophy takes effort.

When once you have tasted flight, you will forever walk the earth with your eyes turned skyward, for there you have been, and there you will always long to return.

~ Leonardo de Vinci

Years ago I started journaling as a form of self-reflection. It enables me to look back. Sometimes it’s a travel log, but mostly it’s a “this is what I was thinking” log, a glimpse at what I was working on, inspired by, or frustrated by. After a large amount of writing and thinking I gained enough perspective to start removing some things, and changing others. I learned to say ‘no’ to some things I would have taken on in the past, and learned how to rearrange other things to make more space.

I always wonder why birds stay in the same place when they can fly anywhere on Earth. Then I ask myself the same question.

~ Harun Yahya ( https://en.wikipedia.org/wiki/Adnan_Oktar )

But only recently have I found myself turning more often to look forward, rather than back.

What would the best possible version of myself do?
Walk the Earth with eyes turned skyward.
Point A to point B, efficiently.

Close the gap.

ɕ


§4 – Close the gap

This entry is part 12 of 37 in the series Study inspired by Pakour & Art du Déplacement by V. Thibault

“What would the greatest version of myself do?”

I can think of no better personal compass than that simple question. I whole-heartedly agree with its sentiment; that exploring your own concept of “greatness” is the single most important thing you can do. Each of us will come to a different answer; potentially very different answers. But, the act of honestly exploring your own conceptions, and the act of self reflection, are what will move you in a positive direction.

I had already begun embracing this idea of seeking the greatest version of myself. As part of that effort, I took up a personal Oath which clearly reflects the idea.

What is Parkour?

Thibault’s section 4 is about seeking personal greatness and striving to constantly improve. That’s clearly a “big picture” goal involving one’s entire self. But we can also use this idea of “closing the gap” to investigate our every-day description of what Parkour is.

When asked, many people say that Parkour is about “efficiency”. They say that Parkour is about “moving efficiently” or “getting from A to B efficiently.” (“Quickly” is also used.) Alternatively, there are many people who dislike the “efficiency” description. Some prefer “personal expression through movement”, “pushing the boundaries of human movement”, or even simply “freedom”. There are many alternatives to the “efficiency” description, but it is undoubtedly one of the most dominant descriptions.

Where did I stand before reading this section?

If you practice Parkour, you will be asked (and often!), “What is Parkour?” I realized I would do well to have a one-sentence answer to that question. I’ve found that people are pleasantly surprised when I have a clear, one-sentence answer. Almost everyone asks further questions and a conversation about Parkour grows naturally from there.

My one-sentence answer is: Parkour is using challenges to improve oneself.

And now?

When I read Thibault’s section 4, it struck me that Parkour is exactly about “getting from point A to point B as efficiently and quickly as possible.”

Point “A” is here; the me of today.

Point “B” is there; the me of tomorrow.

ɕ


Others’ thoughts on what exactly is resilience

This entry is part 11 of 37 in the series Study inspired by Pakour & Art du Déplacement by V. Thibault

A key point from the following podcast is the idea that resilience is not a “broad” skill, but rather something that you develop in a particular aspect of your life. Being resilient in social circumstances is not directly related to being resilient in a violent (eg, combat) circumstance. So that’s something to keep in mind: In Parkour, we’re practicing and developing our resilience in the context of MOVING, and moving is something we do every day.

So that’s what we’ve taken, that idea of resilience and we’ve applied it to human beings and we tell people, you should just bounce back. Bounce back, bounce back. I actually believe human beings can’t bounce back. The reason why you can’t bounce back is because you can’t go back in time. So the 19 year old Marine who leaves for Afghanistan is never going to be 19 again. Parents who lose a child are never going to be the same parents again. The entrepreneur whose business goes bankrupt is never going to be the same entrepreneur again. So what resilient people are able to do is not to bounce back from hardship but they’re able to integrate hard experiences into their lives in such a way that they become better. That’s what I think is really at the heart of resilience.

~ Eric Greitens, from “Resilience With Eric Greitens

slip:4uaopo2.

The link it to a transcript of a podcast, (I recommend just skimming the transcript,) from my ridiculously long queue of podcasts. I was skimming through the list culling a few episodes and realized this one was apropos of the current section from Thibault’s work.

ɕ


Was that resilience?

This entry is part 10 of 37 in the series Study inspired by Pakour & Art du Déplacement by V. Thibault

Sunday’s class contained a block of time where we were told to set a specific goal for ourselves, and then go work on it.

There’s a particular technique that I’ve been stuck on for nearly two years. It’s completely a psychological issue. Each time a coach brings up this technique, I equivocate, and they drop me back to the progressions for the technique. But, I can do the progressions, and every coach then says, “Then just do the technique.” Usually, they manage to encourage me enough to eek out a few tentative iterations of the technique. At which point I’m all like, “Yeah! Progress! Awesome!”

And the next time the technique comes up I have the EXACT. SAME. PROBLEM. I profess inability, the coach assesses the progressions, and then coaxes me through getting the technique. Over and over and over and over and over with too many coaches, way too many times.

Nemesis: n., this technique.

So on Sunday, armed with 15 minutes of time and delusions of making progress on my own, I set off to work on my nemesis.

(Here, there would be a montage and inspirational music.)

13 minutes later I had managed to scare the crap out of myself several times, and had accomplished absolutely nothing. I’d stared at it, fiddled with variations of feet and hands, and jiggered every adjustable parameter. Basically, I spent 13 minutes trying to avoid my fear. It was exceedingly frustrating because I’ve done this countless times: Every single variation, every attempt, every change, telling myself the things coaches would say, my worries, my self-reprimands.

So I’m standing there, mentally kicking myself thinking: “Yes yes, I’ve even tried mentally kicking myself countless times before. Fine. All I have to do it screw around for two more minutes and then this can be over.”

At which point I finally had a different thought: Section 3! Resilience! How can I specifically use resilience in this situation?

Truthfully, I had no idea how to apply resilience. I tried looking at the obstacle differently. I literally laid behind the wall and looked up from where I should land. I sat astride the wall and imagined the technique from the side.

I eventually tried again and — I have no idea why anything was different — I actually made one. Then a second. And then a third. And then, in fact, 13 in a row, banging out the last few repetitions as the instructor called us back together.

NOT comfortable: Even the success freaks me out so badly that my palms are sweating days later as I type this.

NOT impressive: It’s a simple technique. The 13 I did were teeny tiny baby versions with a low obstacle, and most of them had poor landings. Worst of all, I’m not the LEAST bit certain I can do it again.

Was it resilience? Was it stubbornness? Luck? Finally just strong/flexible/whatever enough to make it? I have no clue. I was jammed so far up in my “head space” that I haven’t the slightest idea what actually happened in those last two minutes.

Do I have a point here? I’m not even sure about that. This is just a story related to section 3.

meh.

Some days, Parkour is like this; It’s not all unicorns and rainbows.

ɕ


§3 – The rose that grew from concrete

This entry is part 9 of 37 in the series Study inspired by Pakour & Art du Déplacement by V. Thibault

Resilience.

Why does Parkour so effectively teach resilience? Because your regular world and your regular life are DESIGNED for your interaction. Stairs are a certain height, walking surfaces are smooth and even, door knobs are convenient, chairs, air conditioning, trains and autos; Everything you interact with is designed for human interaction. In a very real sense, that’s what “civilized” means.

Have you ever stopped to consider something as simple and common as doorways? What would life like, if – just for some historic reason – every doorway was only 4 feet high? Life would be much better simply because everyone would have to bend over regularly!

What if stairs were the norm? What if walking was the norm?

When you begin exploring your world through the lens of Parkour, you are told to intentionally seek out challenges. In Parkour practice, you’re exposing yourself to a hard choice: Bend your mind and body to the challenge, or face pain and injury. A good coach sets you up for success, but you’re still told to go under that railing, climb over that wall, and put your hands on that rough concrete. You have to teach your mind and body how to be resilient so that you can rediscover the ways already within yourself to interact with an environment that is, at best, indifferent to your wellbeing.

Once you see things differently, you can start interacting with things that were specifically designed for some reason other than human interaction. You start by looking at your world this way as part of a specific practice; “I’m going to class and the instructor makes us do this”. Eventually, the mindset becomes comfortable on its own without prompting, and you begin to automatically practice a mindful resilience in your daily life.

How could I get to that place over there without using that obvious pedestrian route? How would I get down there, or up there? Why am I eating inside when it’s so nice outside? What would I do if an emergency happened right now?

Once you are well and truly comfortable with the resilient mindset, your body relaxes and the physical uncertainty, or even fear, that you were unconsciously feeling goes away. In it’s place wells up good old natural Human Curiosity. Your mind says, “Sure, let’s go this other way,” and, “Let’s take this road less travelled.” It really does make all the difference.

I shall be telling this with a sigh
Somewhere ages and ages hence:
Two roads diverged in a wood, and I—
I took the one less traveled by,
And that has made all the difference.

~ Robert Frost, from The Road Not Taken

ɕ